HOME - Windows Server Centralized File Storage, Departmental Access Control, Automated Drive Mapping & Shadow Copy Recovery
 Windows Server Centralized File Storage, Departmental Access Control, Automated Drive Mapping & Shadow Copy Recovery
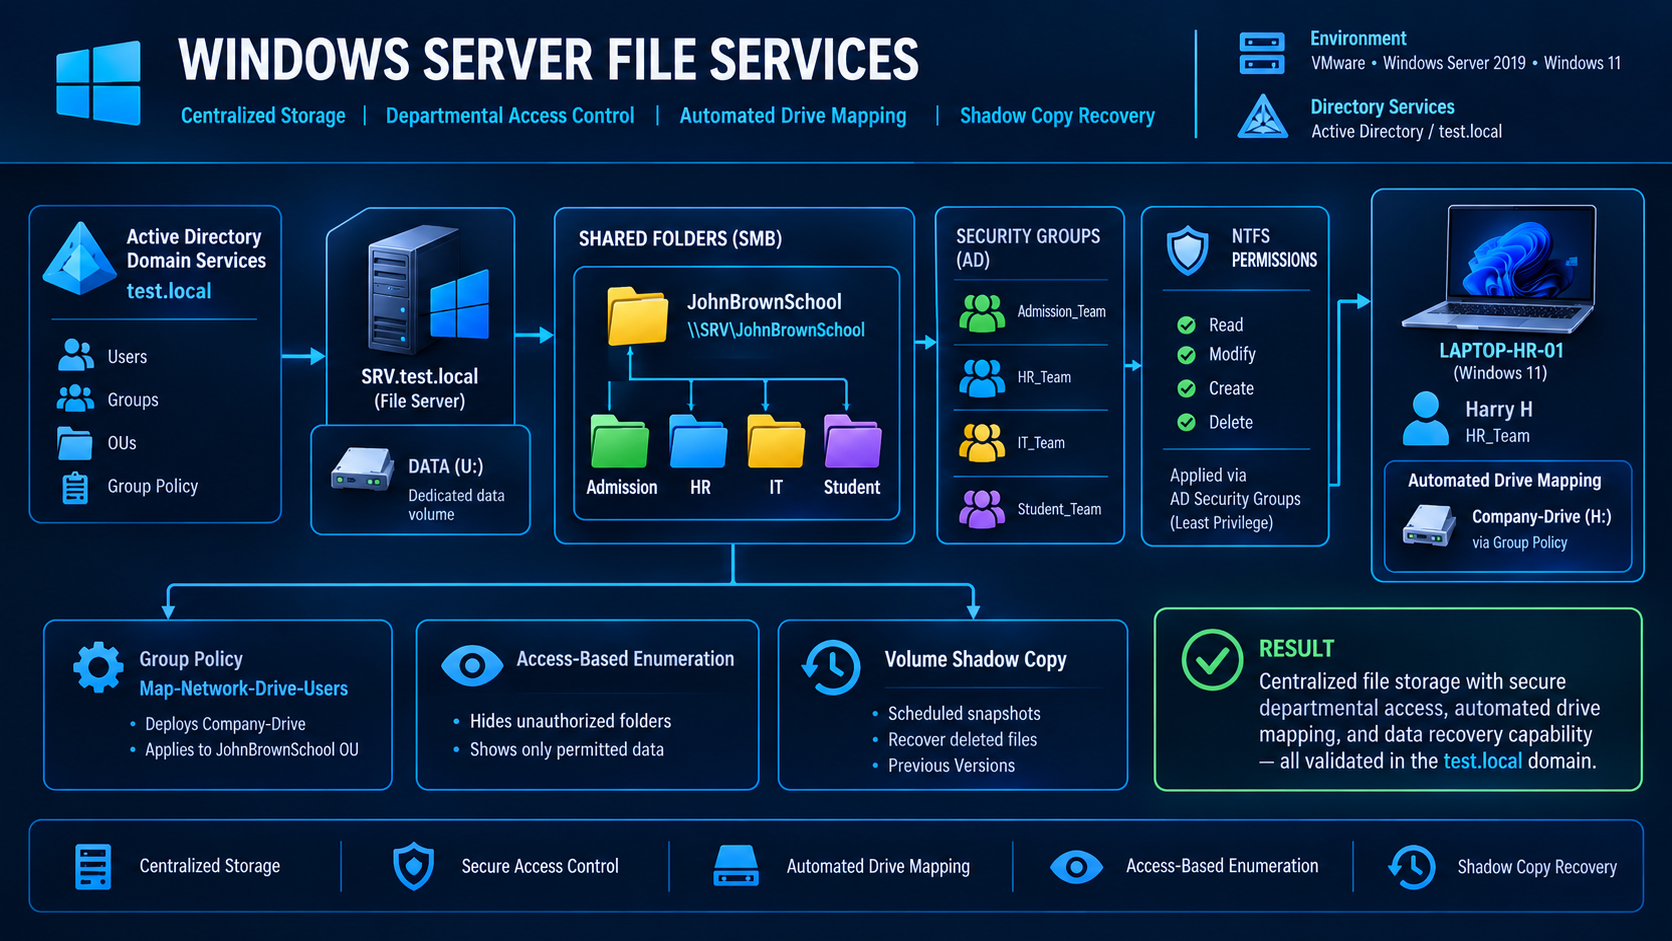
Project: System Administration Portfolio Lab
Role: System Administrator
Environment: VMware • Windows Server 2019 • Windows 11
Directory Services: Active Directory Domain Services / test.local
File Services: SMB File Sharing • NTFS Permissions • Group Policy Drive Maps • Access-Based Enumeration • Volume Shadow Copy
Status: Centralized departmental file storage, automated access, access control and file recovery validated
Project Overview
This lab extends my existing JohnBrownSchool Active Directory environment by implementing a centralized Windows file-services platform for multiple departments. The objective was to create one centrally managed storage location that could serve the organization while still separating departmental data and enforcing access through Active Directory security groups.
I started by adding and preparing a dedicated data volume on Windows Server 2019. I then created a JohnBrownSchool folder structure with separate departmental folders for Admission, HR, IT and Student. NTFS permissions were configured so departmental security groups could receive the appropriate level of access, and the root folder was published as an SMB share so domain users could reach the data across the network.
I validated access from LAPTOP-HR-01 while signed in as Harry H, a member of HR_Team. I confirmed that Harry could access and create content in the HR folder while attempts to open unauthorized departmental folders returned access-denied errors.
To improve usability, I first validated the share manually by mapping it as a network drive. I then created a Group Policy Object named Map-Network-Drive-Users and used Group Policy Preferences to automatically deploy the Company-Drive to users in the JohnBrownSchool OU. I verified the policy with gpupdate and gpresult from the client workstation.
I then enabled Access-Based Enumeration on the SMB share. This changed the user experience from seeing all departmental folders and receiving access-denied messages to seeing only the folder the signed-in user was authorized to access. Finally, I enabled Volume Shadow Copy on the server data volume, scheduled recurring snapshots, simulated accidental file deletion, accessed Previous Versions and verified that the deleted test files could be recovered.
The completed lab demonstrates a full production-style file-services workflow:
Centralized storage → Departmental folder design → NTFS permissions → SMB sharing → Client access testing → Automated drive mapping → Access-Based Enumeration → Shadow Copy recovery
Project Objectives
Build centralized file storage accessible across the existing Active Directory environment.
Create separate shared folders for Admission, HR, IT and Student departments.
Store departmental data on a dedicated server data volume instead of the operating-system volume.
Apply NTFS permissions using Active Directory security groups rather than individual user accounts.
Publish the JohnBrownSchool folder through SMB for network access.
Validate successful and denied access from a domain-joined Windows 11 workstation.
Confirm that an HR user can create and modify content only within the authorized HR folder.
Manually map the share to validate connectivity before automating the process.
Create and link a Group Policy Object for automatic network-drive deployment.
Use Group Policy Preferences to present the shared storage as Company-Drive.
Force and verify Group Policy processing using gpupdate and gpresult.
Enable Access-Based Enumeration so users see only departmental folders they are allowed to access.
Configure Volume Shadow Copy on the file-server data volume.
Schedule recurring weekday snapshots.
Simulate accidental file deletion.
Verify Previous Versions and restore deleted files from a Shadow Copy snapshot.
Implement all of these capabilities on the existing test.local / JohnBrownSchool domain infrastructure.
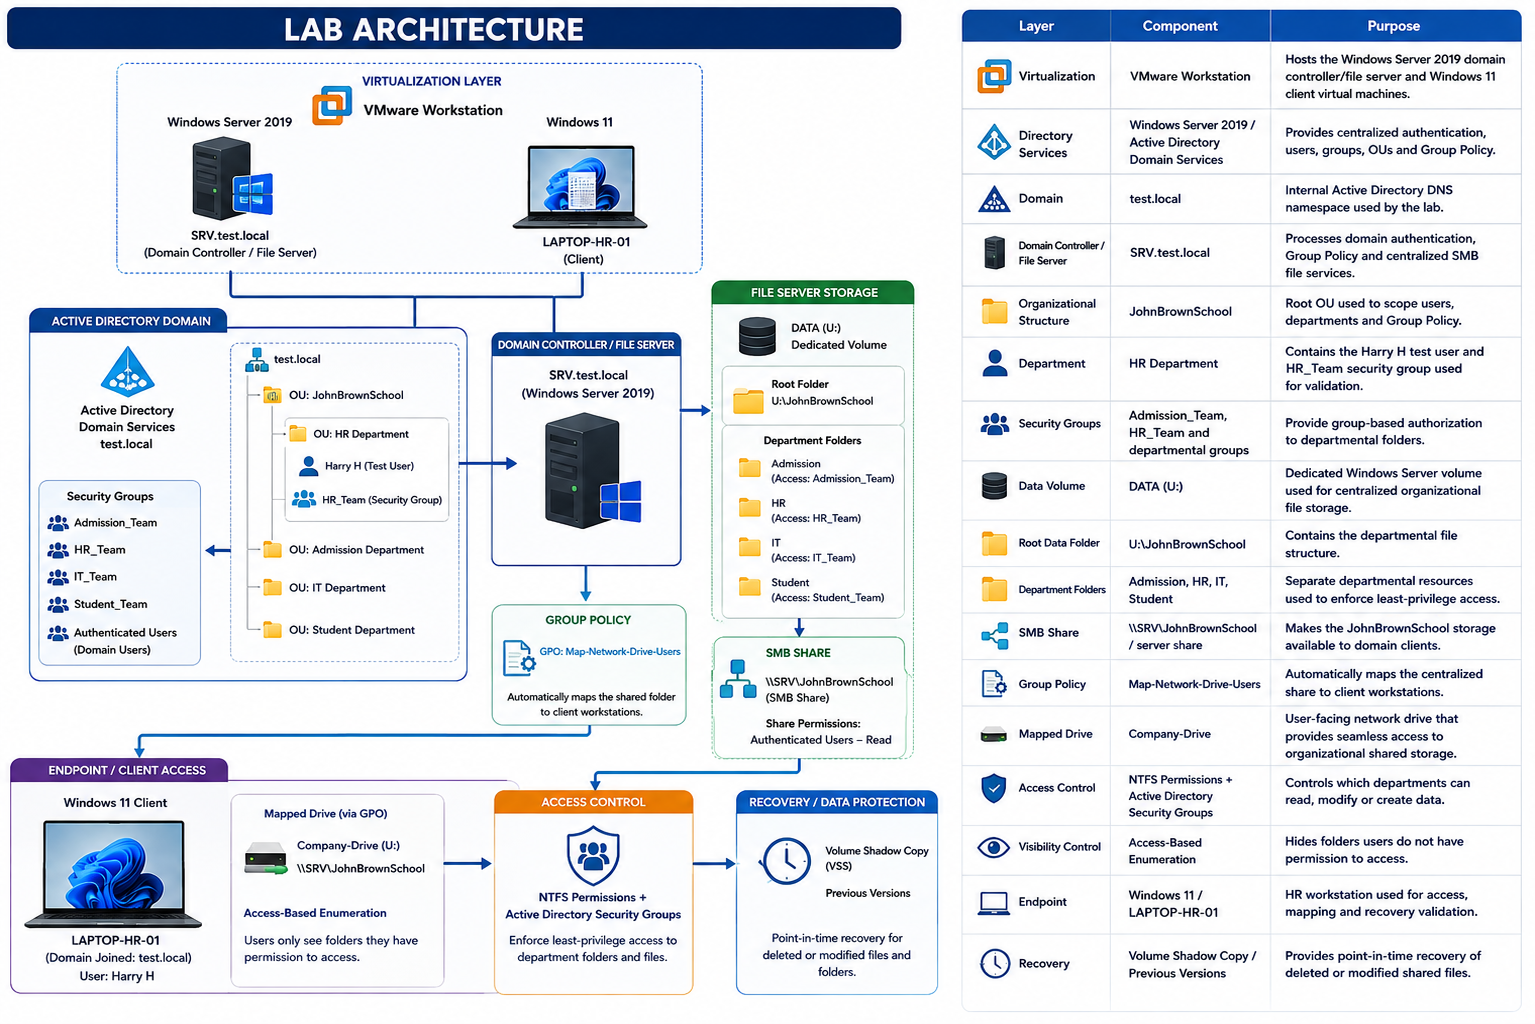
Lab Architecture
Phase 1 — Dedicated Data Storage Preparation
4.1 Preparing the Server Data Volume
I began by confirming the server storage layout in Disk Management. The Windows Server operating system remained on the C: drive while a separate DATA volume was available as U:. Using a dedicated volume for shared organizational data keeps file services separated from the operating-system partition and provides a cleaner design for administration, backup and recovery.
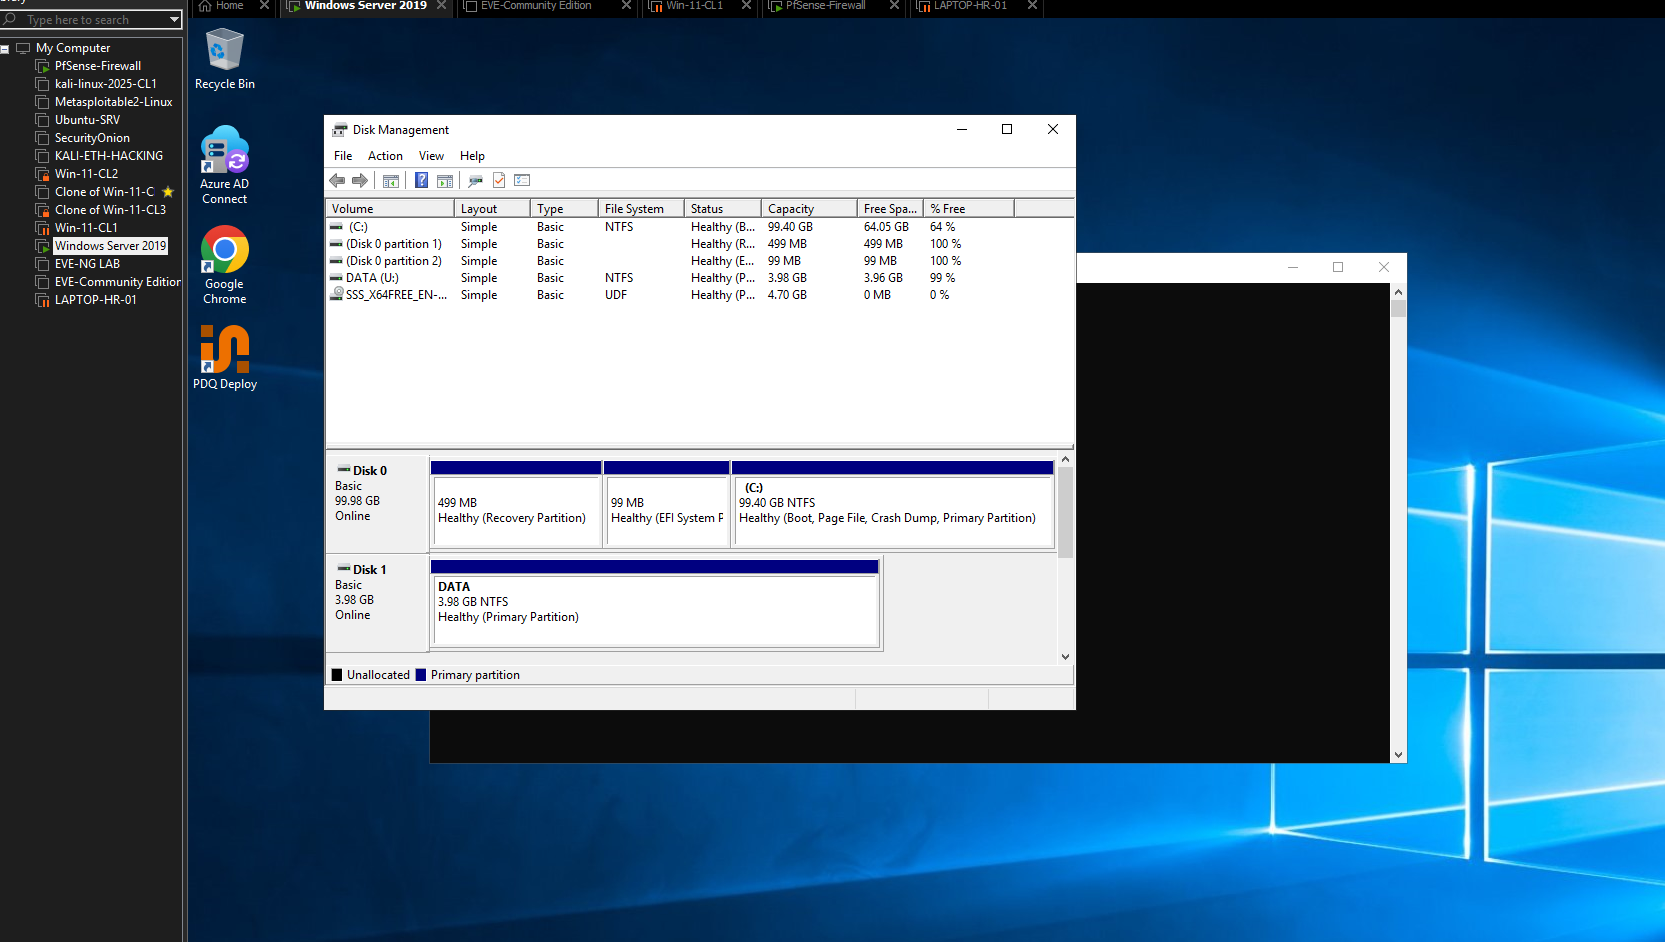
Figure 1 — Dedicated data volume.
Disk Management shows the Windows Server system disk and a separate DATA (U:) NTFS volume. The U: volume became the storage location for the centralized JohnBrownSchool file server.
4.2 Creating the Departmental Folder Structure
On the U: volume, I created the JohnBrownSchool root folder and separate folders for Admission, HR, IT and Student. This creates a logical structure that mirrors the organizational departments already represented in Active Directory.
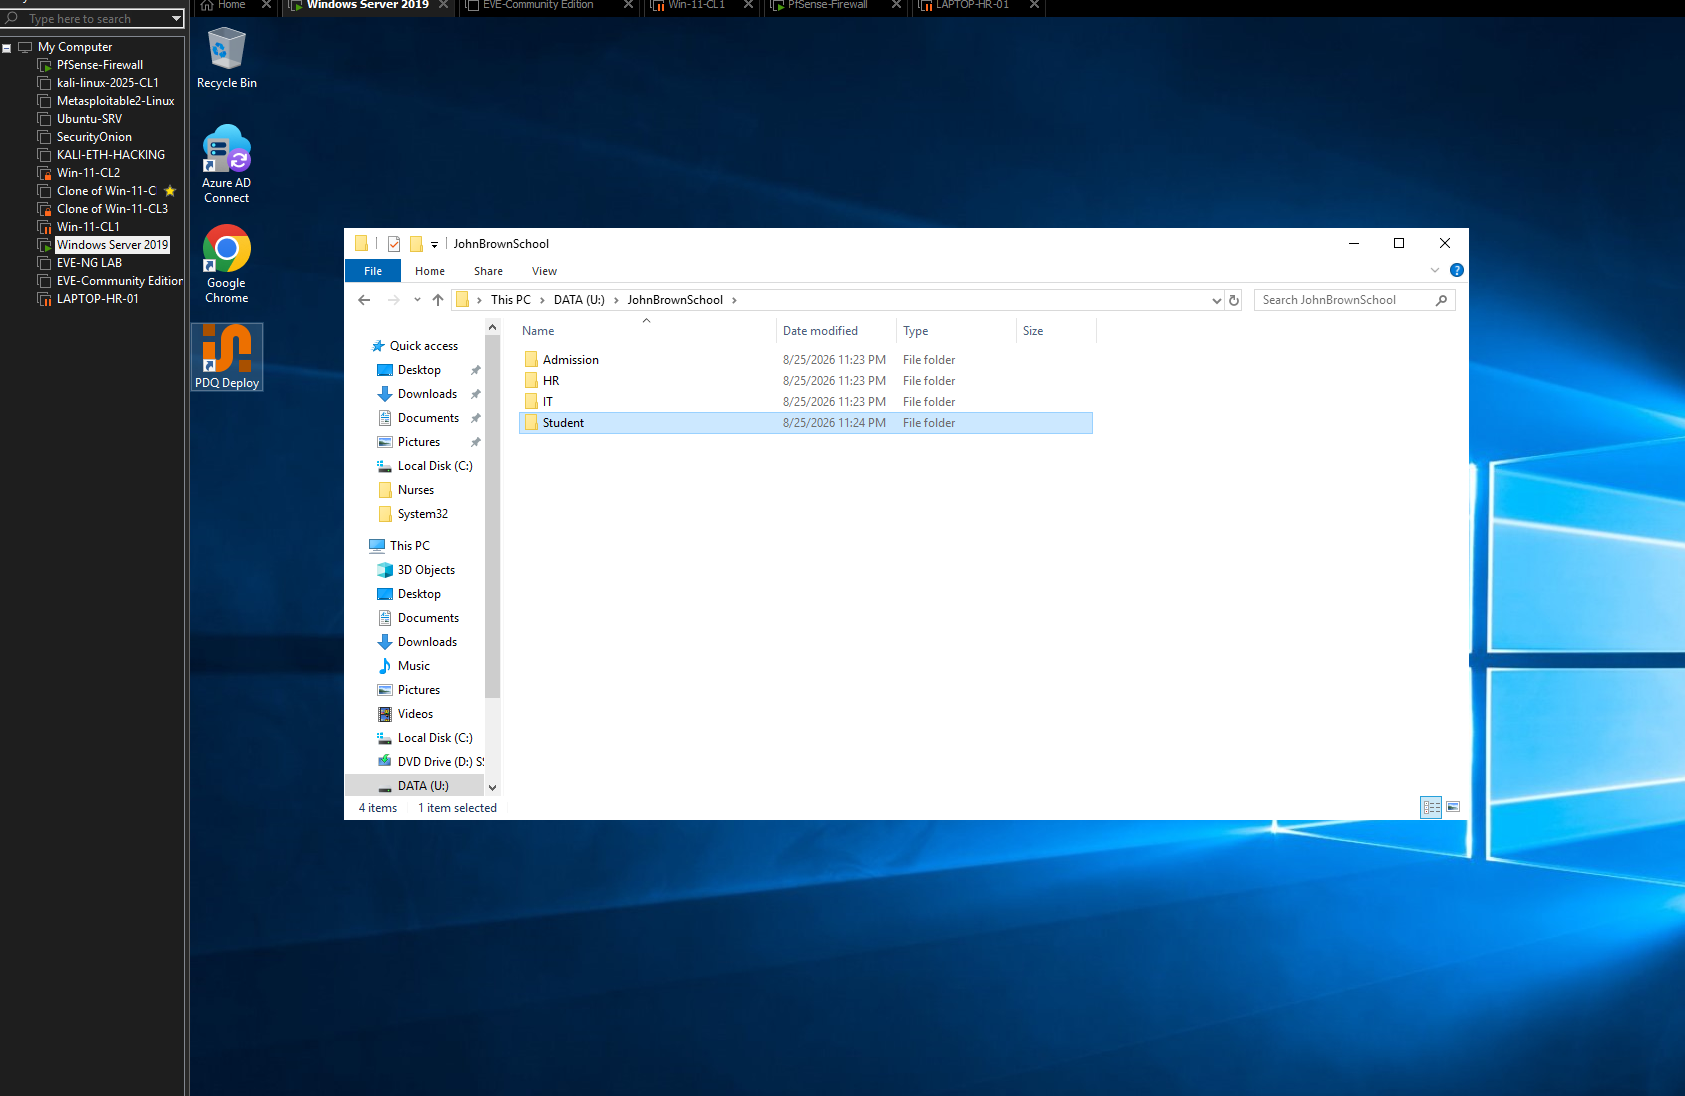
Figure 2 — Departmental storage structure.
The JohnBrownSchool folder contains Admission, HR, IT and Student subfolders. This structure provides the foundation for department-specific NTFS permissions and access control.
Phase 2 — Departmental NTFS Permission Design
5.1 Reviewing and Adjusting Inherited Permissions
I opened the advanced security settings for the Admission folder to review the existing access-control entries. The initial permissions included general domain user access inherited from the parent structure. For departmental data, broad user access is not appropriate because members of unrelated departments should not be able to access each other’s files.
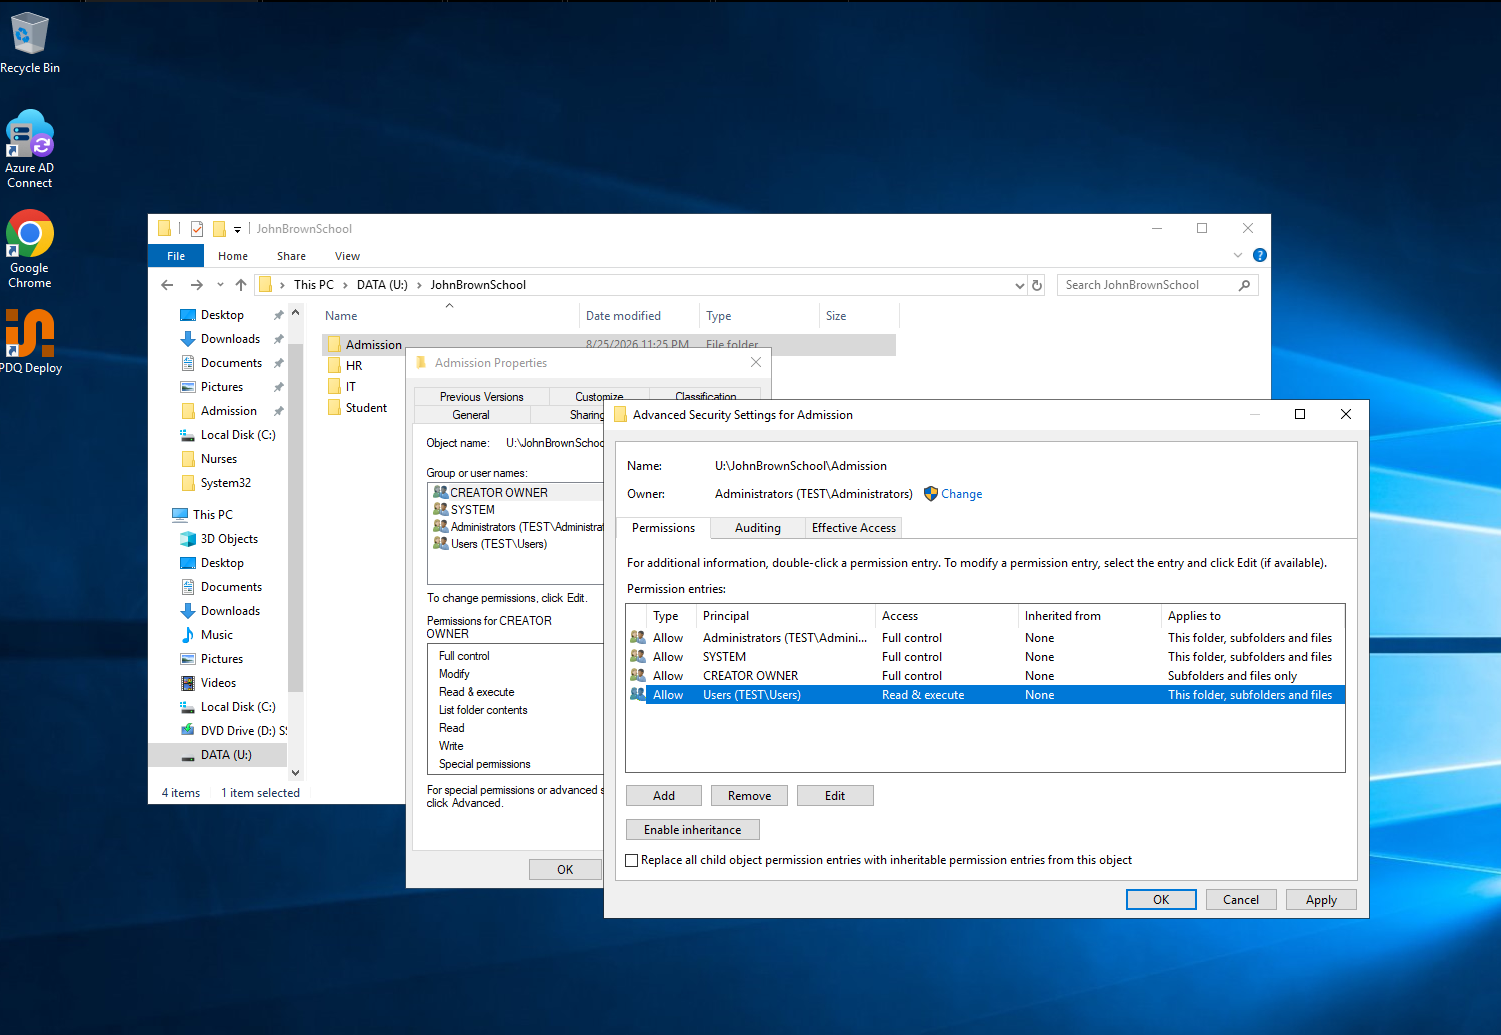
Figure 3 — Advanced NTFS permissions.
The Admission folder security configuration shows inherited/default entries before the departmental security group is fully applied. This step was used to review and refine the folder’s effective access model.
5.2 Selecting the Department Security Group
Instead of assigning permissions directly to individual users, I selected the Admission_Team Active Directory security group as the principal for the Admission folder.
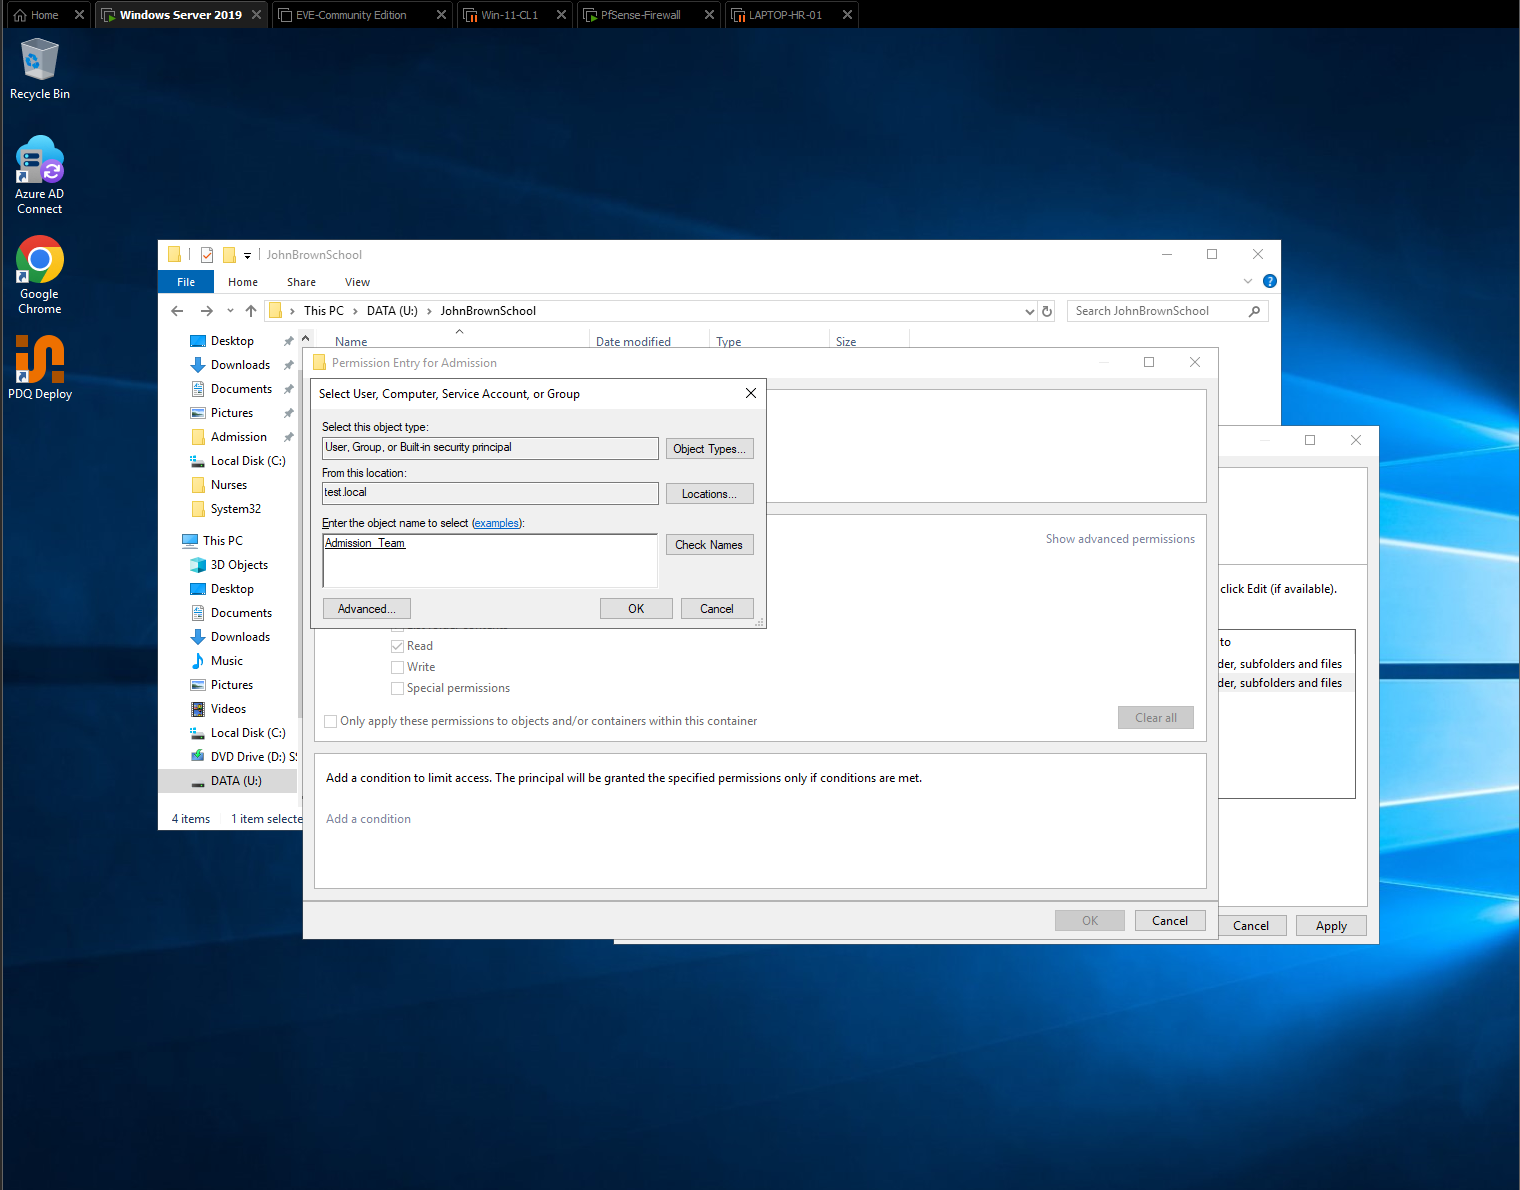
Figure 4 — Department security group selection.
The Select User, Computer, Service Account, or Group dialog is used to locate Admission_Team from test.local. This demonstrates group-based authorization rather than direct user-by-user permission assignment.
5.3 Assigning Departmental Modify Access
I assigned Admission_Team the permissions required for normal departmental work. The permission entry allows Modify, Read & execute, List folder contents, Read and Write across the folder, subfolders and files.
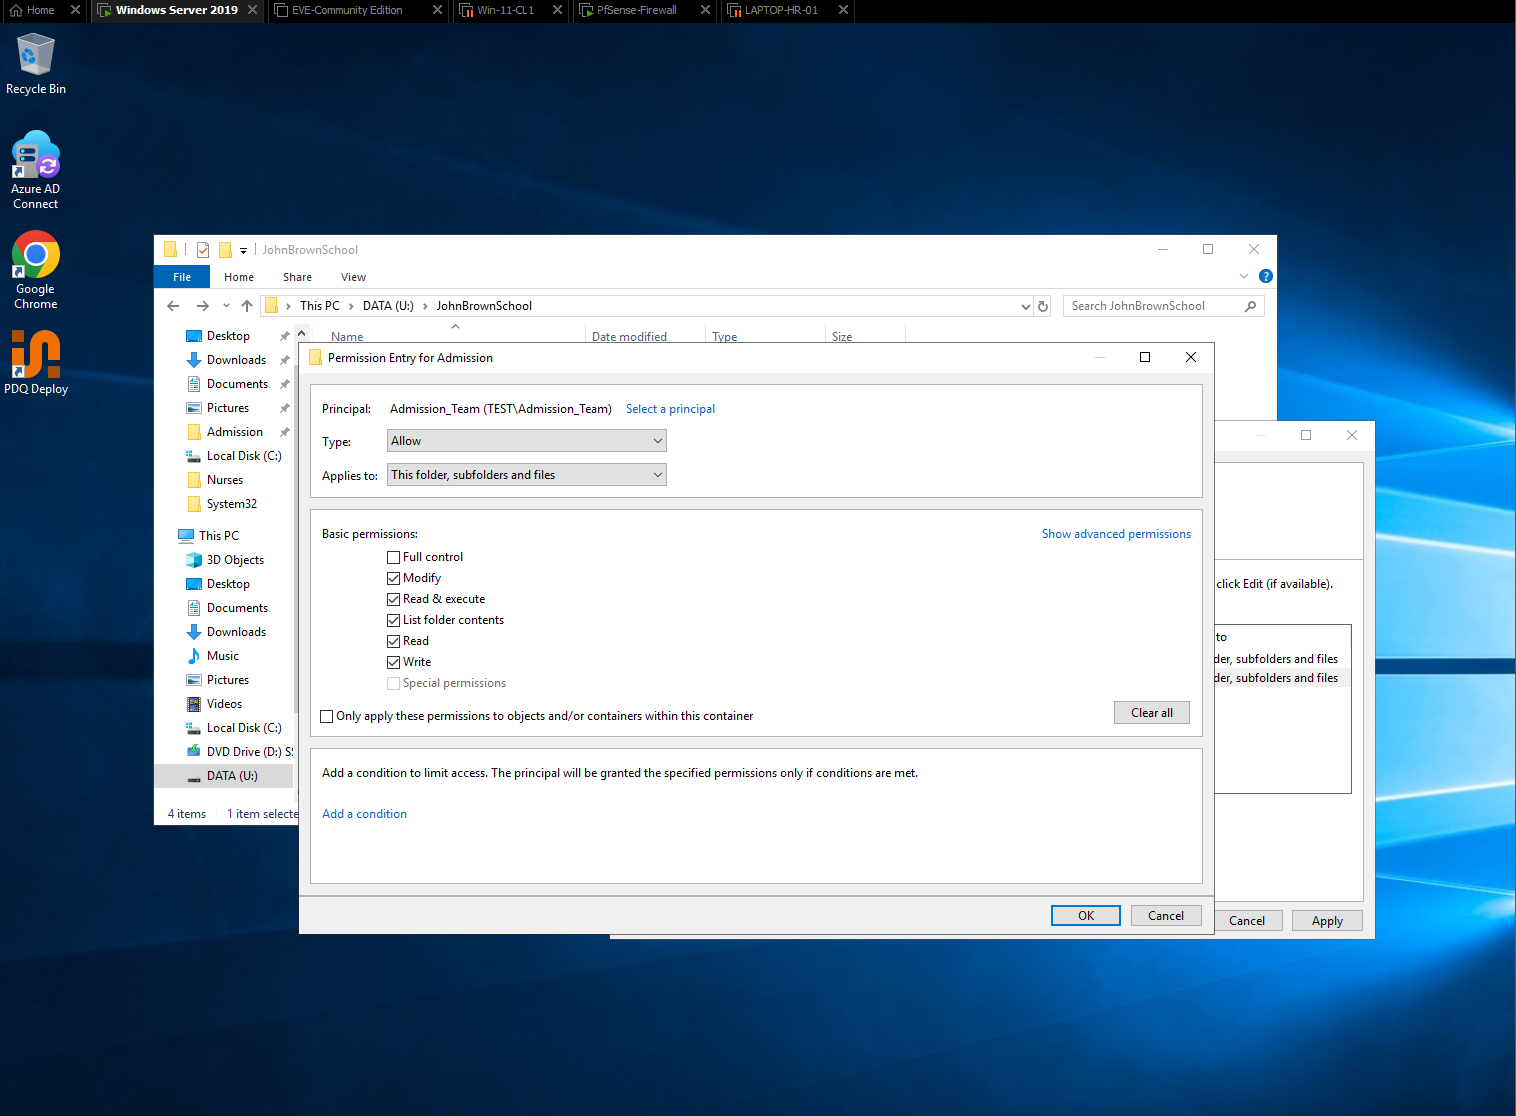
Figure 5 — Admission_Team NTFS permissions.
The permission entry grants the department group Modify-level access, allowing users in the group to create, edit and remove files while avoiding unnecessary Full Control.
5.4 Verifying the Final Folder Security
After applying the departmental permission entry, I reviewed the Admission folder security configuration again to confirm that the department group was present alongside the required system and administrator entries.
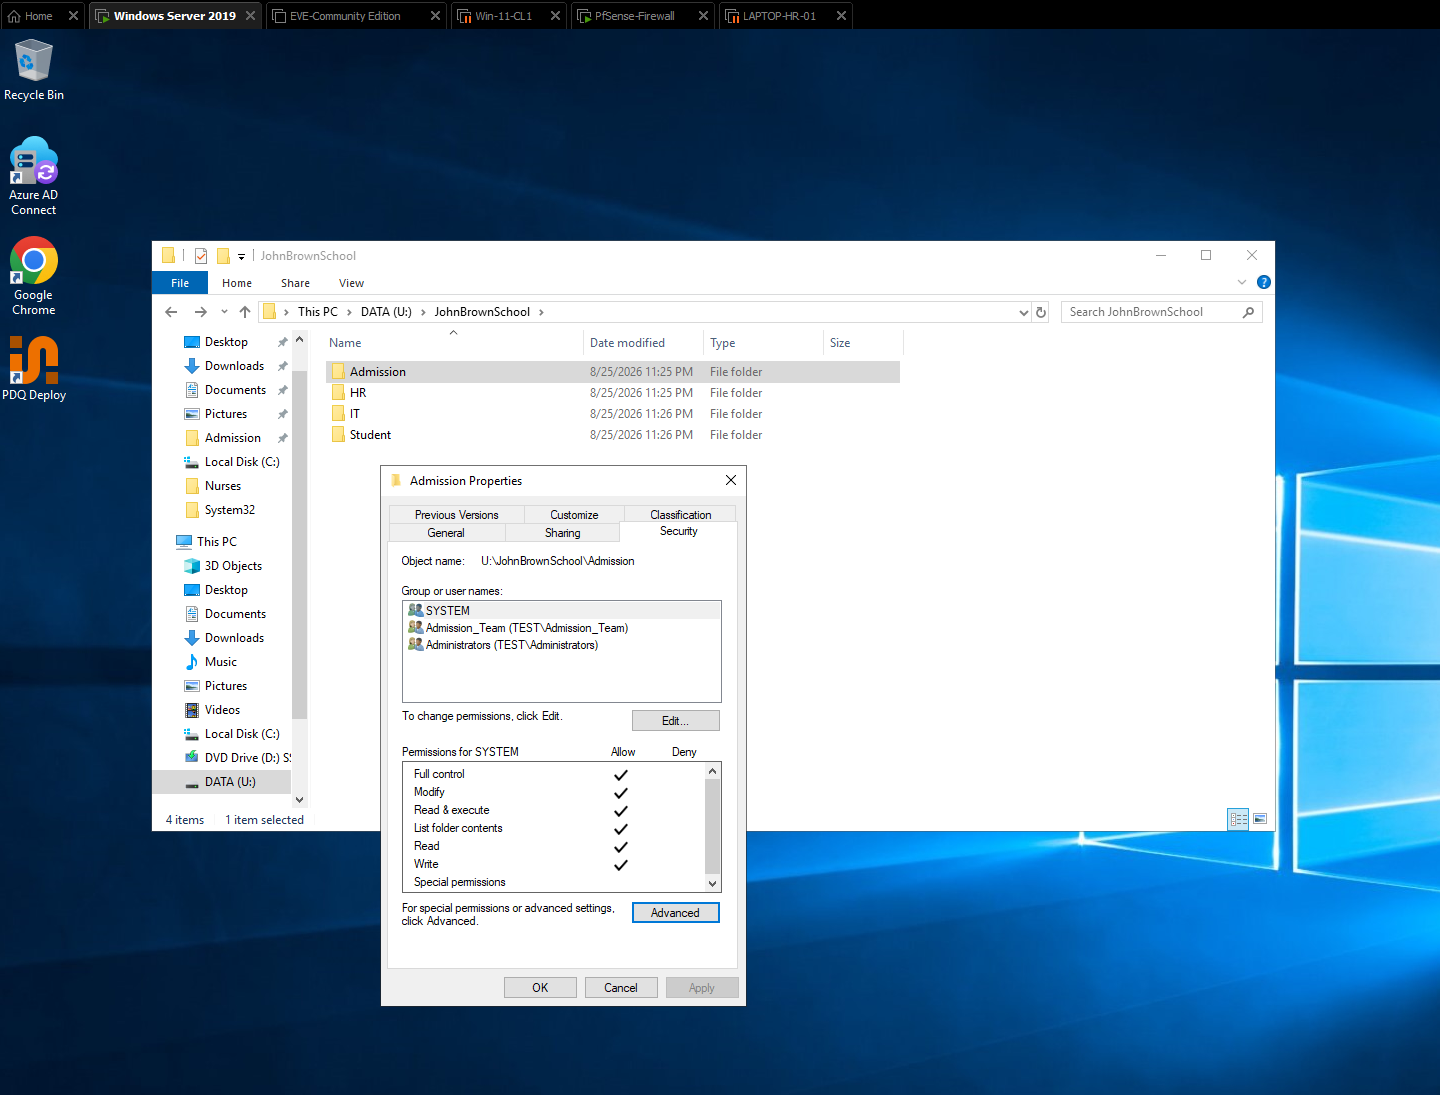
Figure 6 — Final Admission folder security.
The Admission_Team group is visible in the folder’s security configuration, confirming that access to the departmental folder is controlled through Active Directory group membership.
Phase 3 — SMB Share Configuration
6.1 Reviewing Initial Share Permissions
I configured the JohnBrownSchool root as a network share and reviewed the initial share-level permissions. The starting configuration used Everyone with Read access.
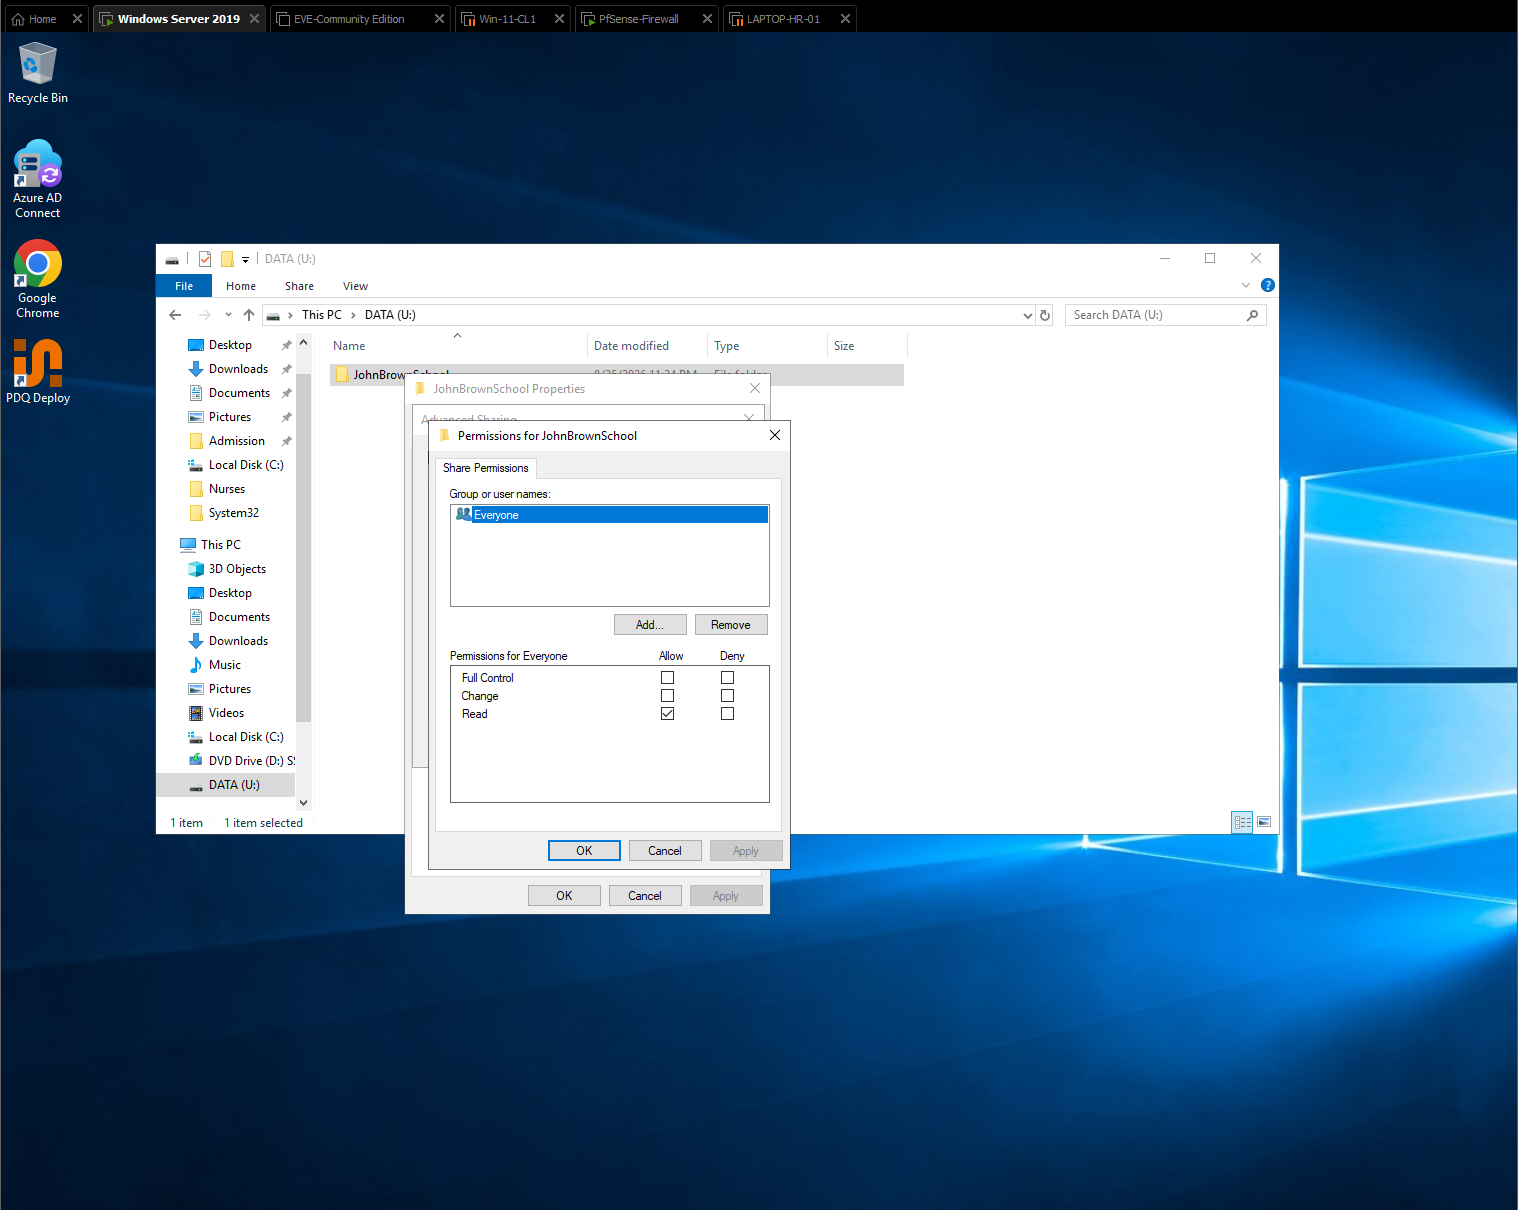
Figure 7 — Initial share permissions.
The JohnBrownSchool share initially exposes Read access through the Everyone principal. This was reviewed before tightening the share-level access model.
6.2 Replacing Broad Access with Authenticated Users
I changed the share-level principal from Everyone to Authenticated Users so the share is intended for authenticated domain users rather than anonymous or unauthenticated access.
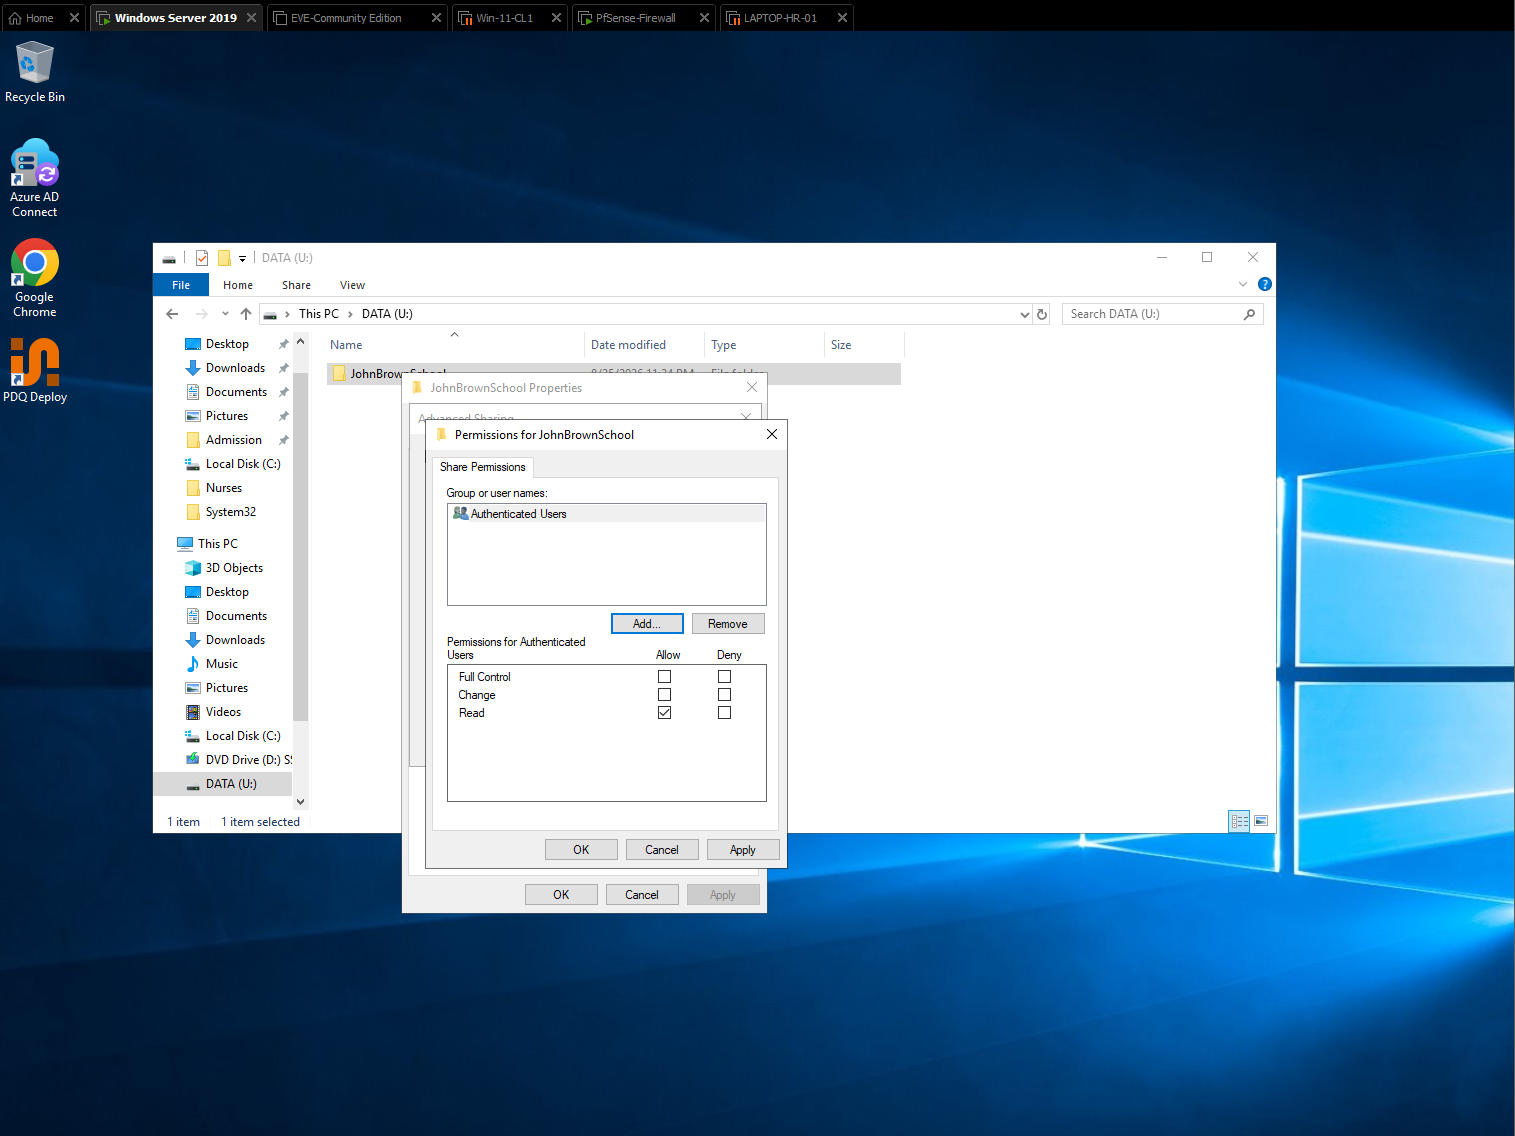
Figure 8 — Authenticated Users share principal.
The share permission list now uses Authenticated Users, limiting network access to users who successfully authenticate to the environment.
6.3 Granting Share-Level Change and Read
The share-level permissions were configured to allow Authenticated Users Change and Read. Fine-grained departmental access remains controlled through NTFS permissions on the individual folders.
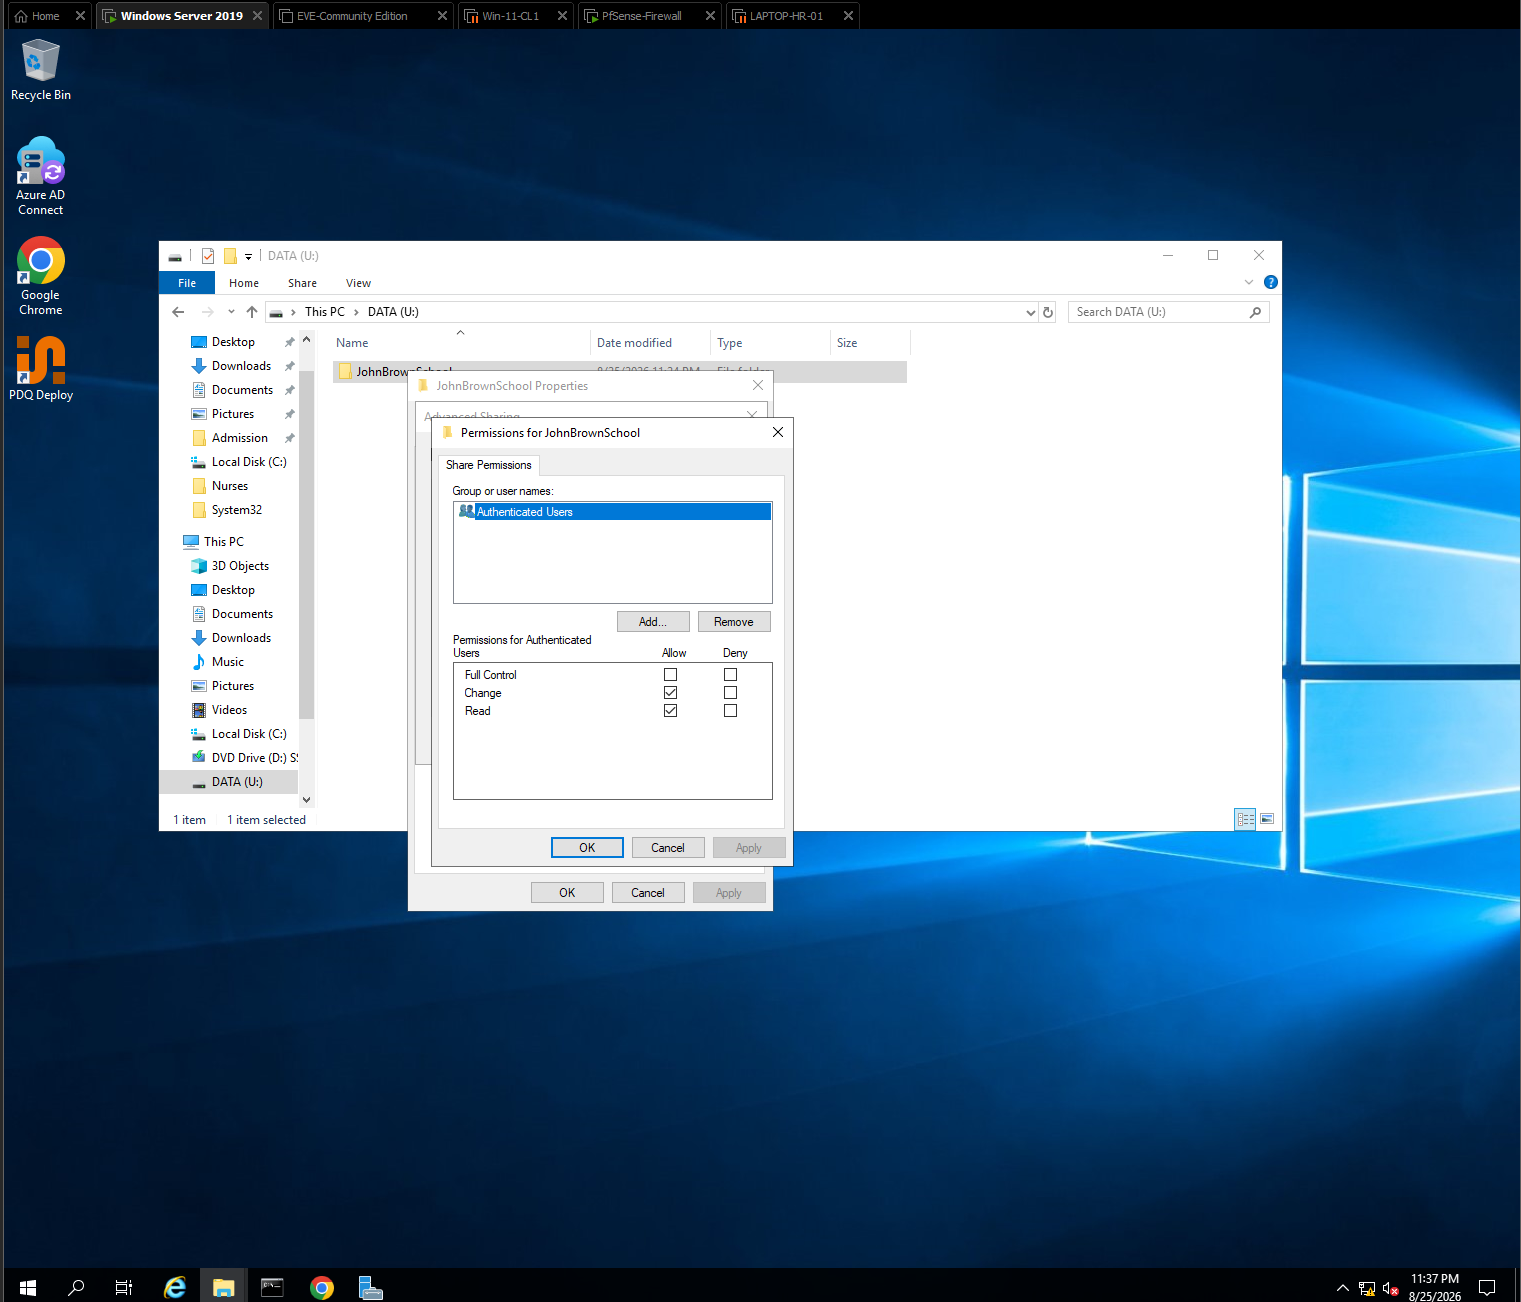
Figure 9 — Final share permissions.
Authenticated Users receive Change and Read at the SMB share layer. NTFS permissions then provide the more restrictive department-specific authorization.
This follows the common Windows file-server model of keeping share permissions sufficiently broad for authenticated organizational users while using NTFS permissions as the primary control for folder-level access.
6.4 Verifying the Published SMB Share
I confirmed the JohnBrownSchool network share and its network path after the sharing configuration was completed.
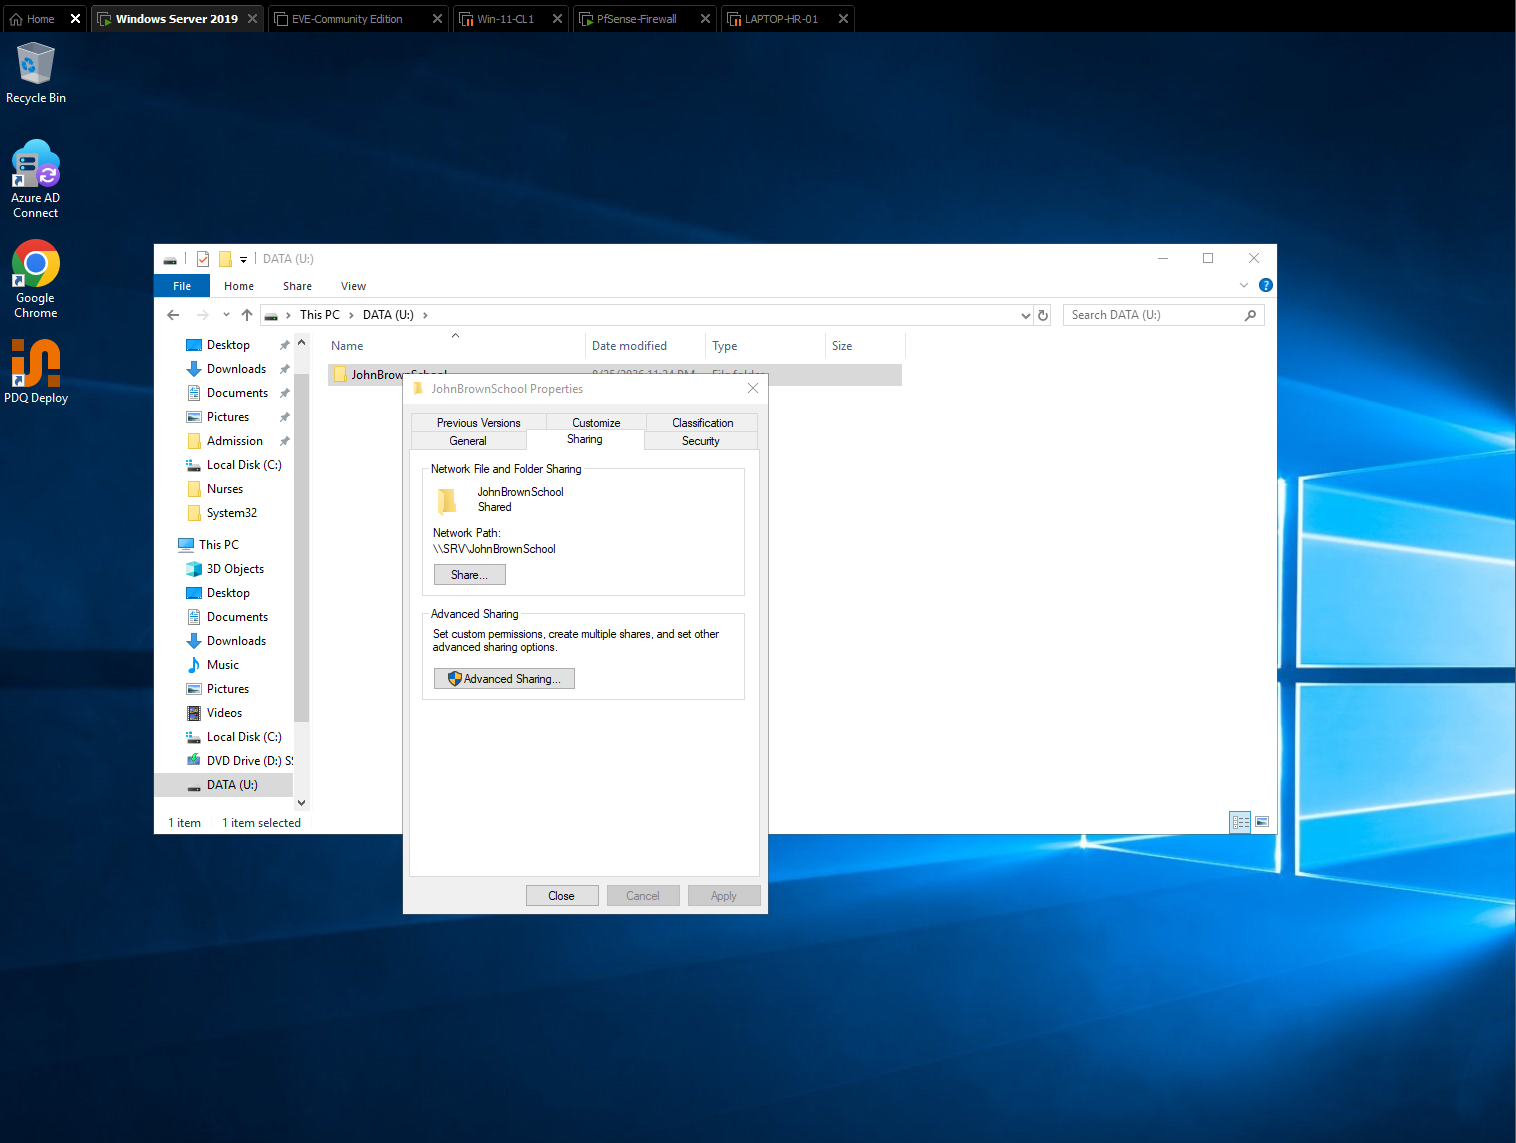
Figure 10 — JohnBrownSchool SMB share.
The folder properties show that the centralized storage is shared over the network, providing the path used by client workstations.
Phase 4 — Client-Side Network Access Validation
7.1 Browsing the File Server by Domain Name
From LAPTOP-HR-01, I browsed the test.local network resources and confirmed that JohnBrownSchool was visible from the Windows 11 client.
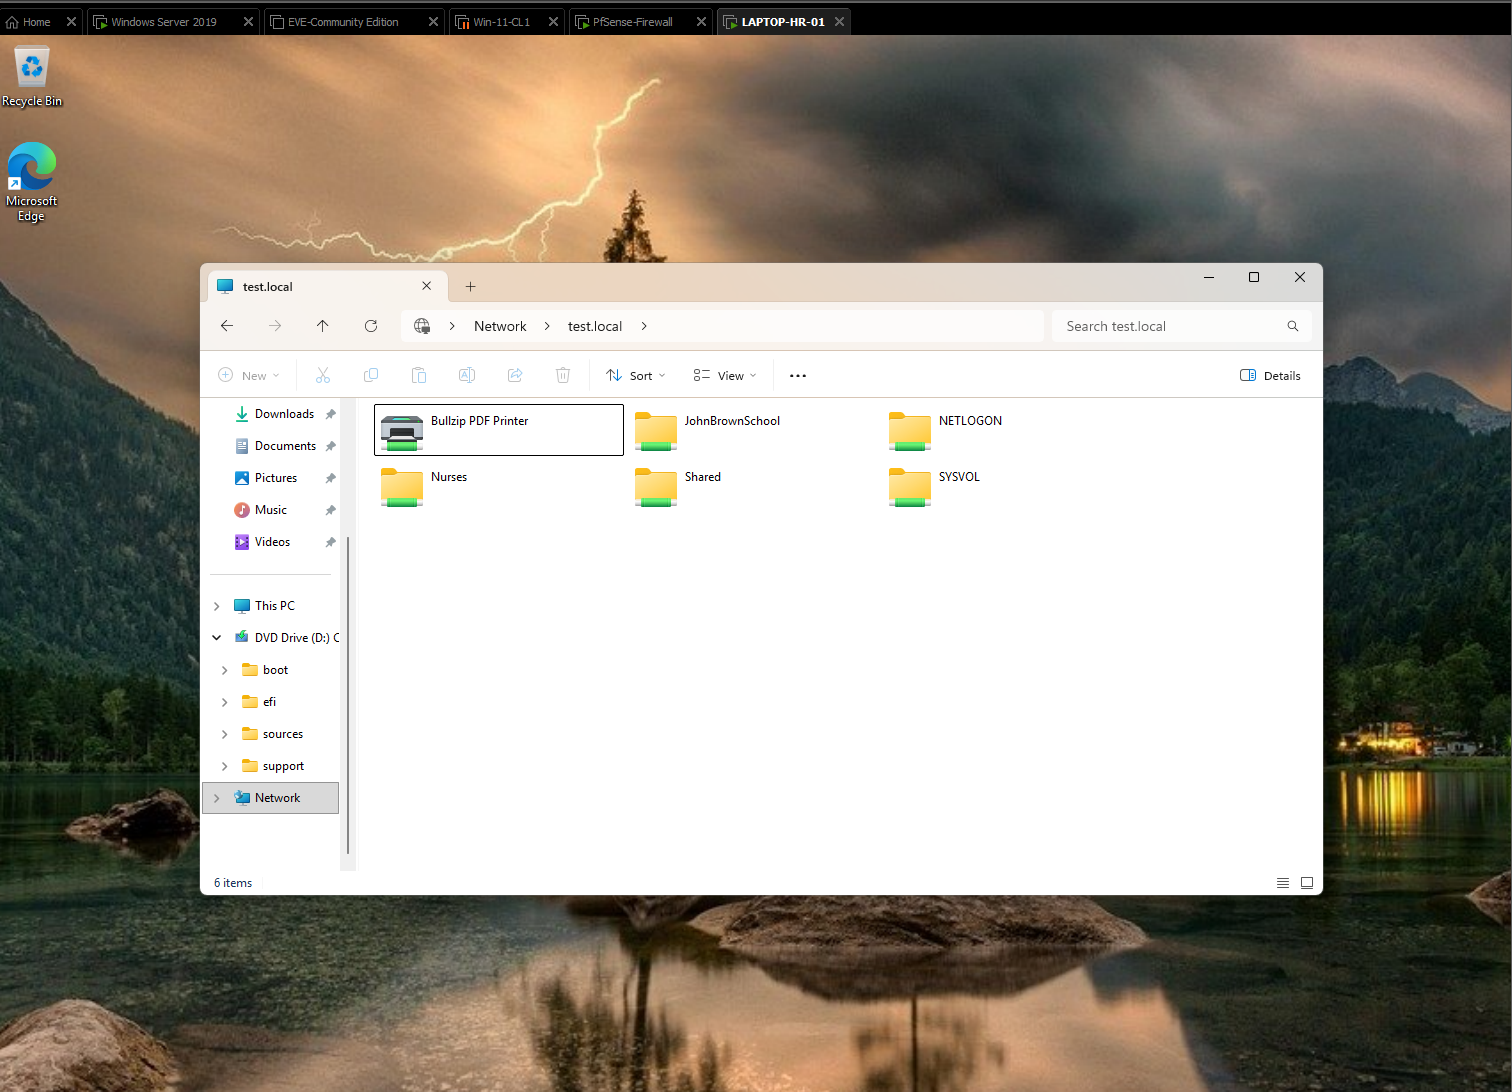
Figure 11 — Network browsing by domain.
The HR workstation can browse the domain network and see the JohnBrownSchool share together with other server resources. This confirms SMB connectivity from the client.
7.2 Browsing the File Server by IP Address
I also validated access by connecting directly to the server’s IP address. The same shared resources were visible, confirming connectivity independently of the normal domain-name browsing path.
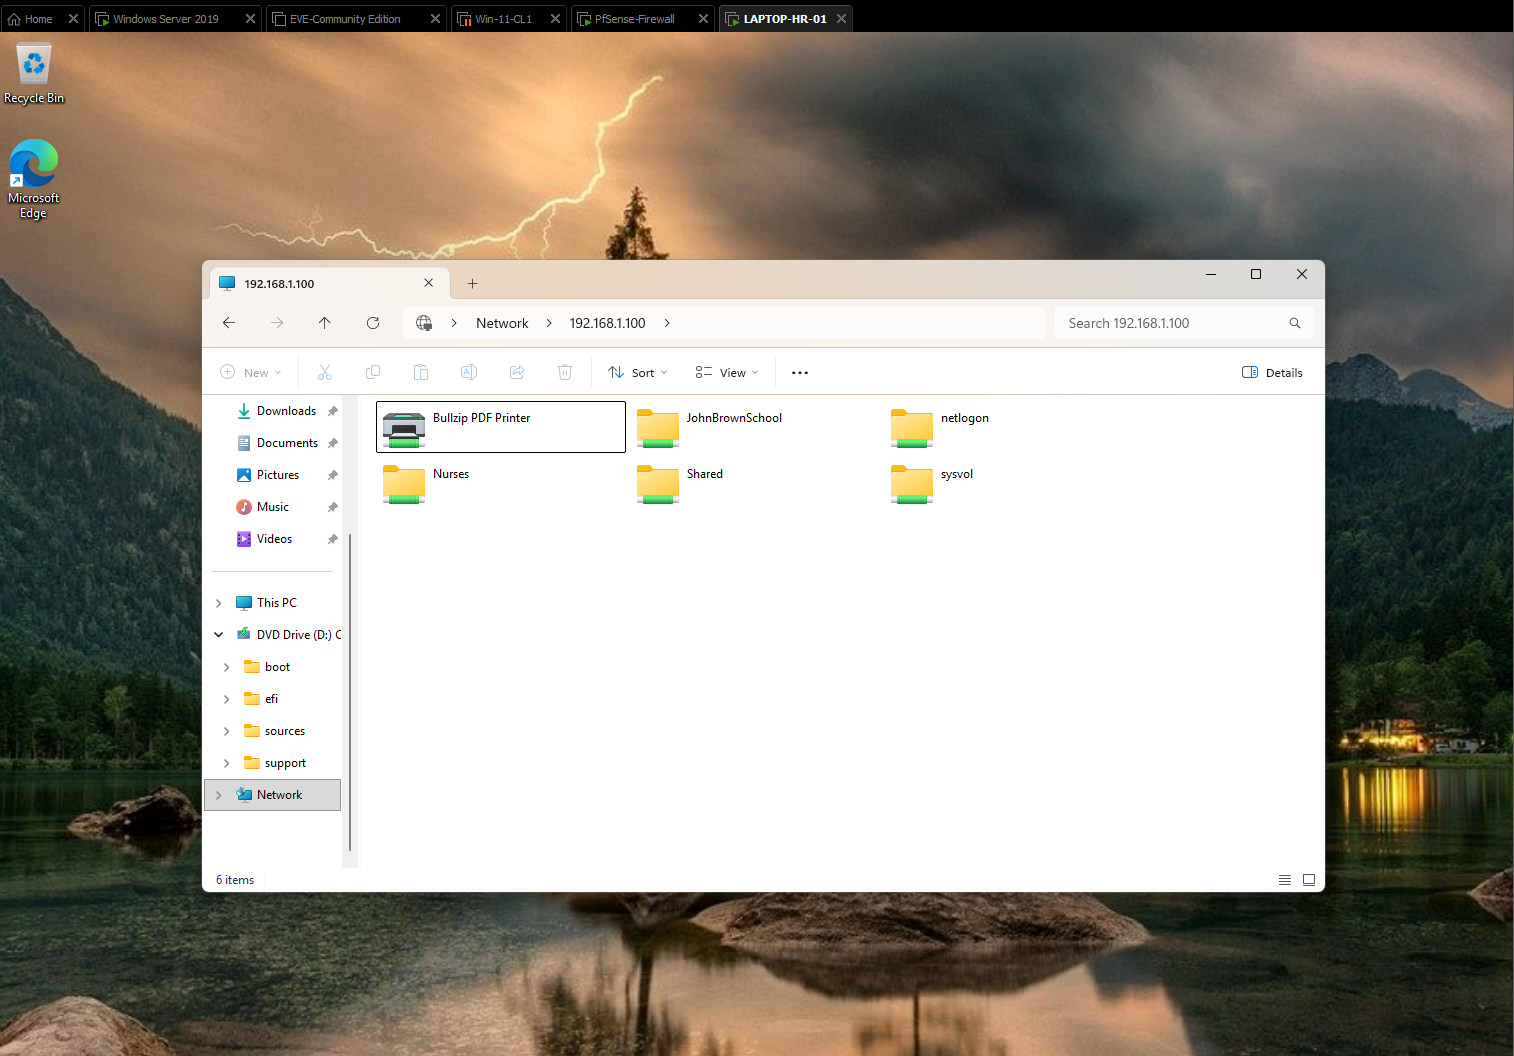
Figure 12 — Network browsing by server IP.
The Windows 11 client connects to 192.168.1.100 and displays the server’s published resources, confirming direct SMB reachability.
7.3 Testing Unauthorized Admission Access
While signed in as Harry H from the HR department, I attempted to open the Admission folder. Windows returned a permission error, confirming that the HR user did not have authorization to access Admission data.
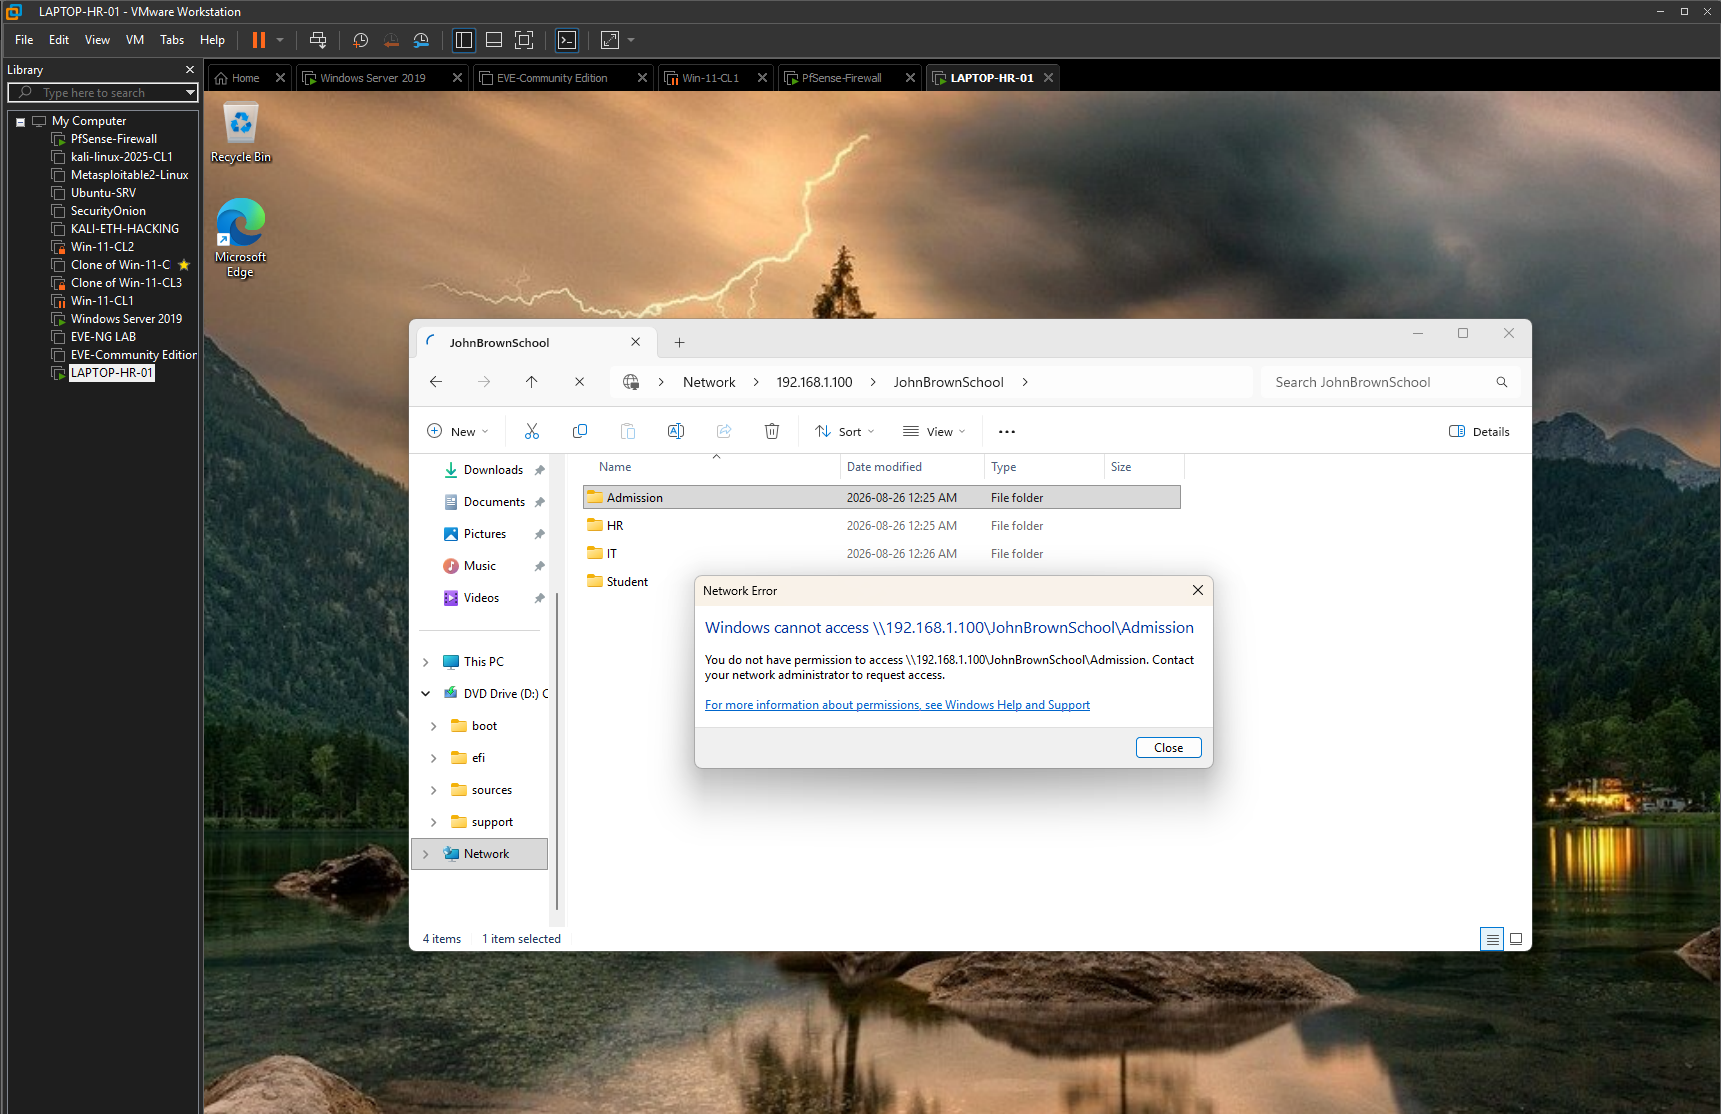
Figure 13 — Admission access denied.
Harry receives a Windows network-access error when attempting to open the Admission folder. This validates cross-department access restriction.
7.4 Confirming the HR User Context
I verified that the client session was running as Harry H, the HR test user associated with the HR_Team security group.
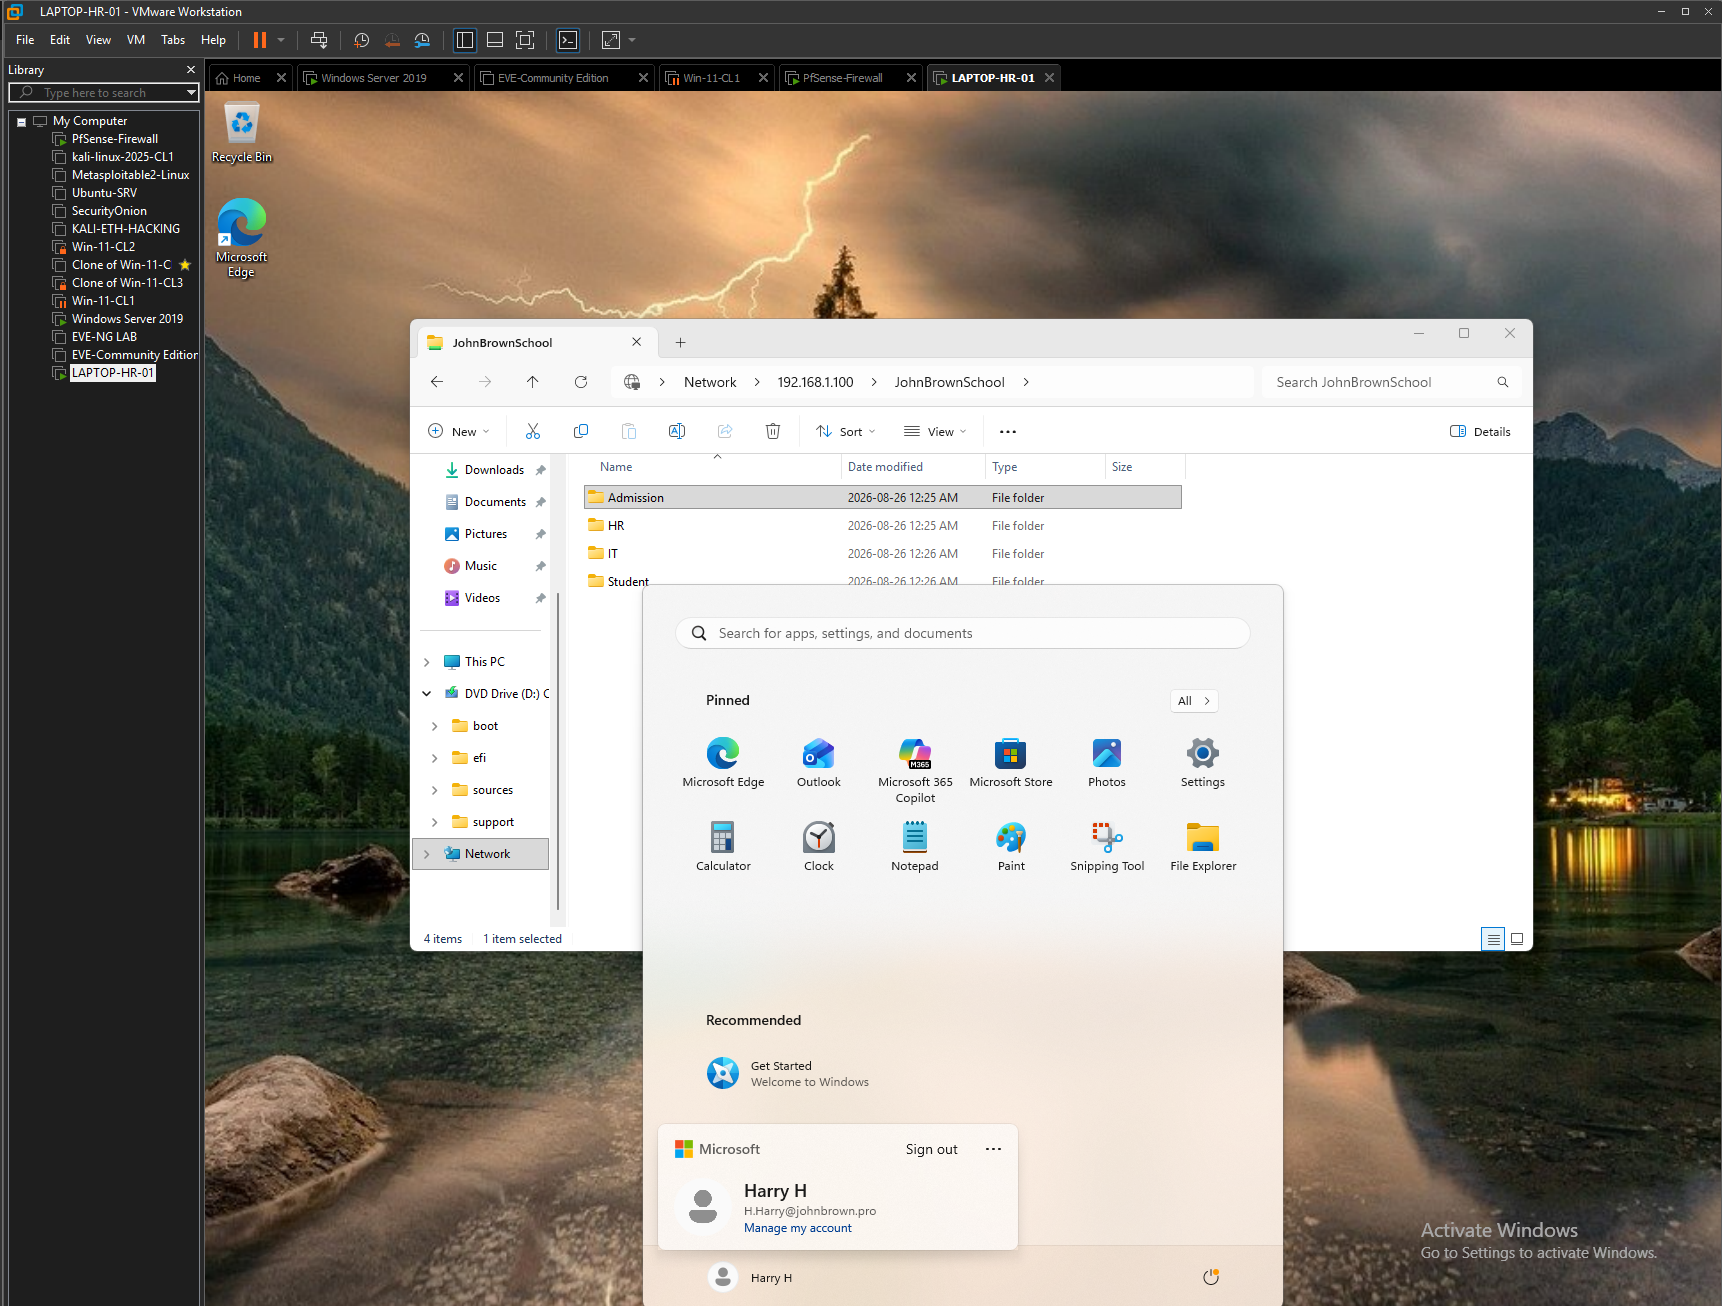
Figure 14 — HR user session.
The Windows 11 workstation is signed in under Harry H. This establishes the identity used for the subsequent authorization tests.
7.5 Validating Authorized HR Access
Harry successfully opened the HR folder and accessed existing test files. This confirmed that the NTFS permissions allowed the expected departmental access.
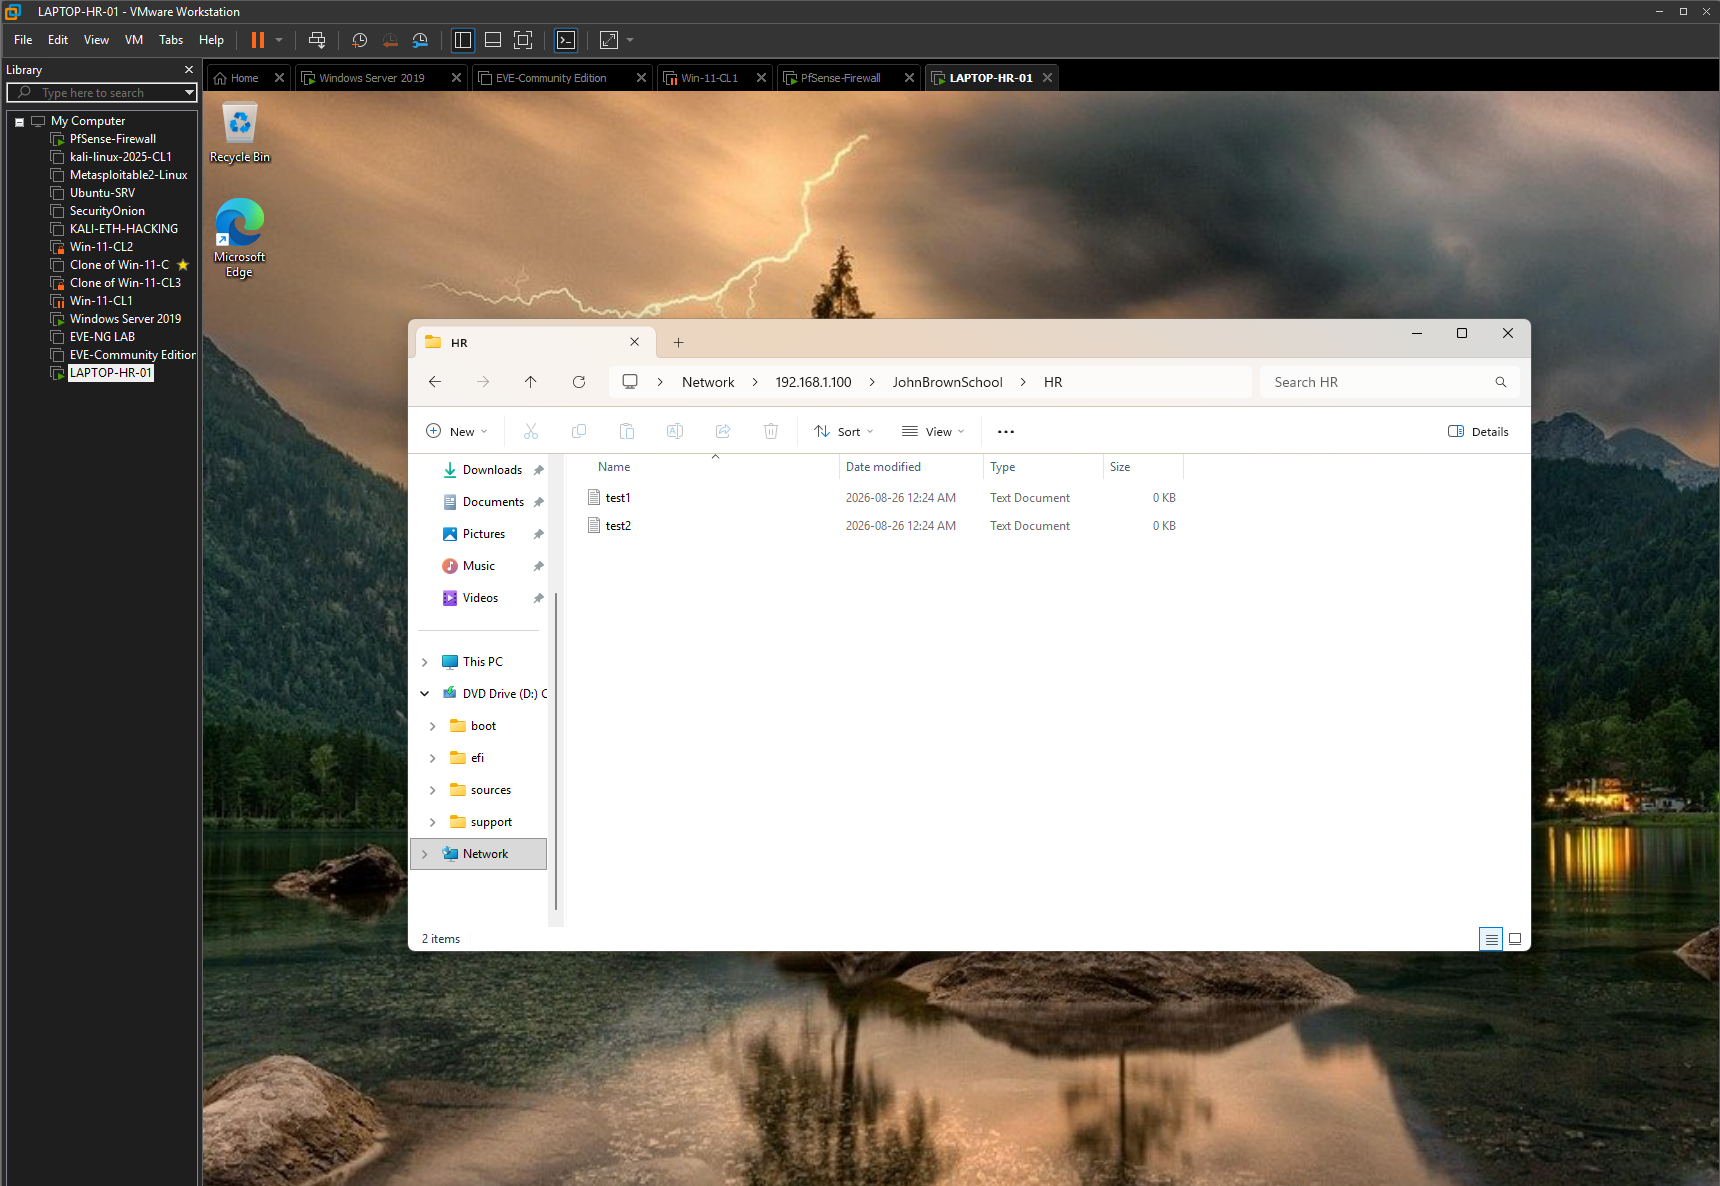
Figure 15 — Authorized HR folder access.
Harry can open the HR folder and view the existing test files. This contrasts with the denied Admission access and demonstrates department-based authorization.
7.6 Validating Write / Modify Permissions
I created new content inside the HR folder to verify that the user had more than read-only access. The new folder and new text document confirm that Harry could create and modify content in the authorized department location.
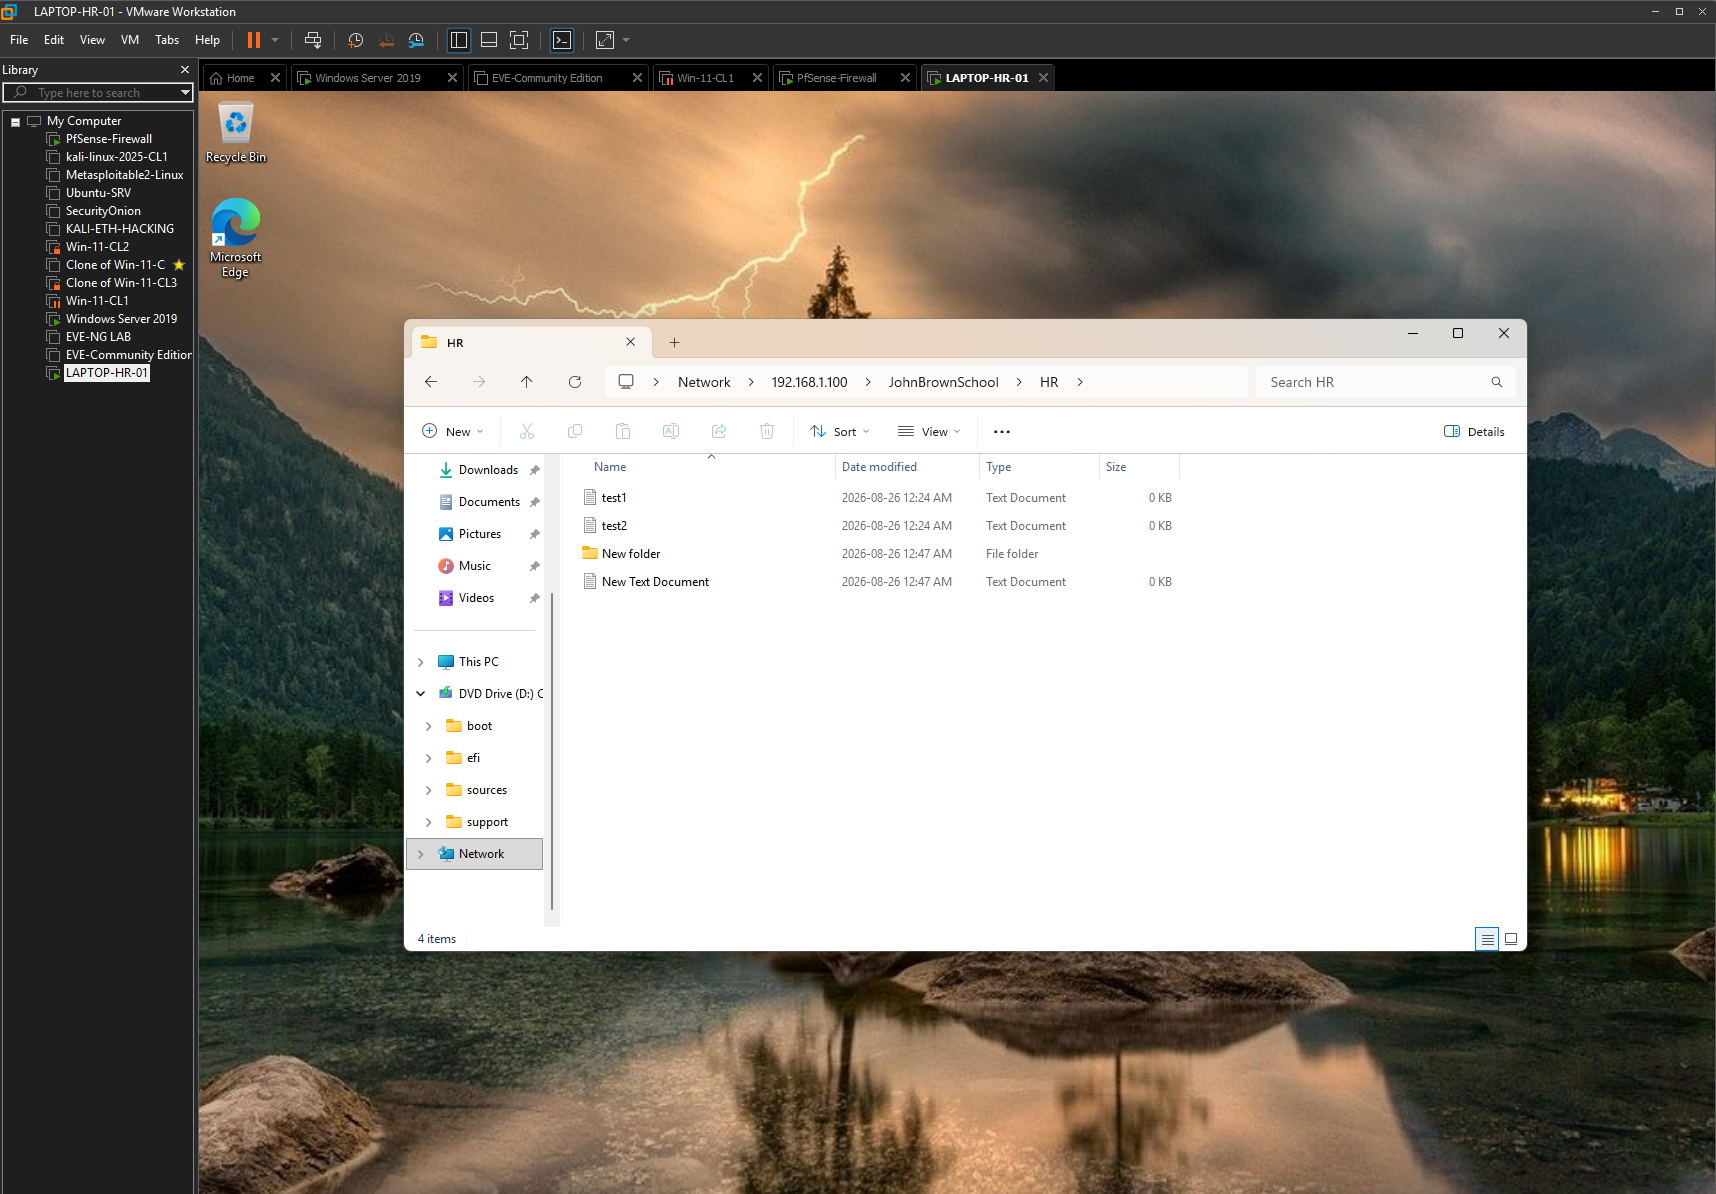
Figure 16 — HR write-access validation.
New objects created by Harry appear in the HR folder, demonstrating effective Modify/Write permissions for the department user.
7.7 Testing Unauthorized Student Access
I also attempted to access the Student folder from Harry’s HR account. Windows again returned an access-denied message.
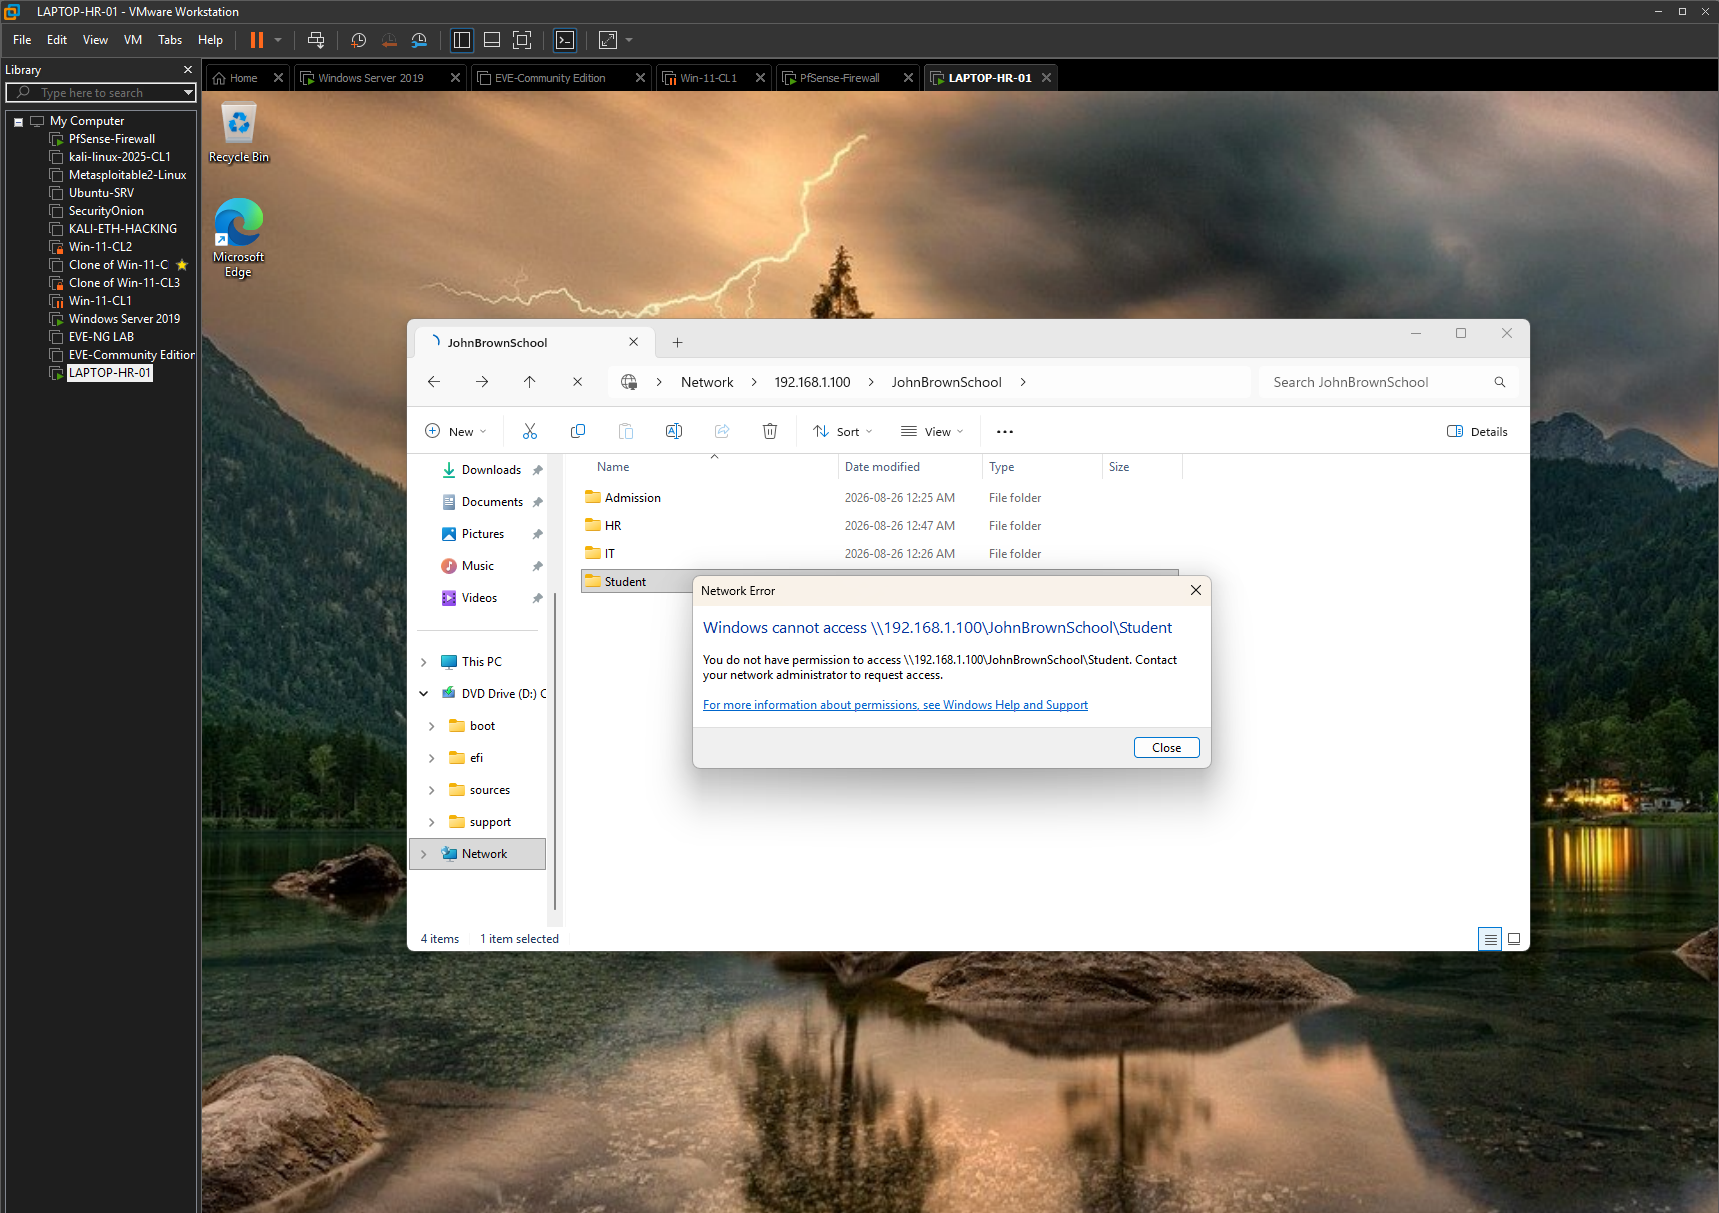
Figure 17 — Student access denied.
Harry cannot open the Student folder, further validating that authorization is based on department rather than broad access to the entire share.
Phase 5 — Manual Network Drive Validation
8.1 Mapping the Share Manually
Before automating the mapping with Group Policy, I manually mapped the JohnBrownSchool share from the Windows 11 client. This was a useful validation step because it separated SMB connectivity from Group Policy configuration.
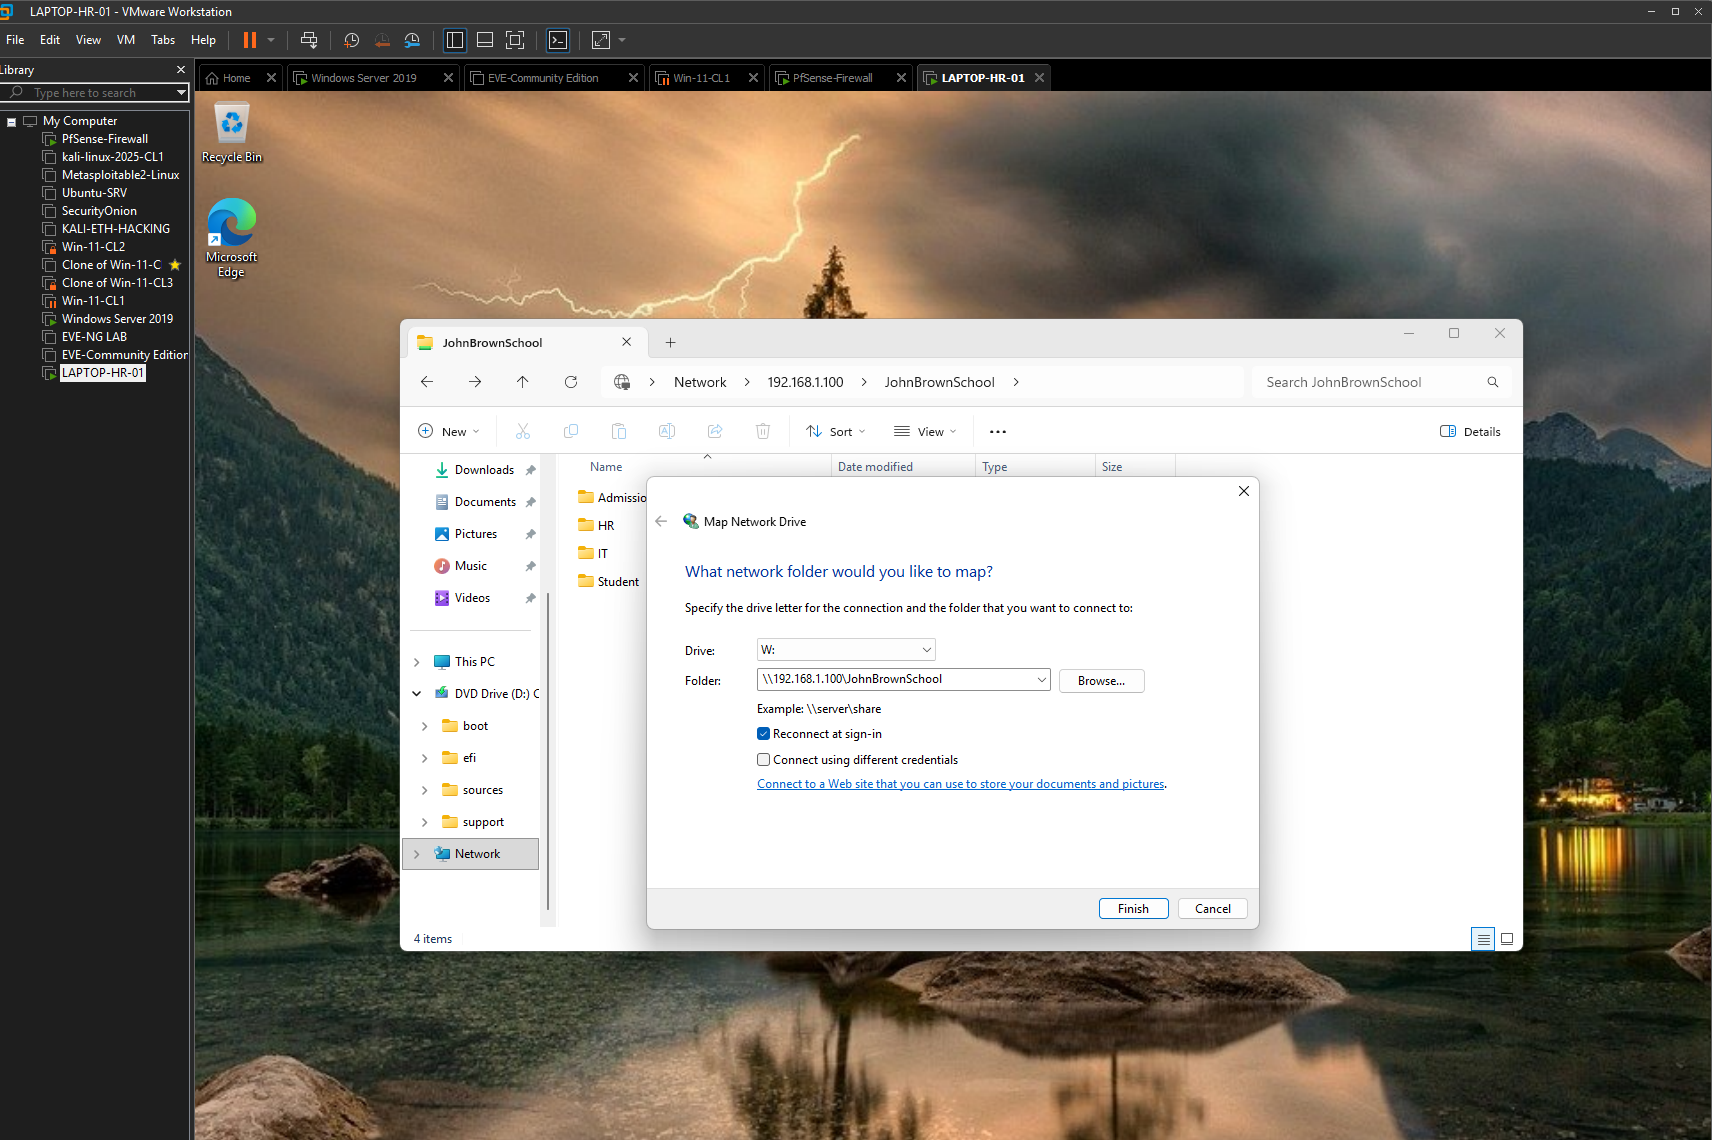
Figure 18 — Manual network-drive mapping.
The Map Network Drive wizard points to the centralized JohnBrownSchool share and is configured to reconnect at sign-in.
8.2 Confirming the Manual Mapped Drive
After completing the wizard, the network location appeared in This PC as a mapped drive.
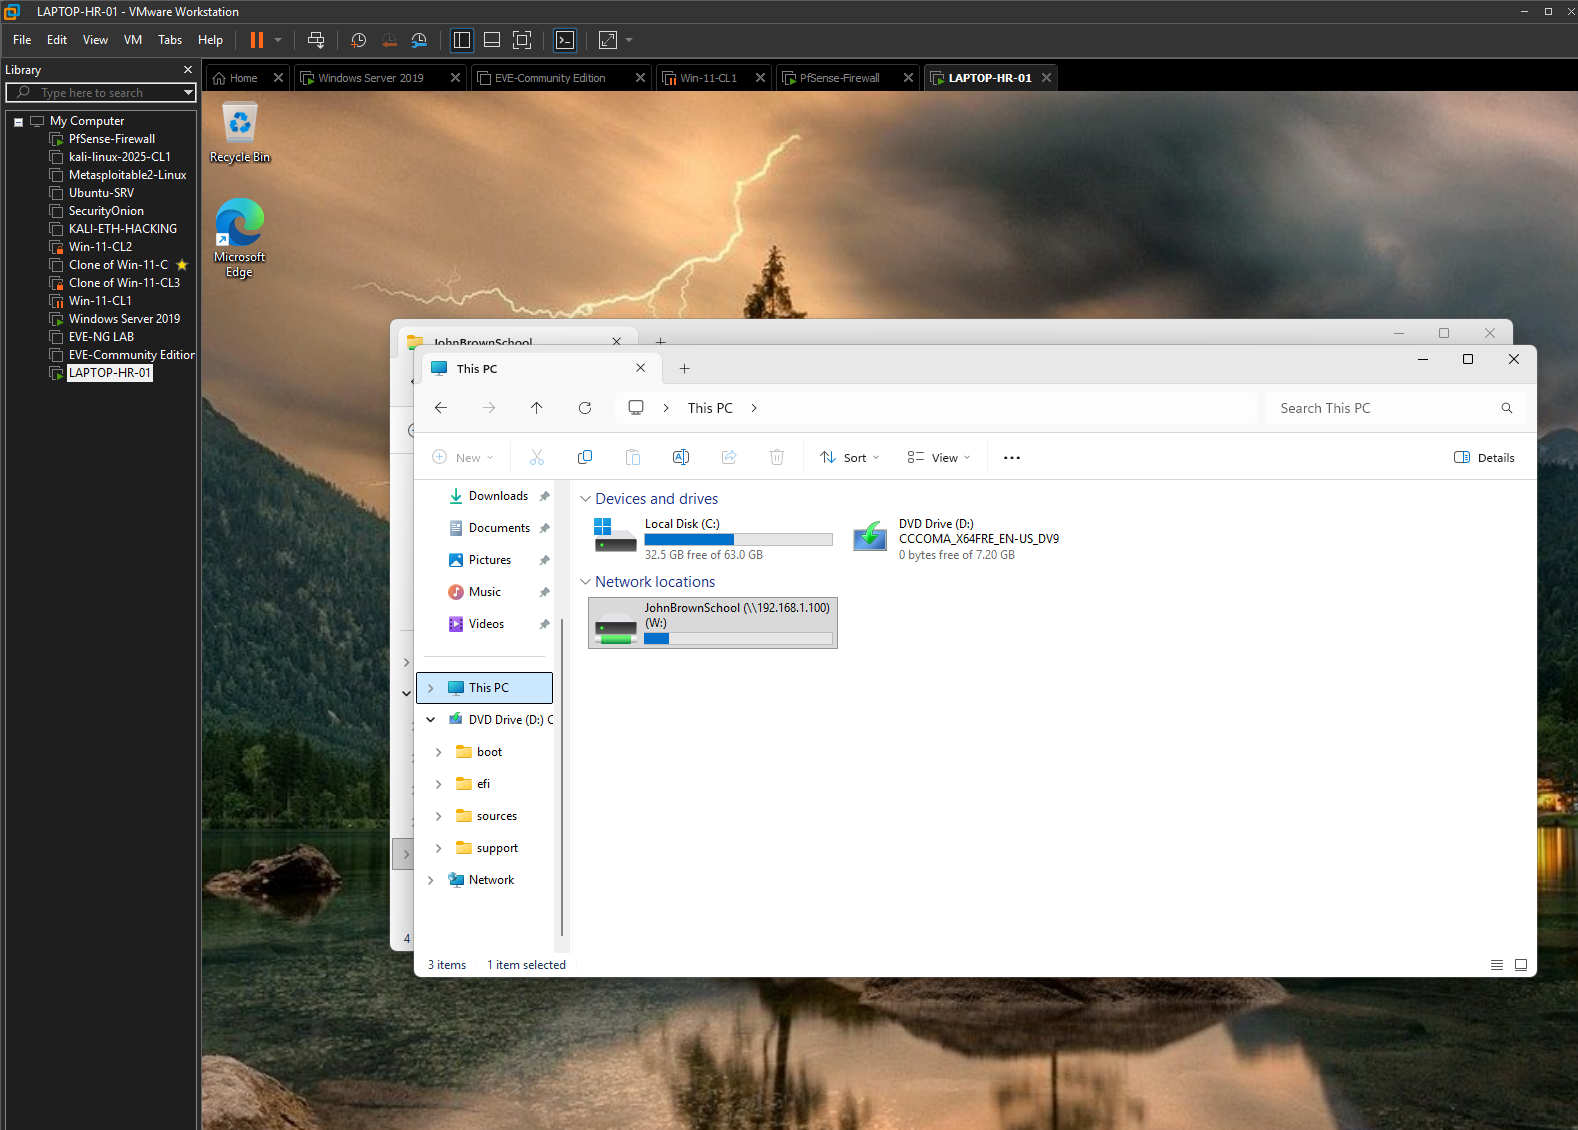
Figure 19 — Manually mapped network drive.
The JohnBrownSchool network location is visible in File Explorer, proving that the share path works correctly before Group Policy automation is introduced.
Phase 6 — Automated Drive Mapping with Group Policy
9.1 Creating the Drive-Mapping GPO
I created a new Group Policy Object named Map-Network-Drive-Users. The purpose of the GPO was to remove the need to manually configure the network drive on every workstation.
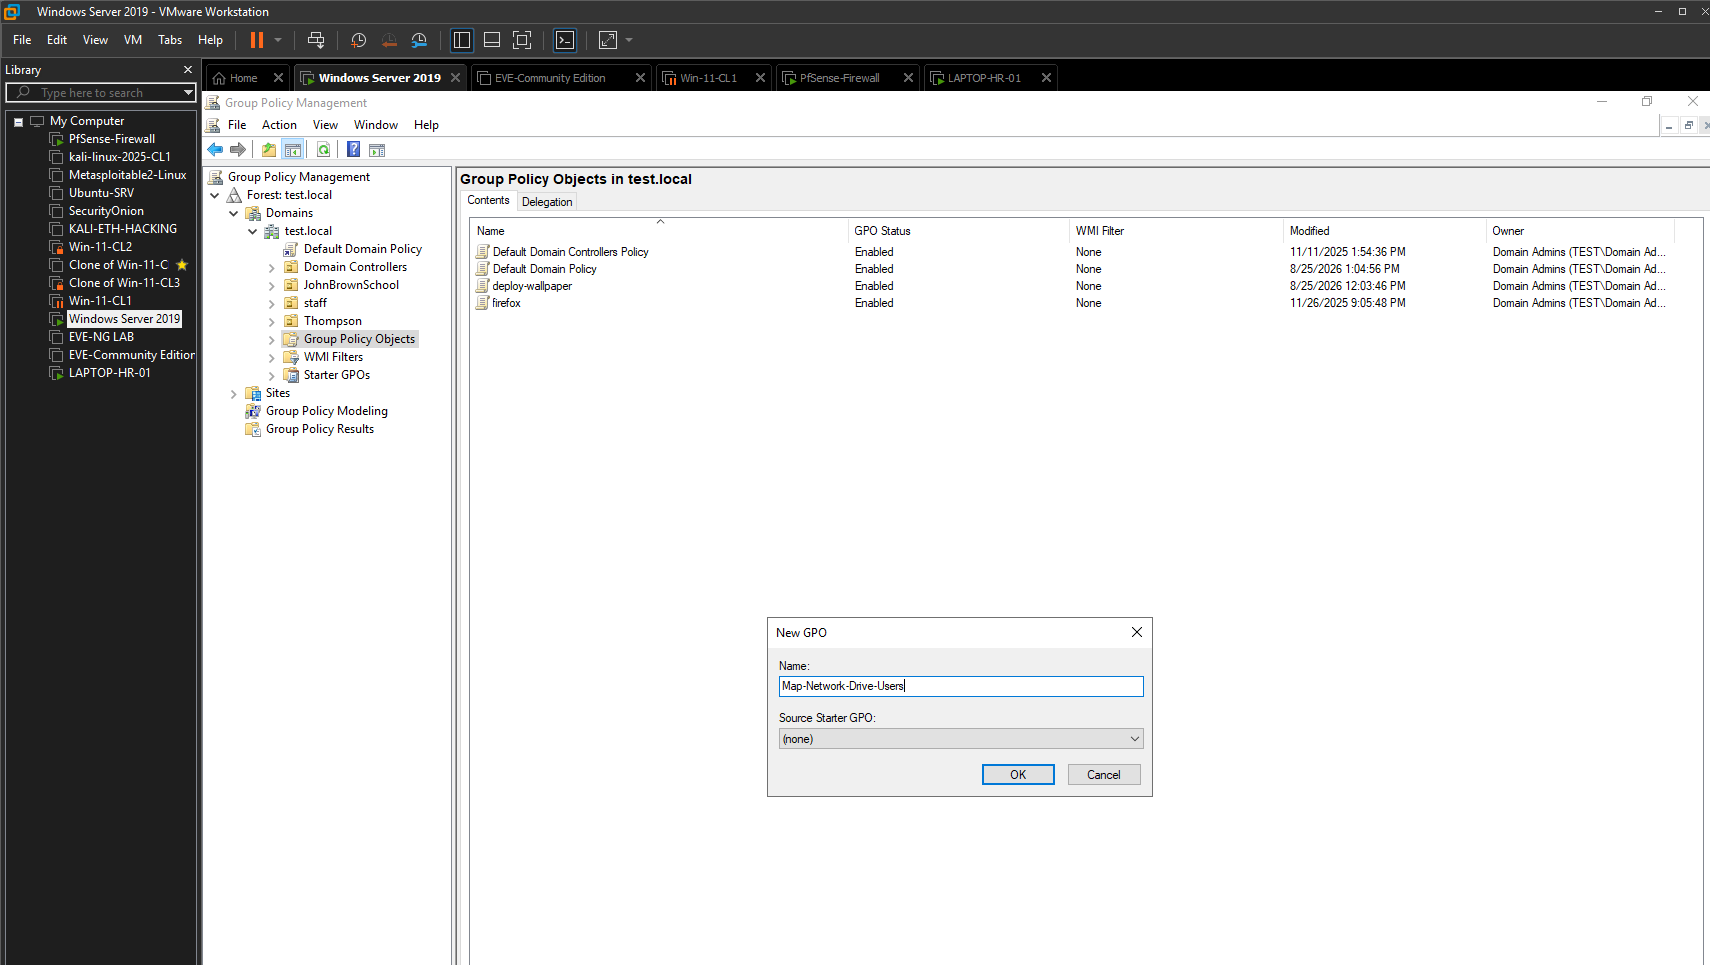
Figure 20 — Map-Network-Drive-Users GPO creation.
A dedicated GPO is created for centralized drive deployment, separating the drive-mapping configuration from other policies.
9.2 Configuring Group Policy Preferences
Inside the GPO, I navigated to User Configuration → Preferences → Windows Settings → Drive Maps. Group Policy Preferences provides a centralized way to create and maintain mapped drives for users.
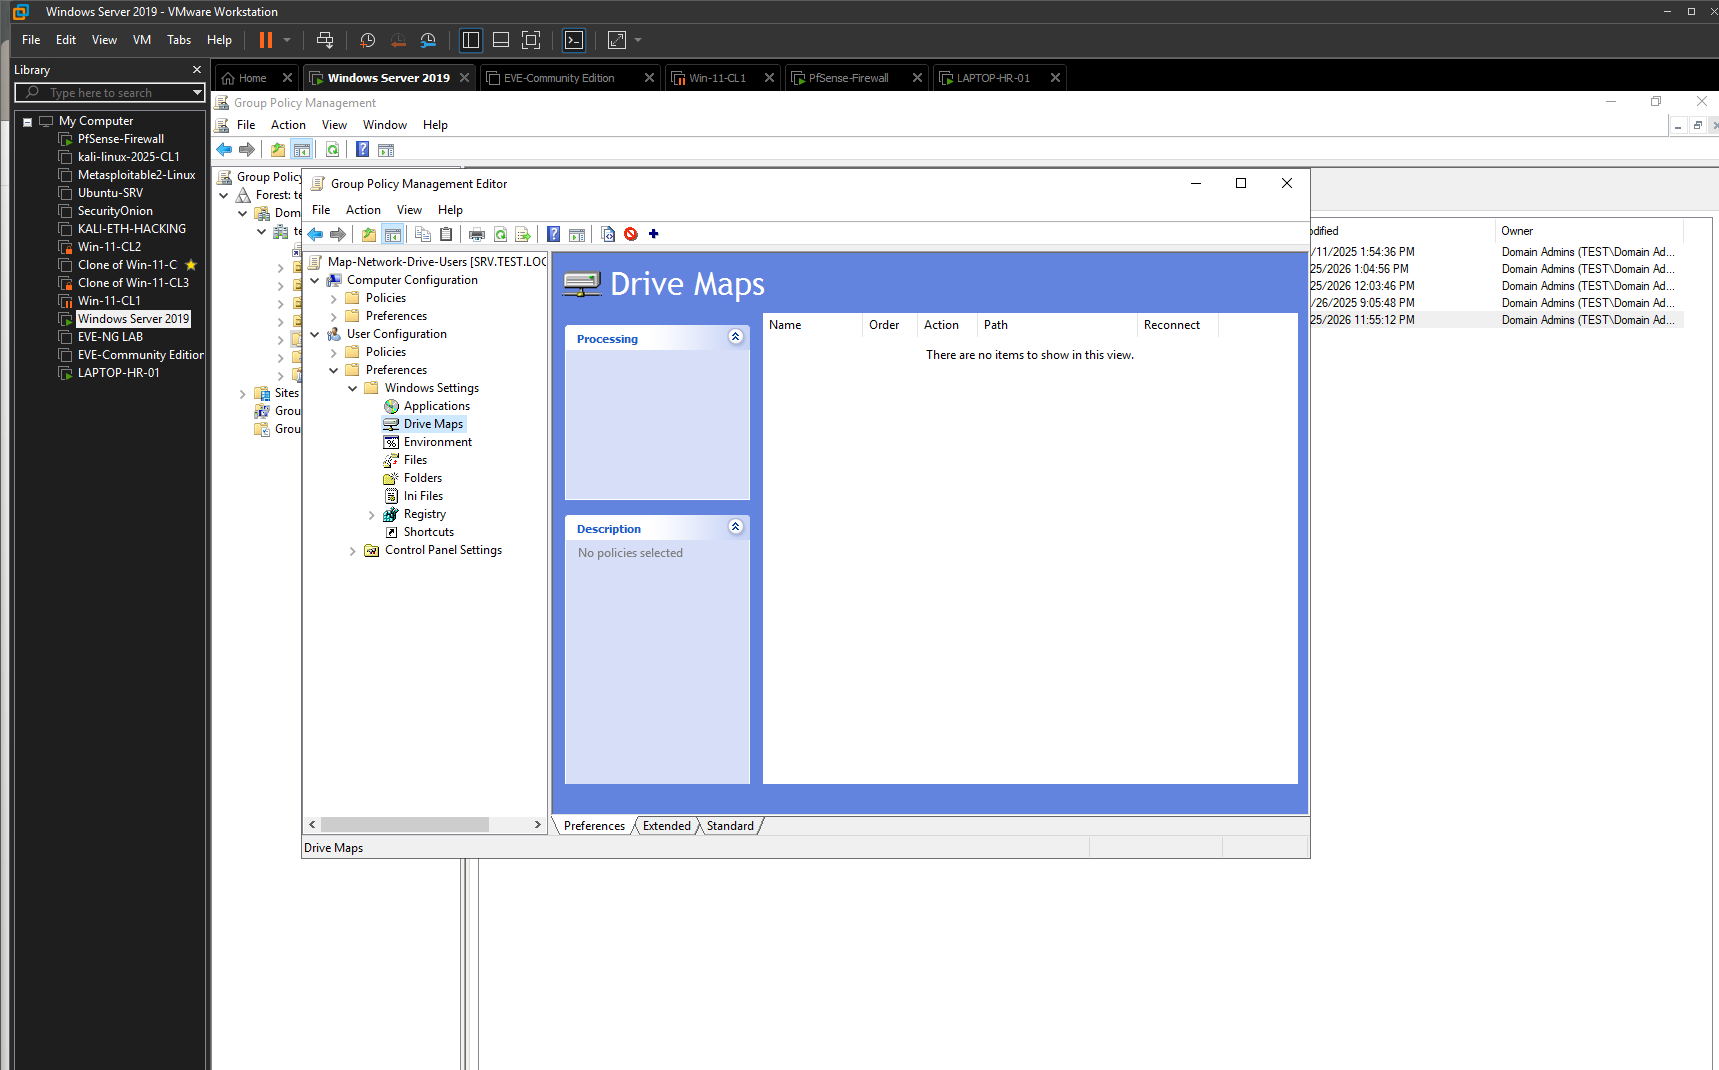
Figure 21 — Drive Maps preference location.
The Group Policy Management Editor shows the Drive Maps section where the new mapped-drive item is configured.
9.3 Configuring the Company Drive
I configured the mapped-drive item to point to the JohnBrownSchool share and assigned the user-facing label Company-Drive.
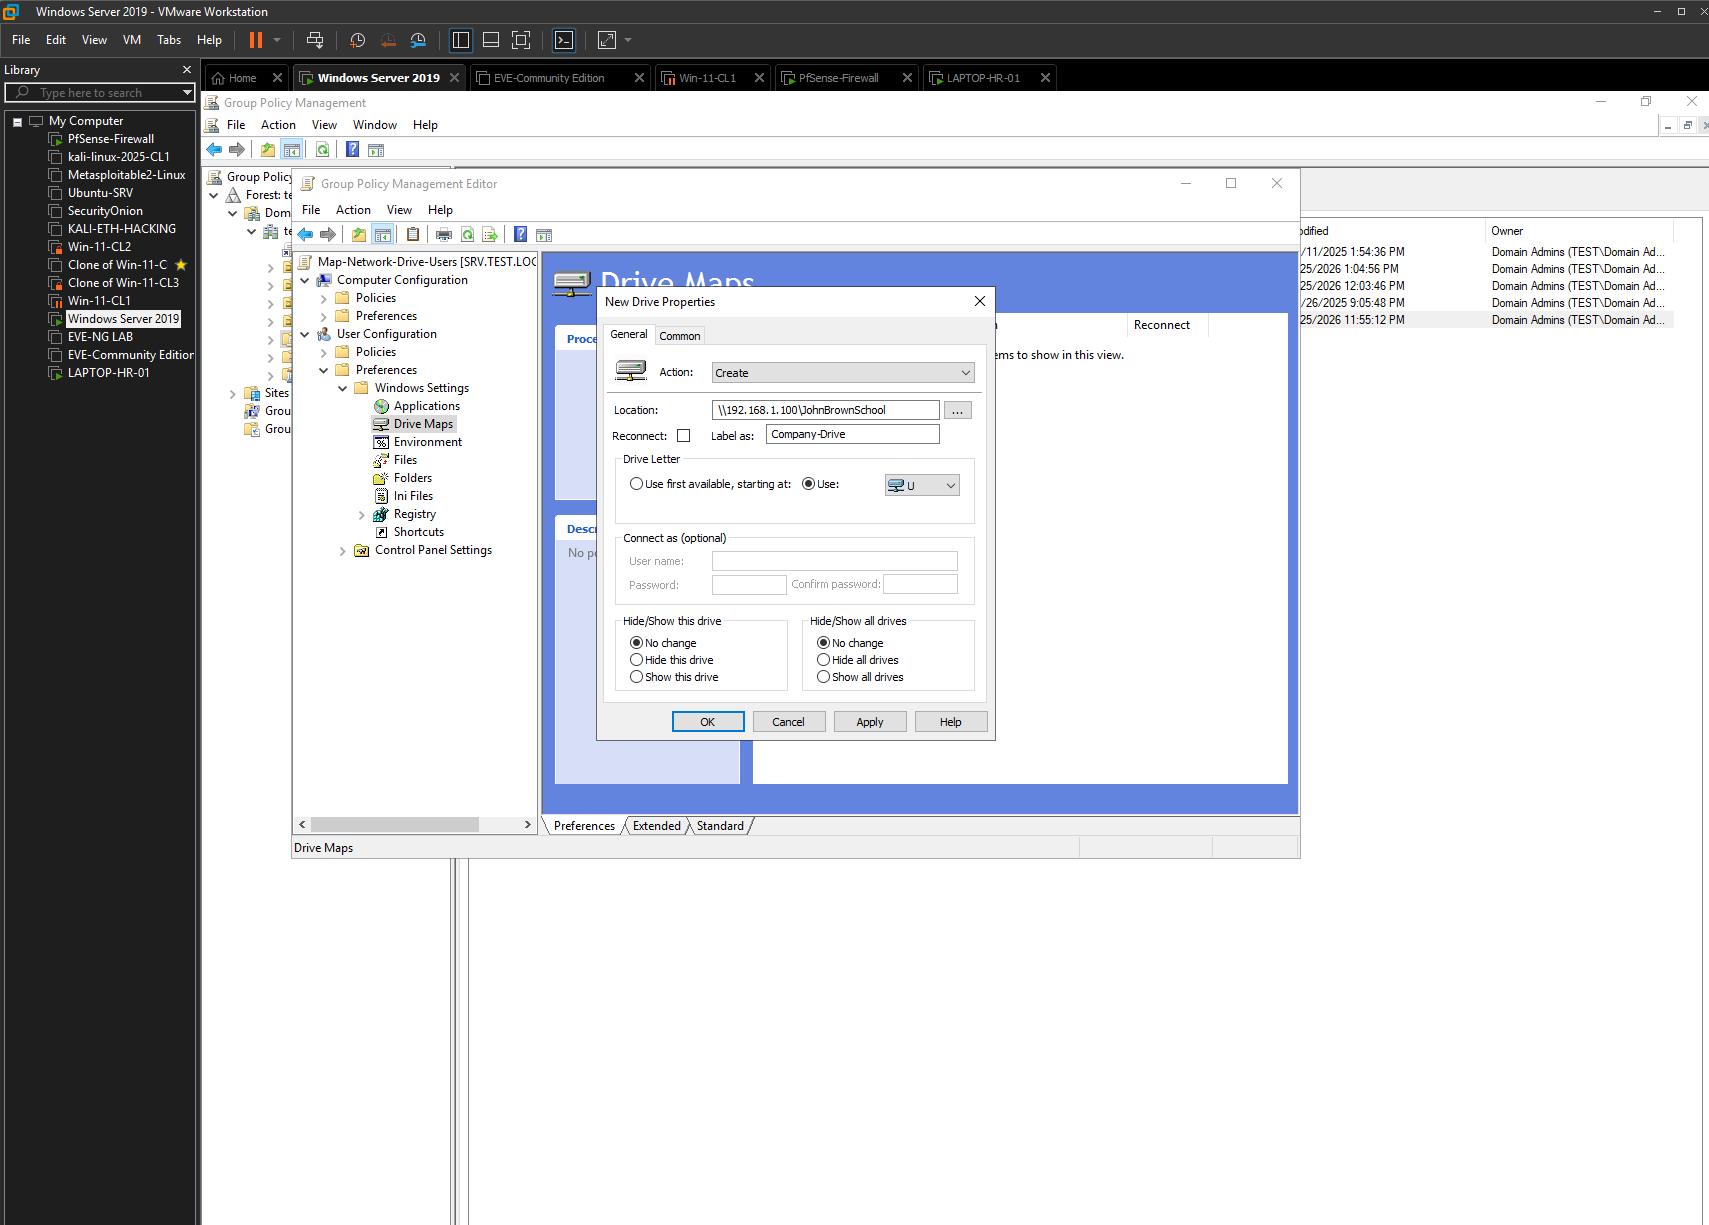
Figure 22 — Company-Drive GPO properties.
The drive-map preference defines the share location, Company-Drive label and assigned drive letter. This is the configuration that is delivered automatically to client users.
The lab screenshot uses the server’s IP address in the UNC path. For a production environment, I would prefer a DNS-based path such as \SRV.test.local\JohnBrownSchool so the policy is not tied to one IP address.
9.4 Reviewing Existing GPO Inheritance
Before adding the new drive-map policy to the JohnBrownSchool OU, I reviewed the existing Group Policy inheritance. The OU already received the deploy-wallpaper policy and the inherited Default Domain Policy.
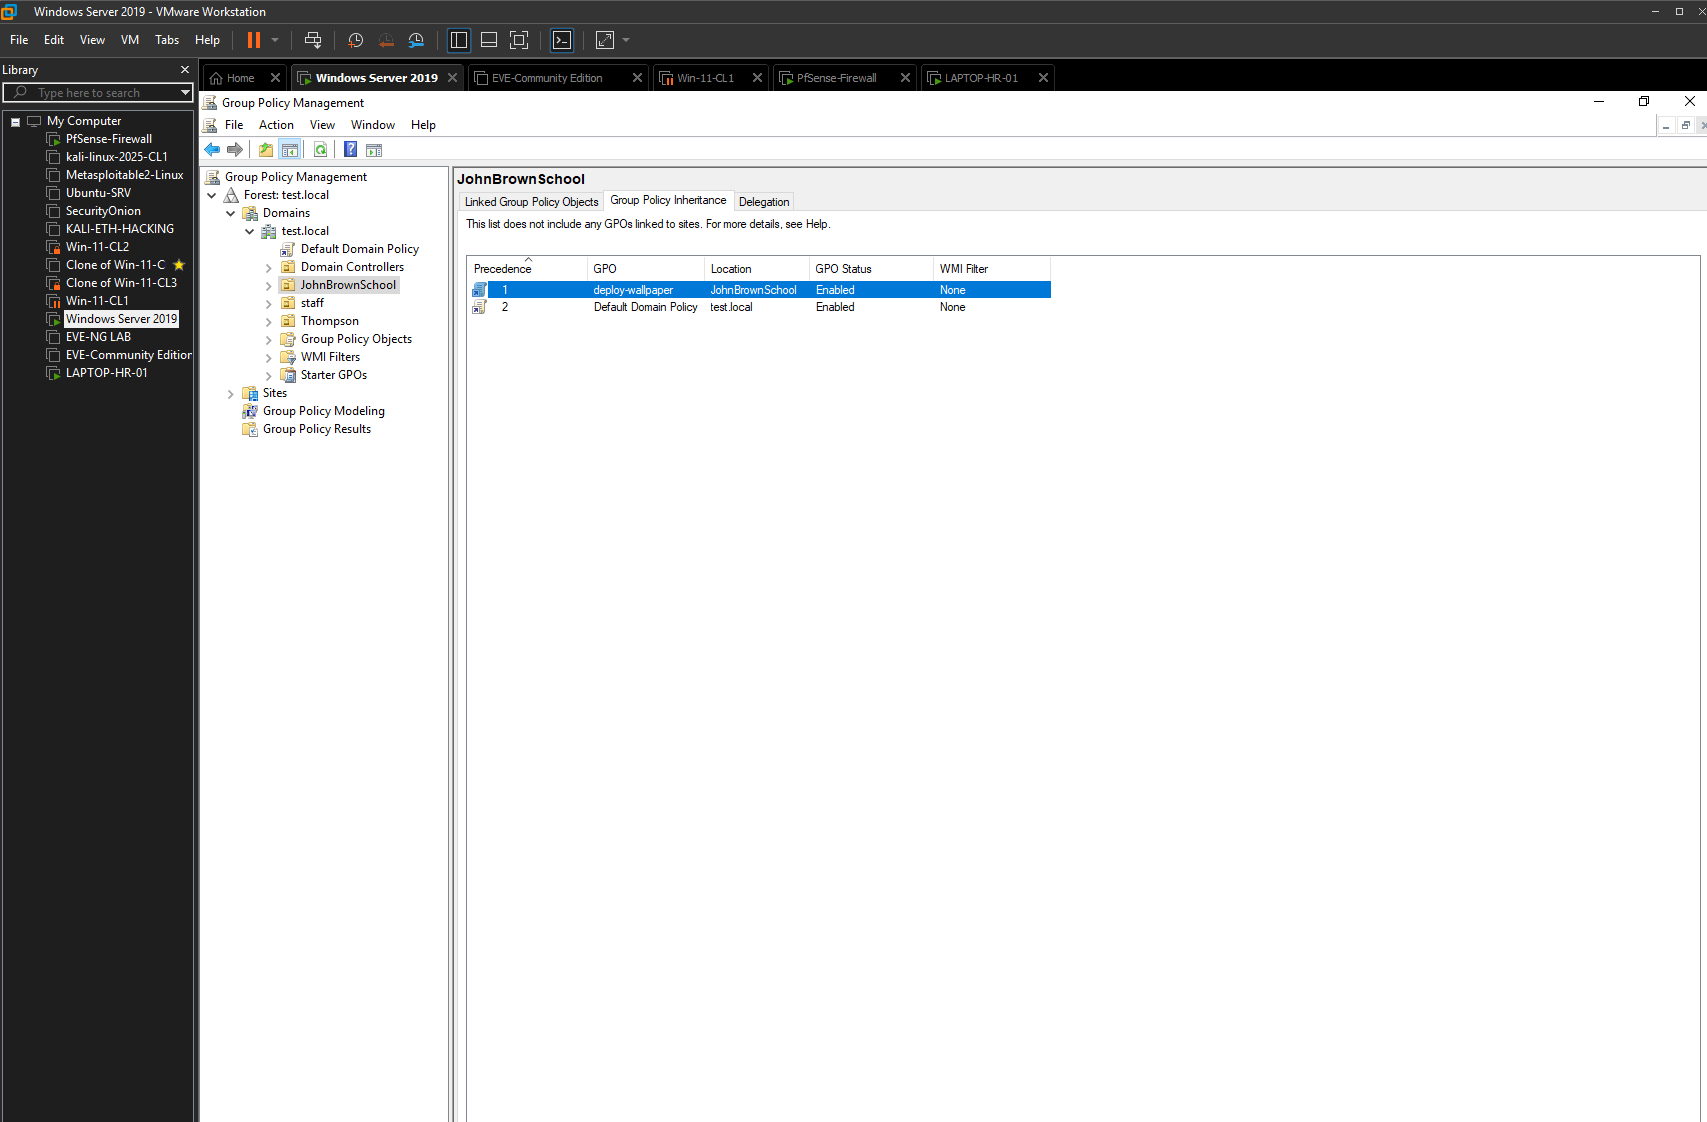
Figure 23 — GPO inheritance before drive-map deployment.
The JohnBrownSchool OU shows the existing policy set before Map-Network-Drive-Users is linked.
9.5 Linking the Drive-Mapping GPO
I linked Map-Network-Drive-Users to the JohnBrownSchool OU and verified that the link was enabled.
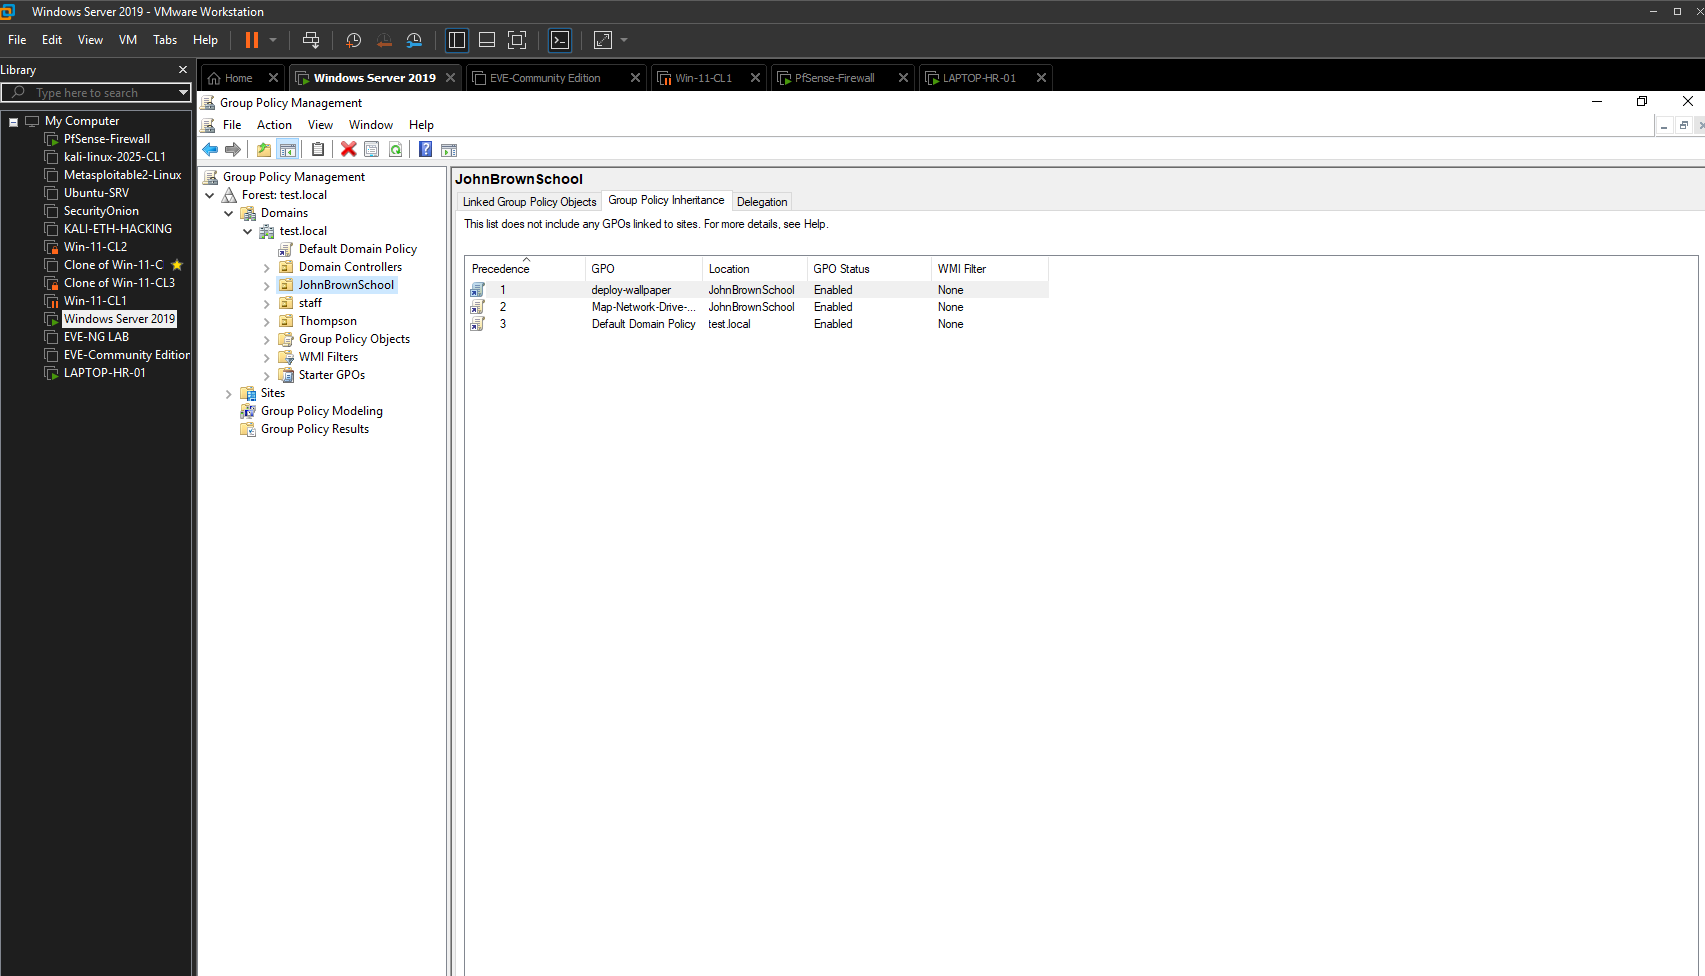
Figure 24 — Drive-map GPO linked.
The JohnBrownSchool OU now includes Map-Network-Drive-Users along with the existing policies, placing the drive-mapping configuration in the user’s policy scope.
Phase 7 — Group Policy Processing and Troubleshooting
10.1 Checking Policy Results Before Refresh
On LAPTOP-HR-01, I ran:
gpresult /r
The initial result showed the existing deploy-wallpaper GPO but did not yet list Map-Network-Drive-Users.
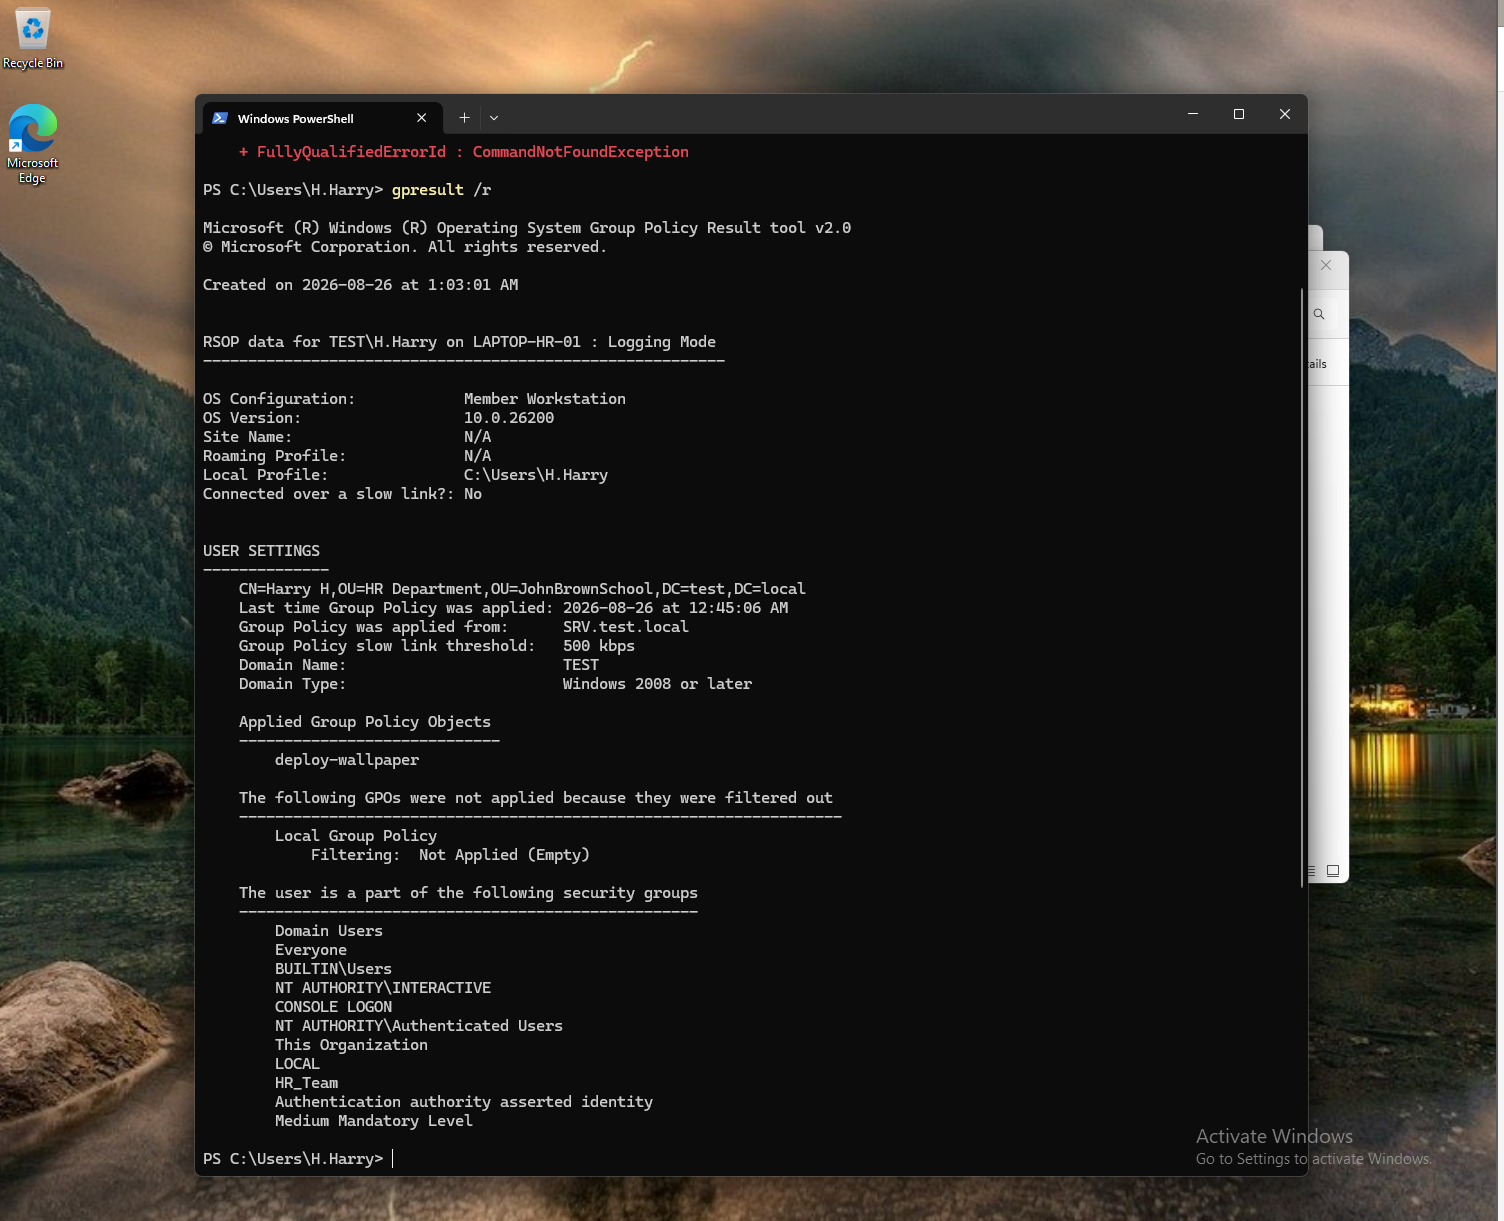
Figure 25 — Policy result before refresh.
gpresult confirms Harry H’s user context and shows that the new drive-map policy had not yet been processed.
10.2 Forcing a Group Policy Update
I forced both computer and user policy processing with:
gpupdate /force
After the update completed successfully, I ran:
gpresult /r
again. The refreshed output now listed Map-Network-Drive-Users under Applied Group Policy Objects and also showed Harry’s HR_Team group membership.
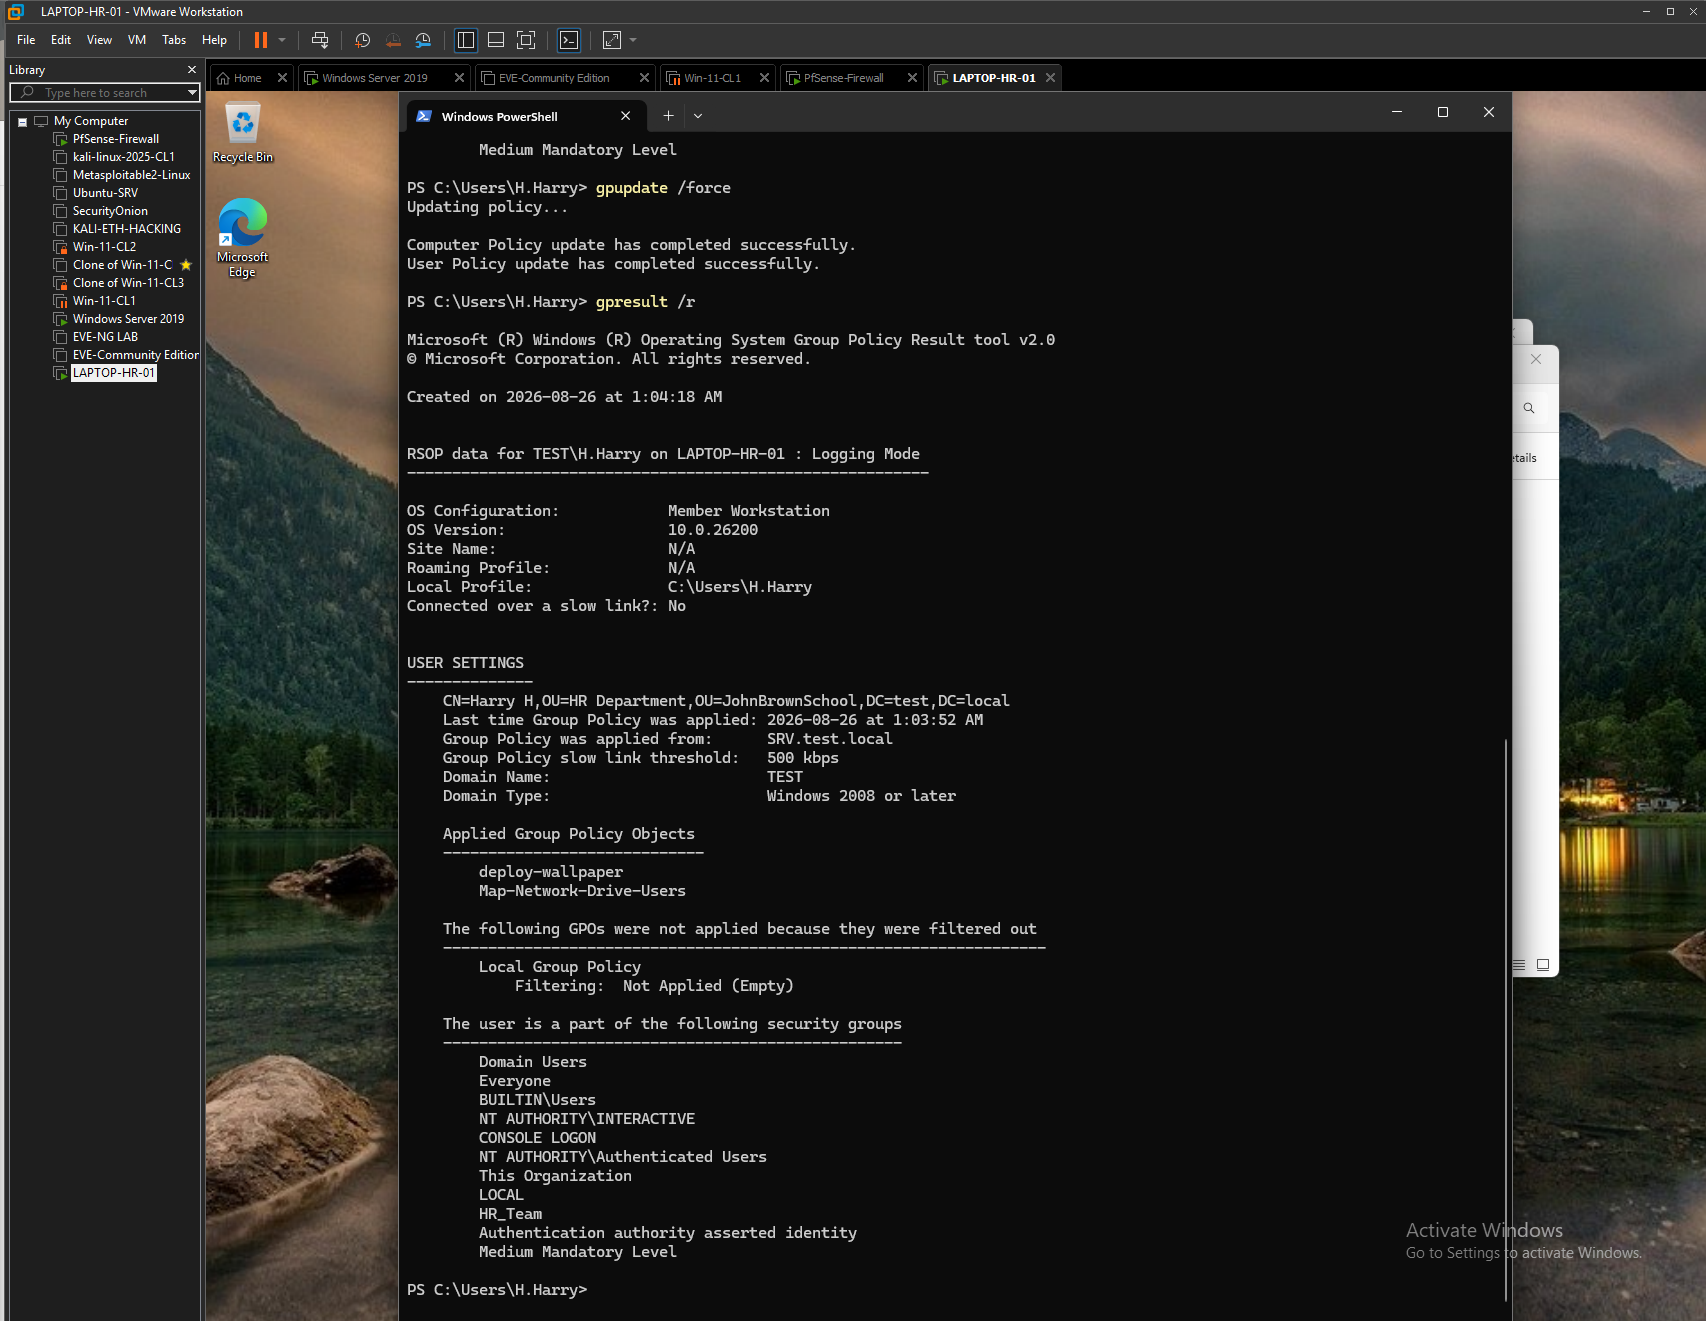
Figure 26 — Group Policy refresh and verification.
gpupdate reports successful policy updates, and gpresult confirms that Map-Network-Drive-Users is now applied to Harry’s session.
This was an important troubleshooting step. Rather than assuming the policy would immediately appear, I verified the Resultant Set of Policy from the actual user workstation.
10.3 Validating Automatic Drive Deployment
After policy processing, Company-Drive appeared automatically under Network Locations in This PC.
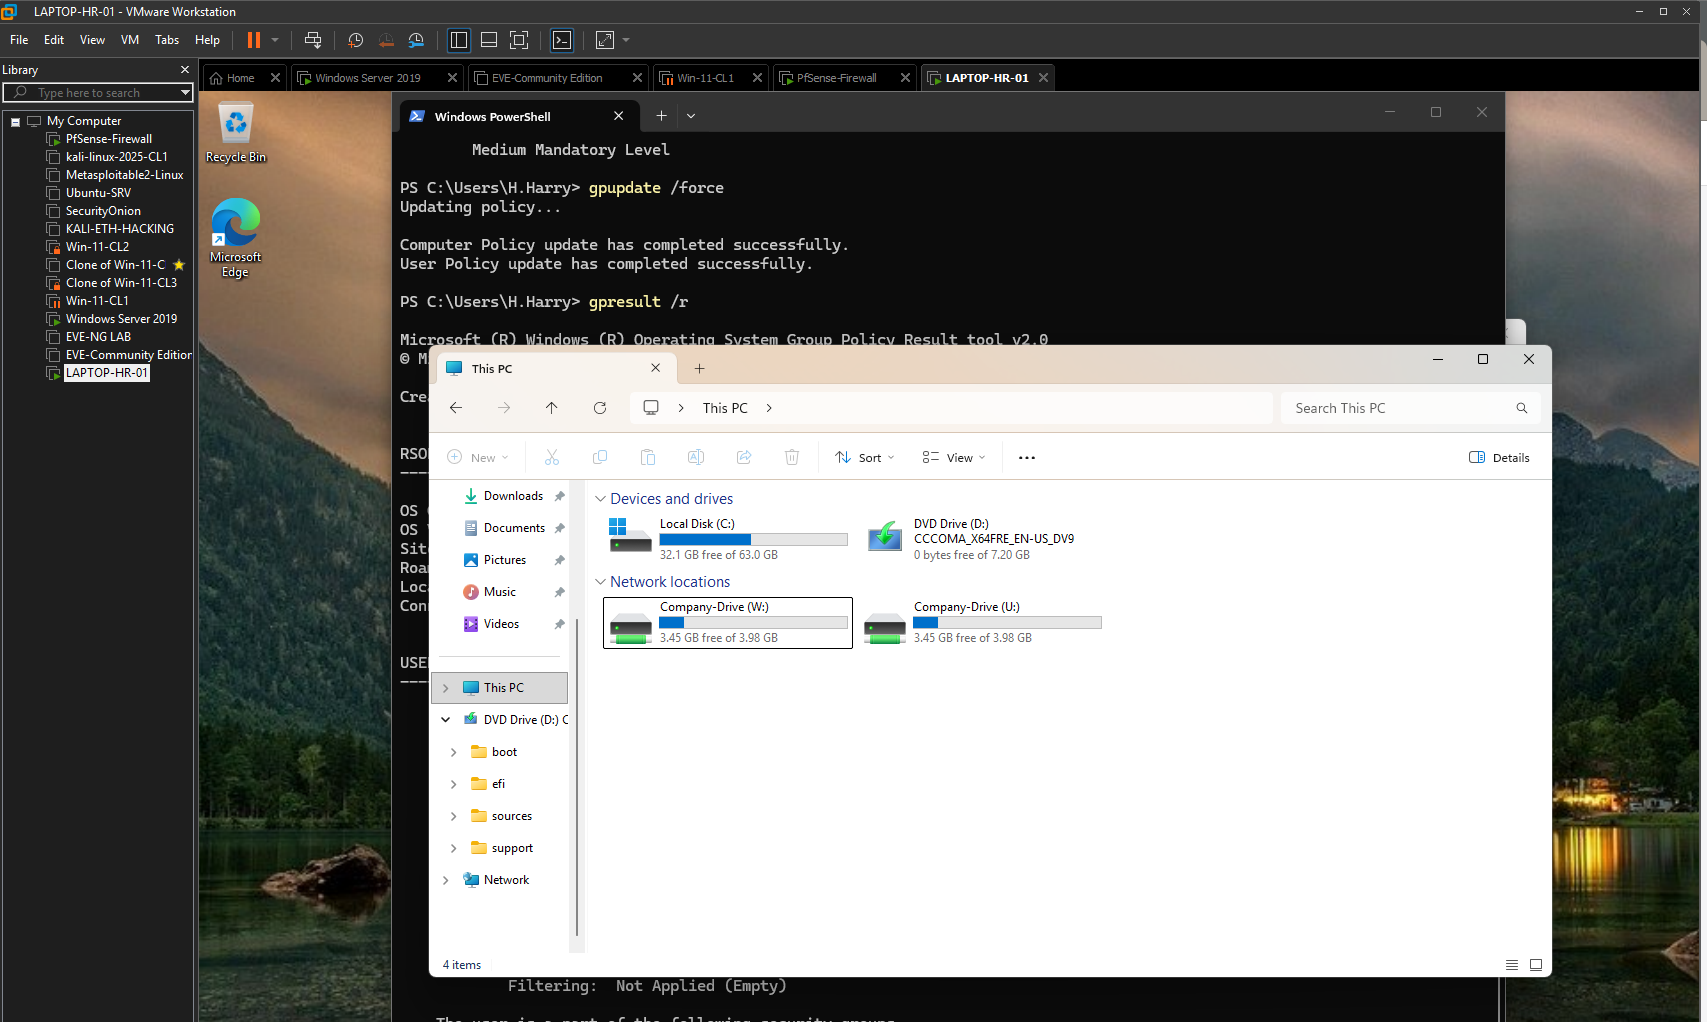
Figure 27 — Company-Drive deployed by Group Policy.
The mapped network drive is present on LAPTOP-HR-01 after the GPO is applied, validating automated user access.
Phase 8 — Access-Based Enumeration
11.1 Company Drive Before Access-Based Enumeration
Before Access-Based Enumeration was enabled, Harry could see all department folders in Company-Drive even though NTFS permissions prevented him from opening unauthorized folders.
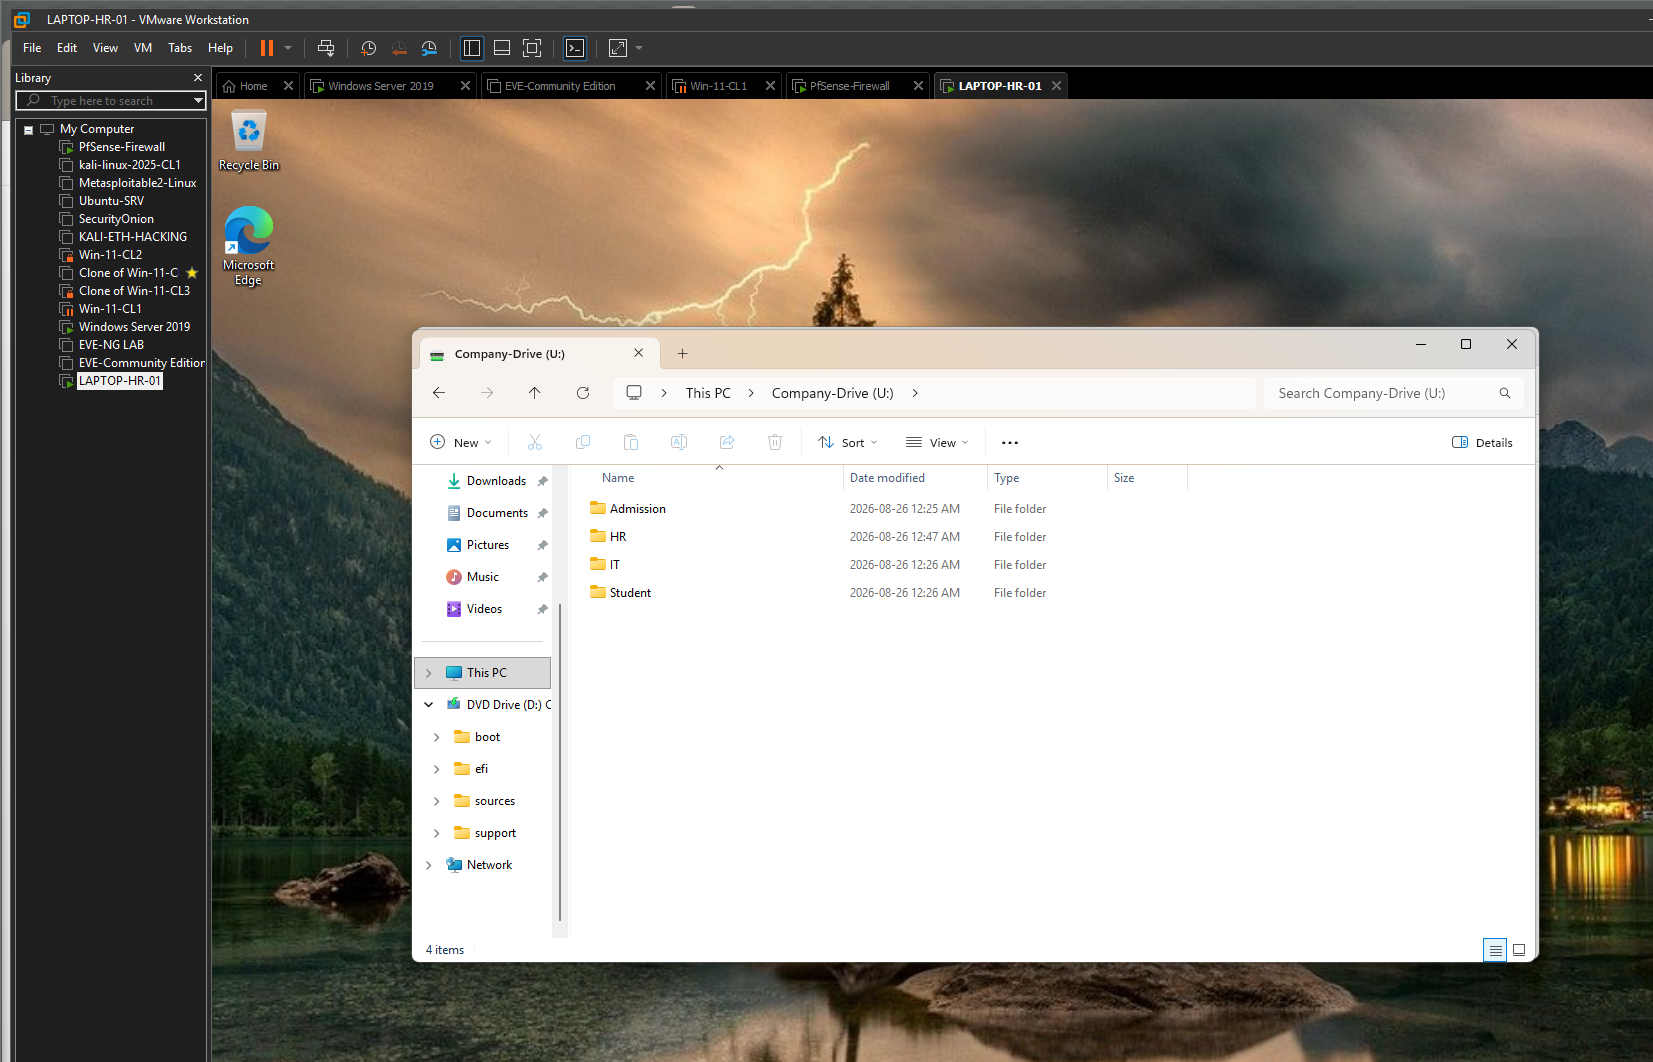
Figure 28 — Company-Drive before ABE.
Admission, HR, IT and Student folders are all visible to the HR user. Unauthorized folders are visible even though access is blocked by NTFS permissions.
11.2 Verifying the SMB Share in Server Manager
I reviewed the JohnBrownSchool share through Server Manager → File and Storage Services → Shares to confirm the server-side SMB configuration and the U:\JohnBrownSchool path.
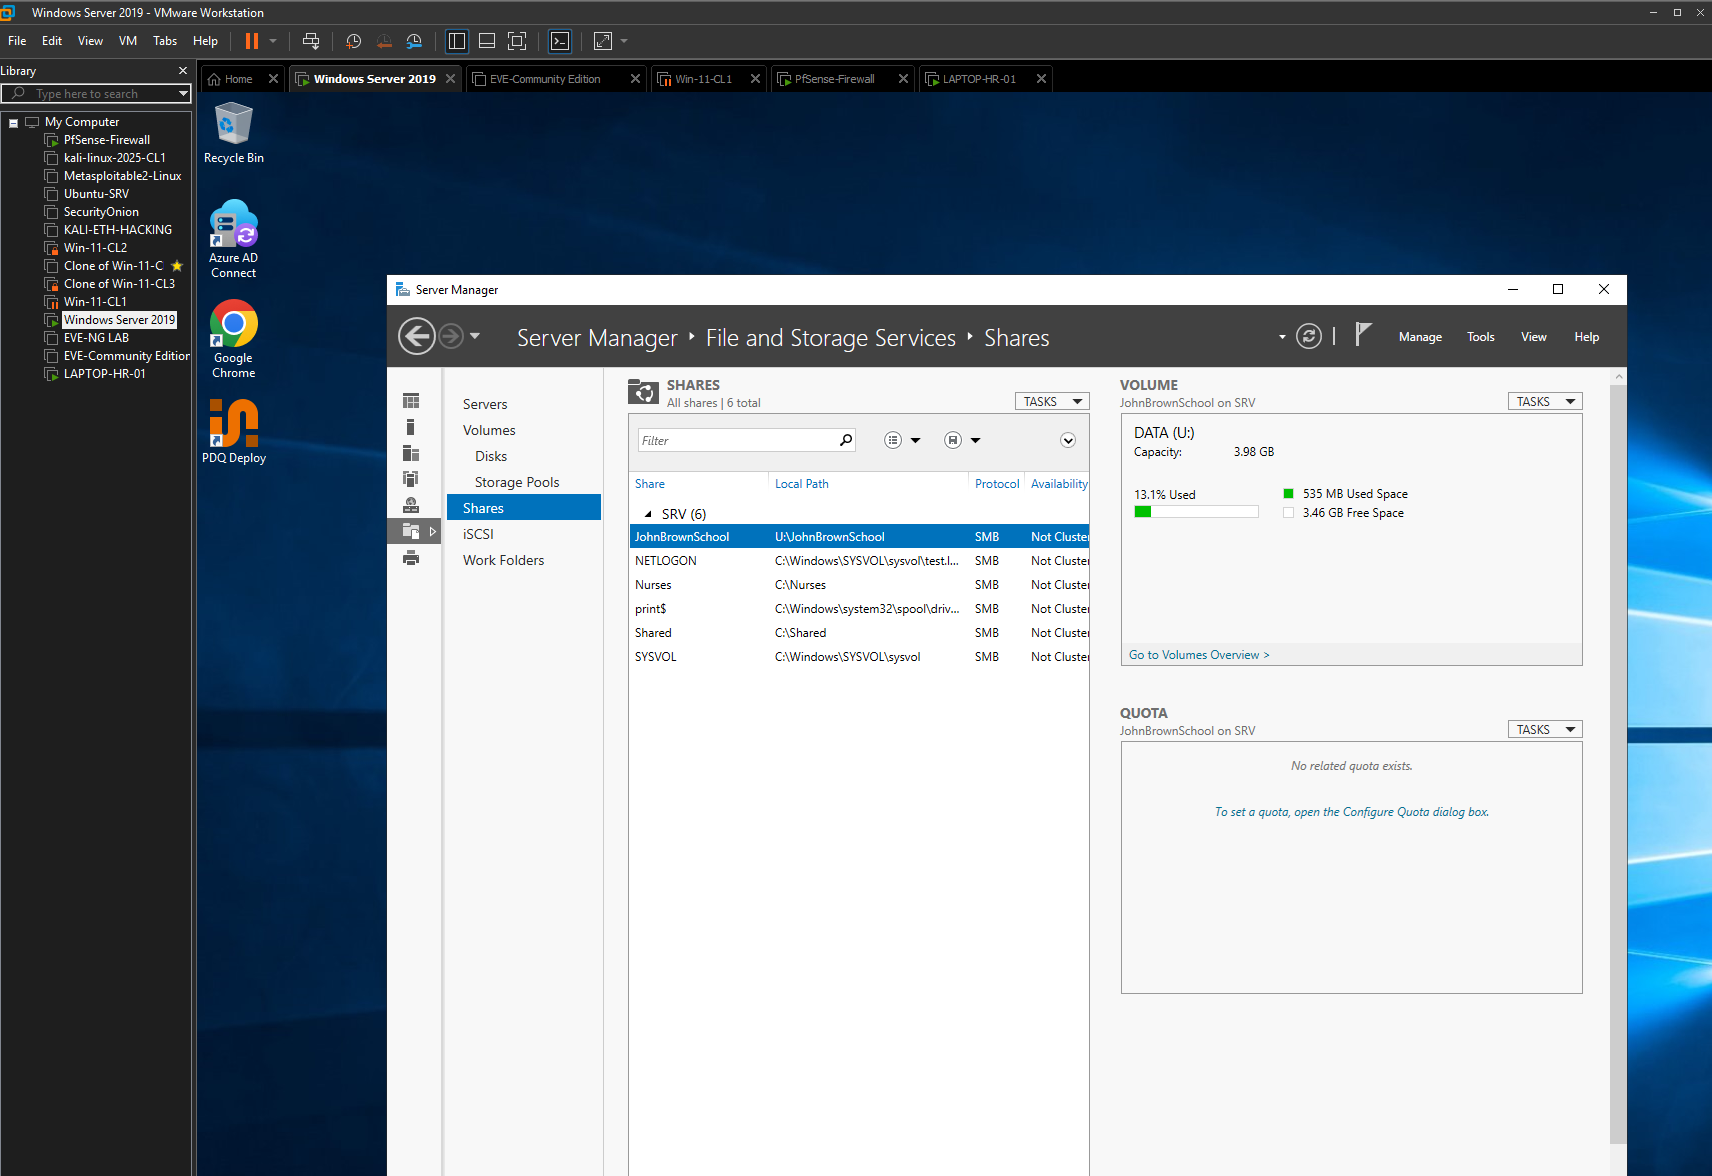
Figure 29 — Server Manager share verification.
JohnBrownSchool is listed as an SMB share on the DATA (U:) volume, confirming the centralized file-service configuration.
11.3 Enabling Access-Based Enumeration
I enabled Access-Based Enumeration in the JohnBrownSchool share settings. ABE uses the user’s permissions to determine which files and folders are shown in a shared folder.
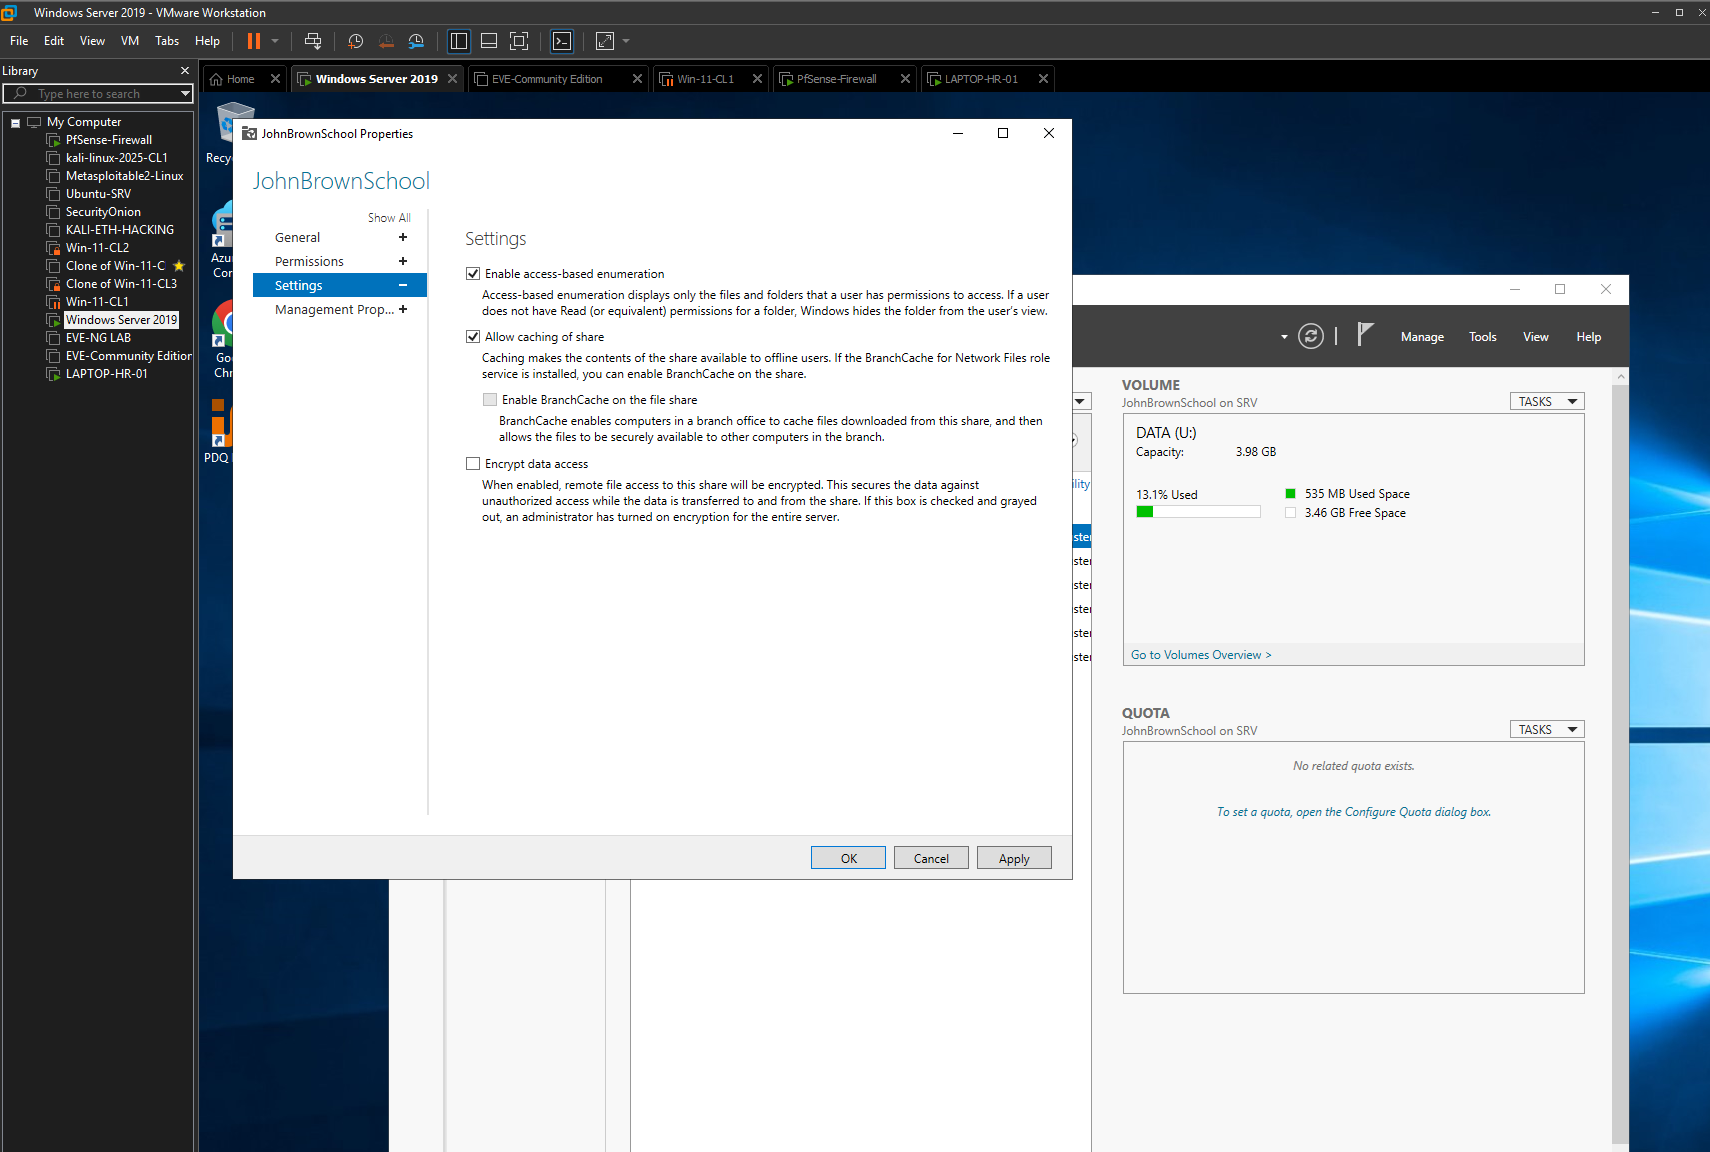
Figure 30 — Access-Based Enumeration enabled.
The share settings show Enable access-based enumeration selected, adding permission-aware visibility to the network share.
11.4 Validating the HR User Experience After ABE
After enabling ABE, Harry opened Company-Drive again. Only the HR folder was visible.
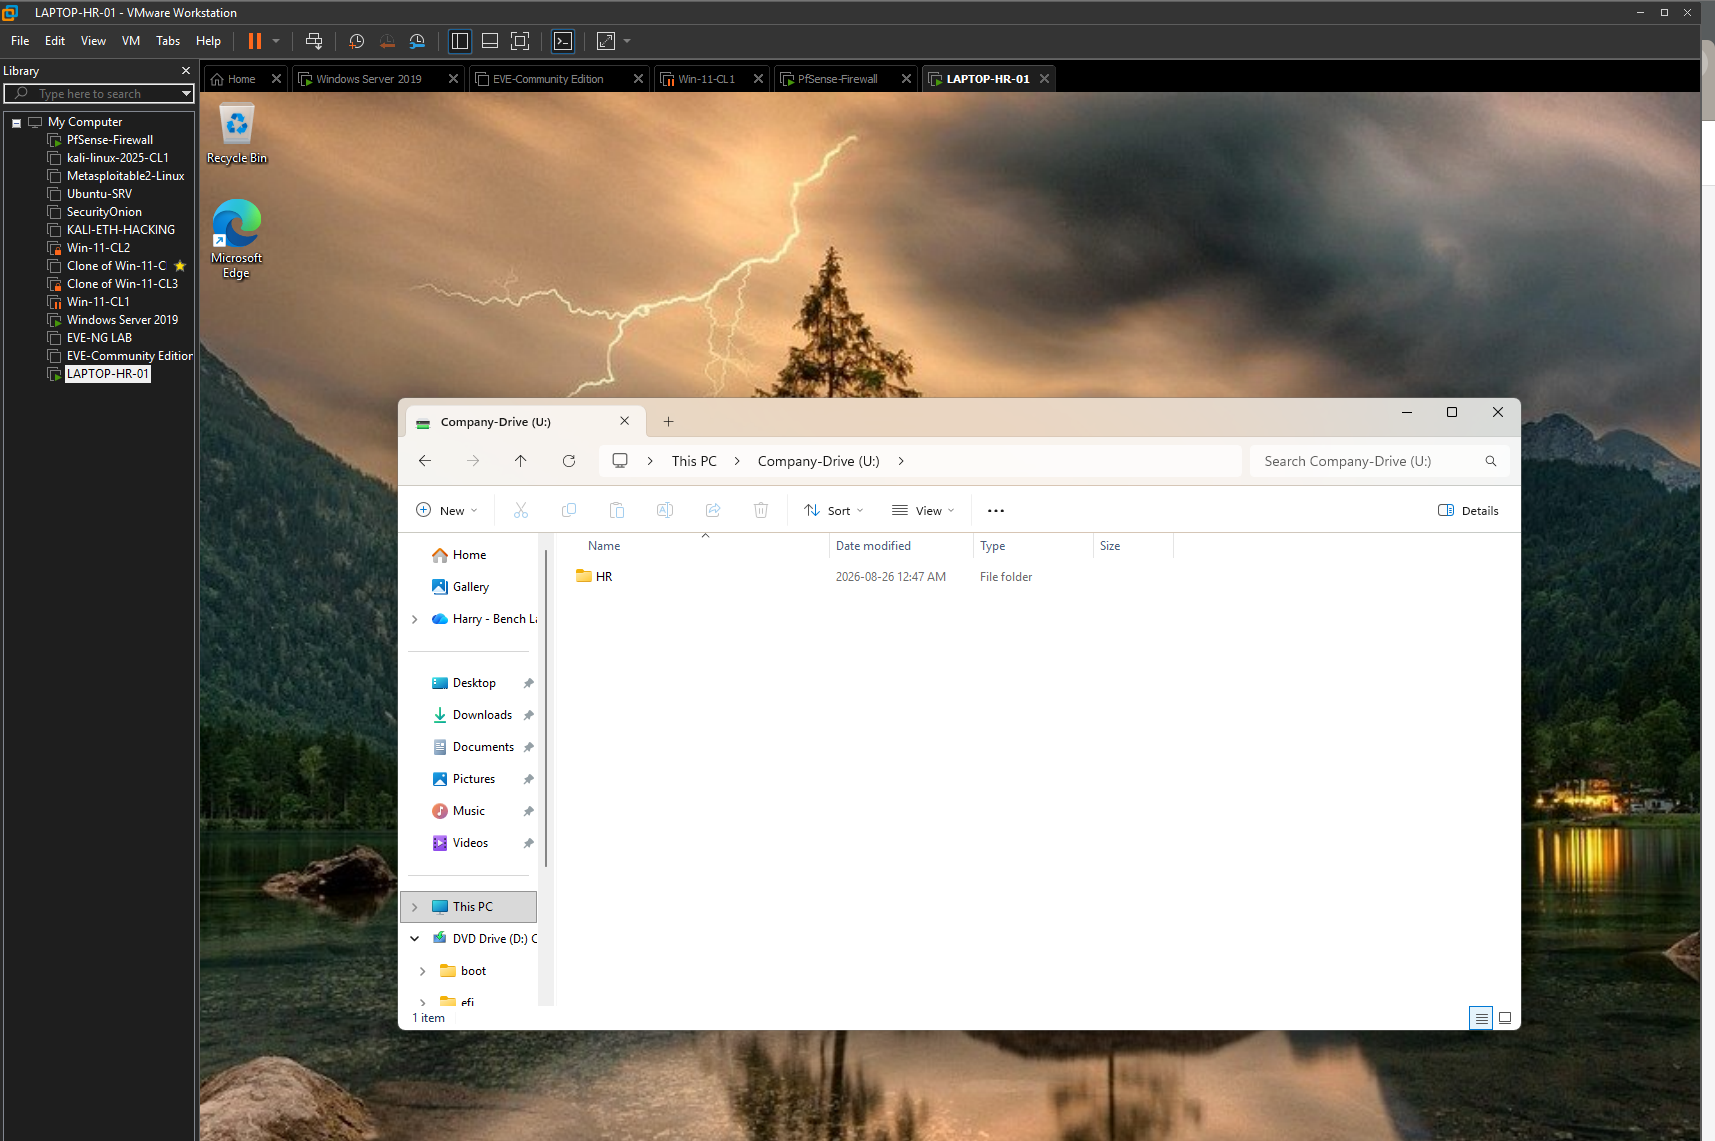
Figure 31 — HR-only company-drive view.
The HR user now sees only the HR department folder. Admission, IT and Student are no longer displayed because Harry lacks permission to those resources.
This validates two separate controls working together:
NTFS permissions enforce actual authorization.
Access-Based Enumeration improves the user experience by hiding resources the user cannot access.
Phase 9 — Volume Shadow Copy and File Recovery
12.1 Reviewing the Initial Shadow Copy State
I opened the DATA (U:) volume properties and selected Shadow Copies. The initial configuration showed Shadow Copies disabled for the data volume.
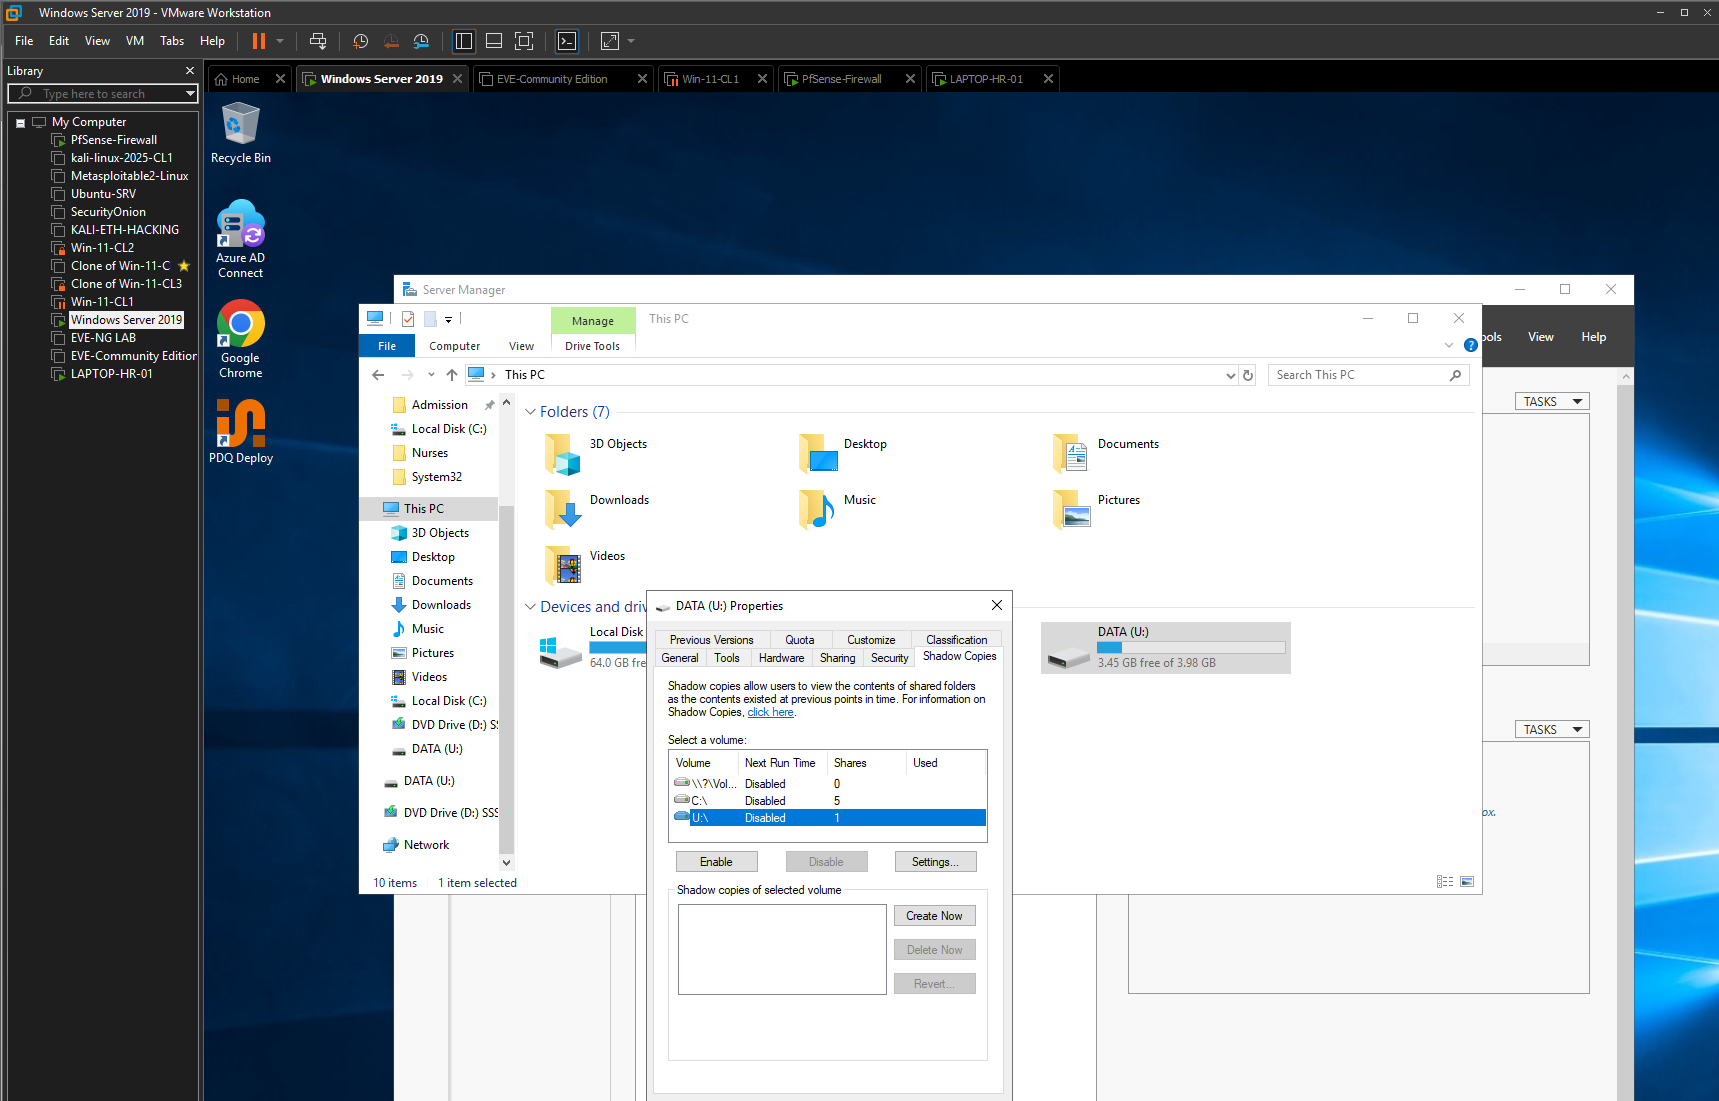
Figure 32 — Shadow Copies initially disabled.
The U: volume is selected before point-in-time recovery is configured.
12.2 Configuring a Recurring Snapshot Schedule
I configured a recurring weekday schedule for Shadow Copies. The schedule was set to create snapshots Monday through Friday at 7:00 AM.
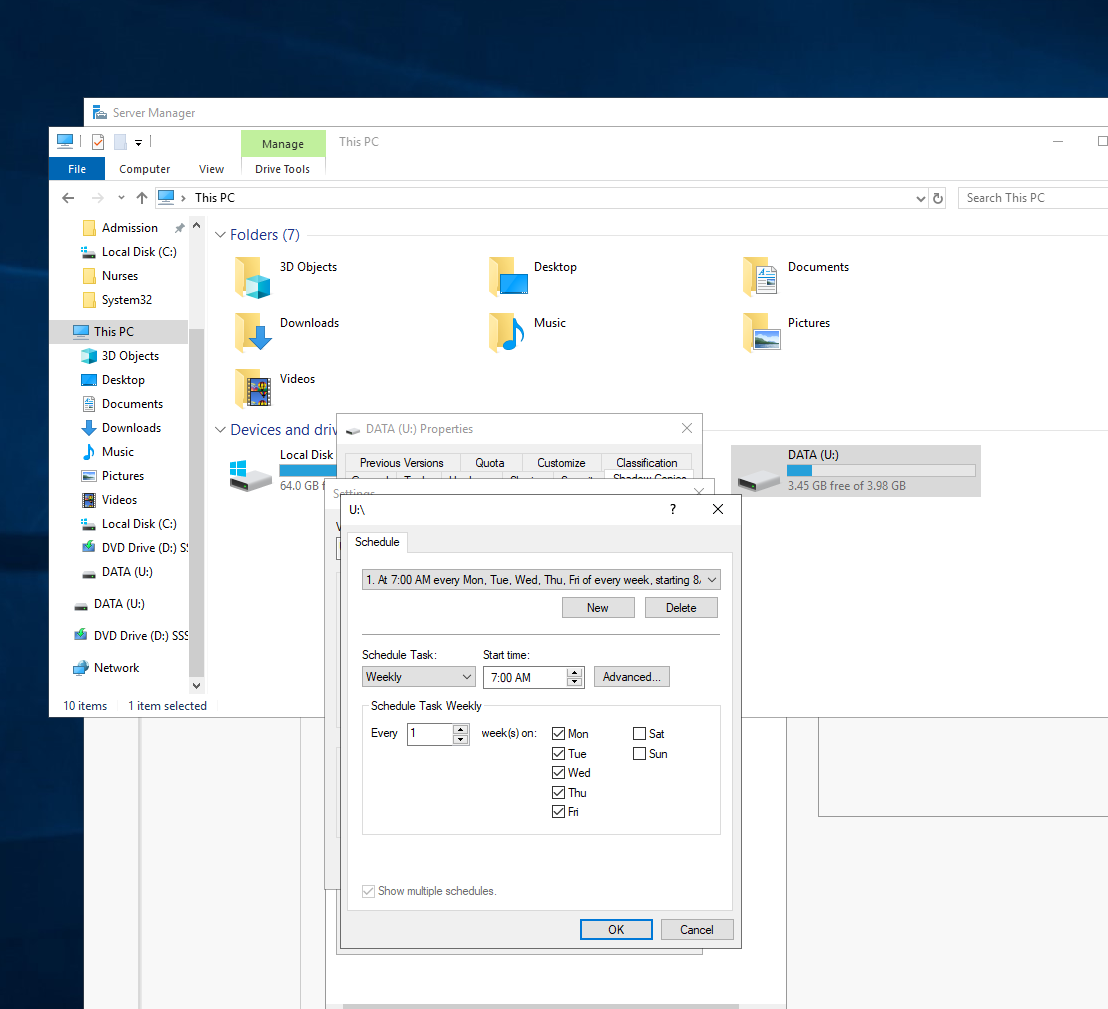
Figure 33 — Shadow Copy schedule.
A recurring weekday schedule is configured so the server automatically maintains point-in-time versions of the shared data.
12.3 Creating and Verifying the Snapshot
After enabling Shadow Copies, the DATA volume showed an available snapshot.
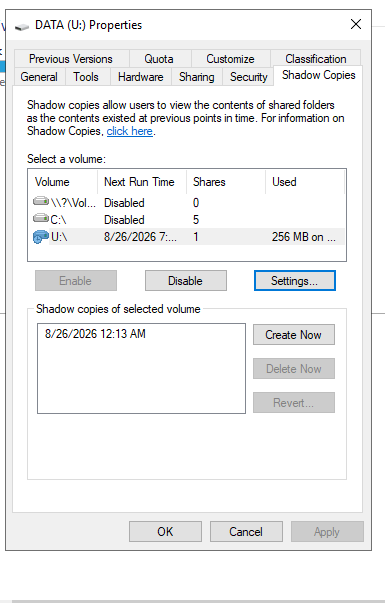
Figure 34 — Shadow Copy snapshot created.
The U: volume now has an available point-in-time snapshot, confirming that the recovery feature is active.
12.4 Confirming Previous Versions Availability
On the HR folder, I opened Properties → Previous Versions and confirmed that Windows exposed a recoverable earlier version of the folder.
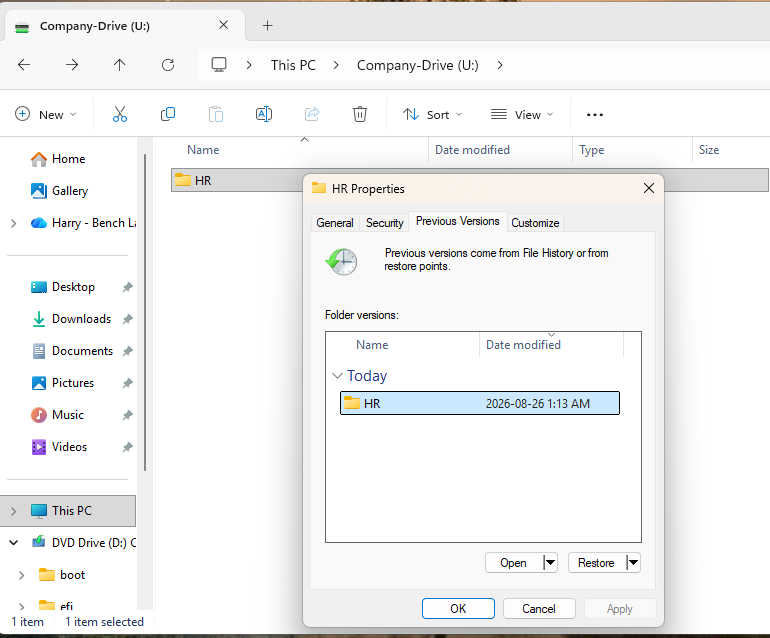
Figure 35 — HR Previous Version available.
The HR folder shows a point-in-time version created from the Shadow Copy snapshot.
Phase 10 — Simulated Accidental Deletion and Recovery
13.1 Establishing the Pre-Deletion State
Before deleting anything, I captured the HR folder with four objects: New folder, New Text Document, test1 and test2.
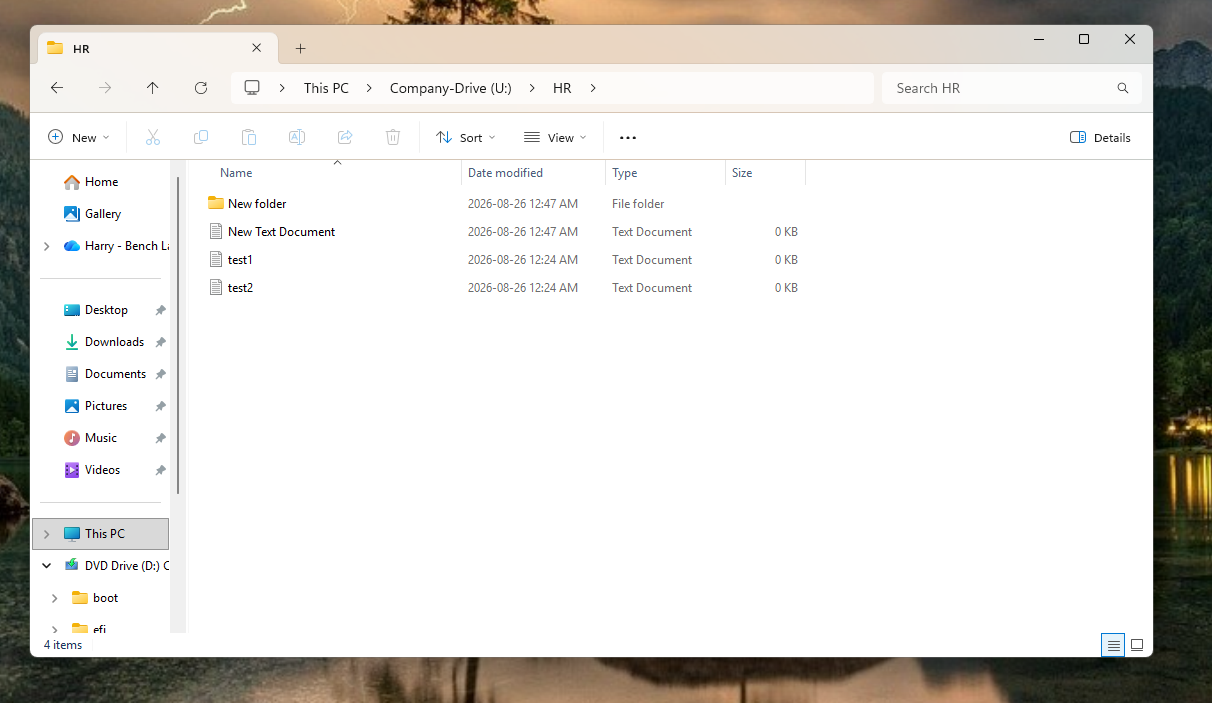
Figure 36 — HR folder before deletion.
The live folder contains four objects and establishes the baseline for the recovery test.
13.2 Simulating User File Deletion
I removed test1 and test2 from the live HR folder. Only New folder and New Text Document remained.
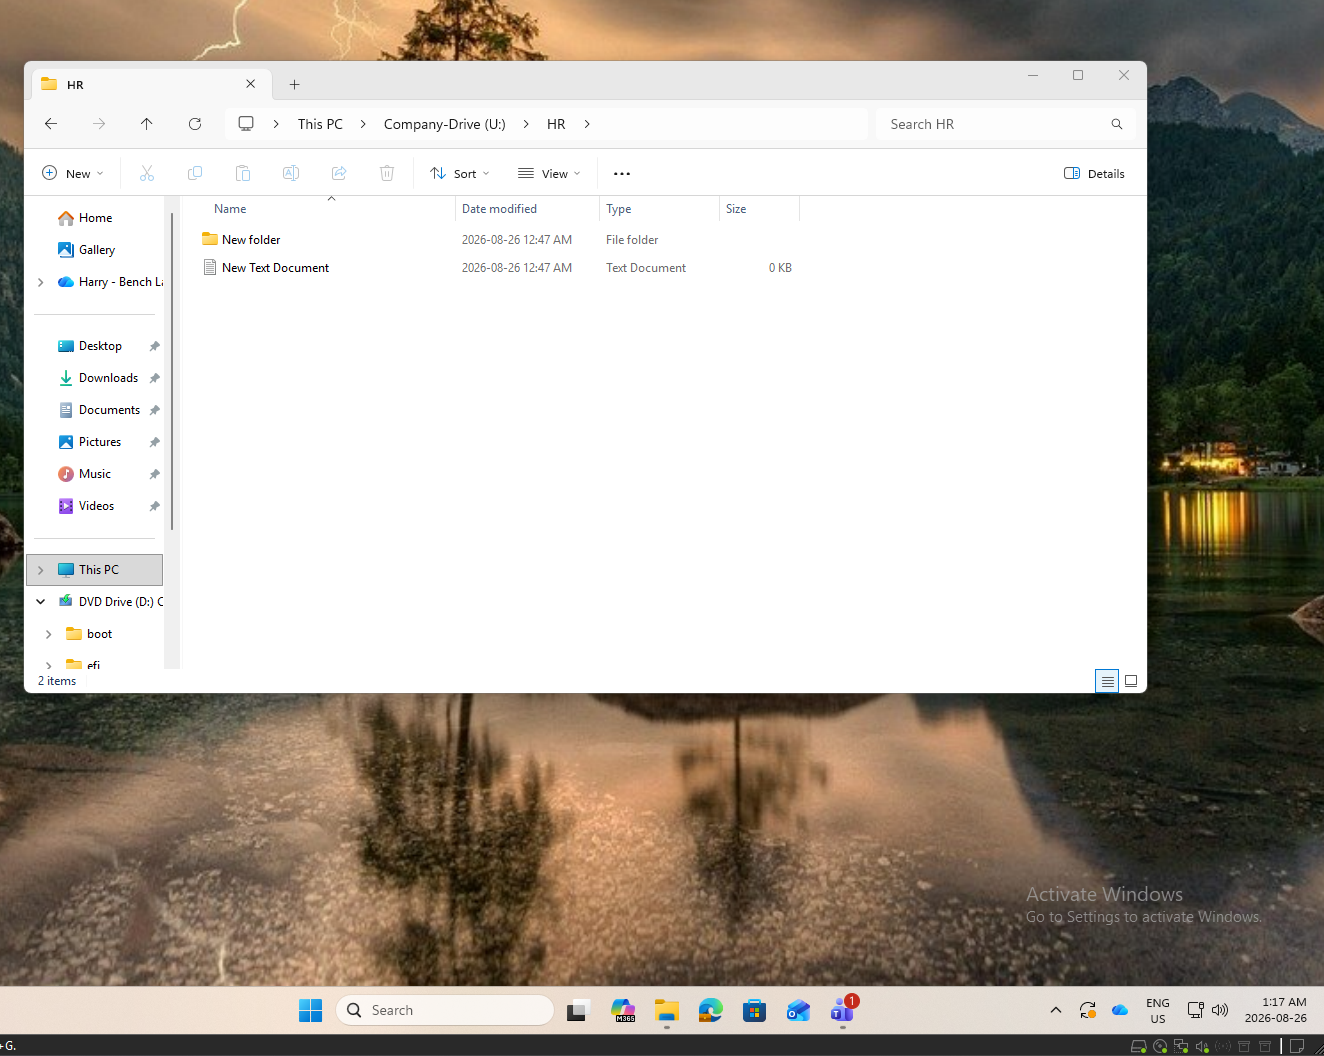
Figure 37 — HR folder after deletion.
test1 and test2 are no longer present in the current folder, simulating accidental user deletion from centralized shared storage.
13.3 Comparing the Live Folder with the Previous Version
I opened the earlier Shadow Copy version of the HR folder while the current live folder remained visible. The Previous Version still contained test1 and test2 even though they had been deleted from the current folder.
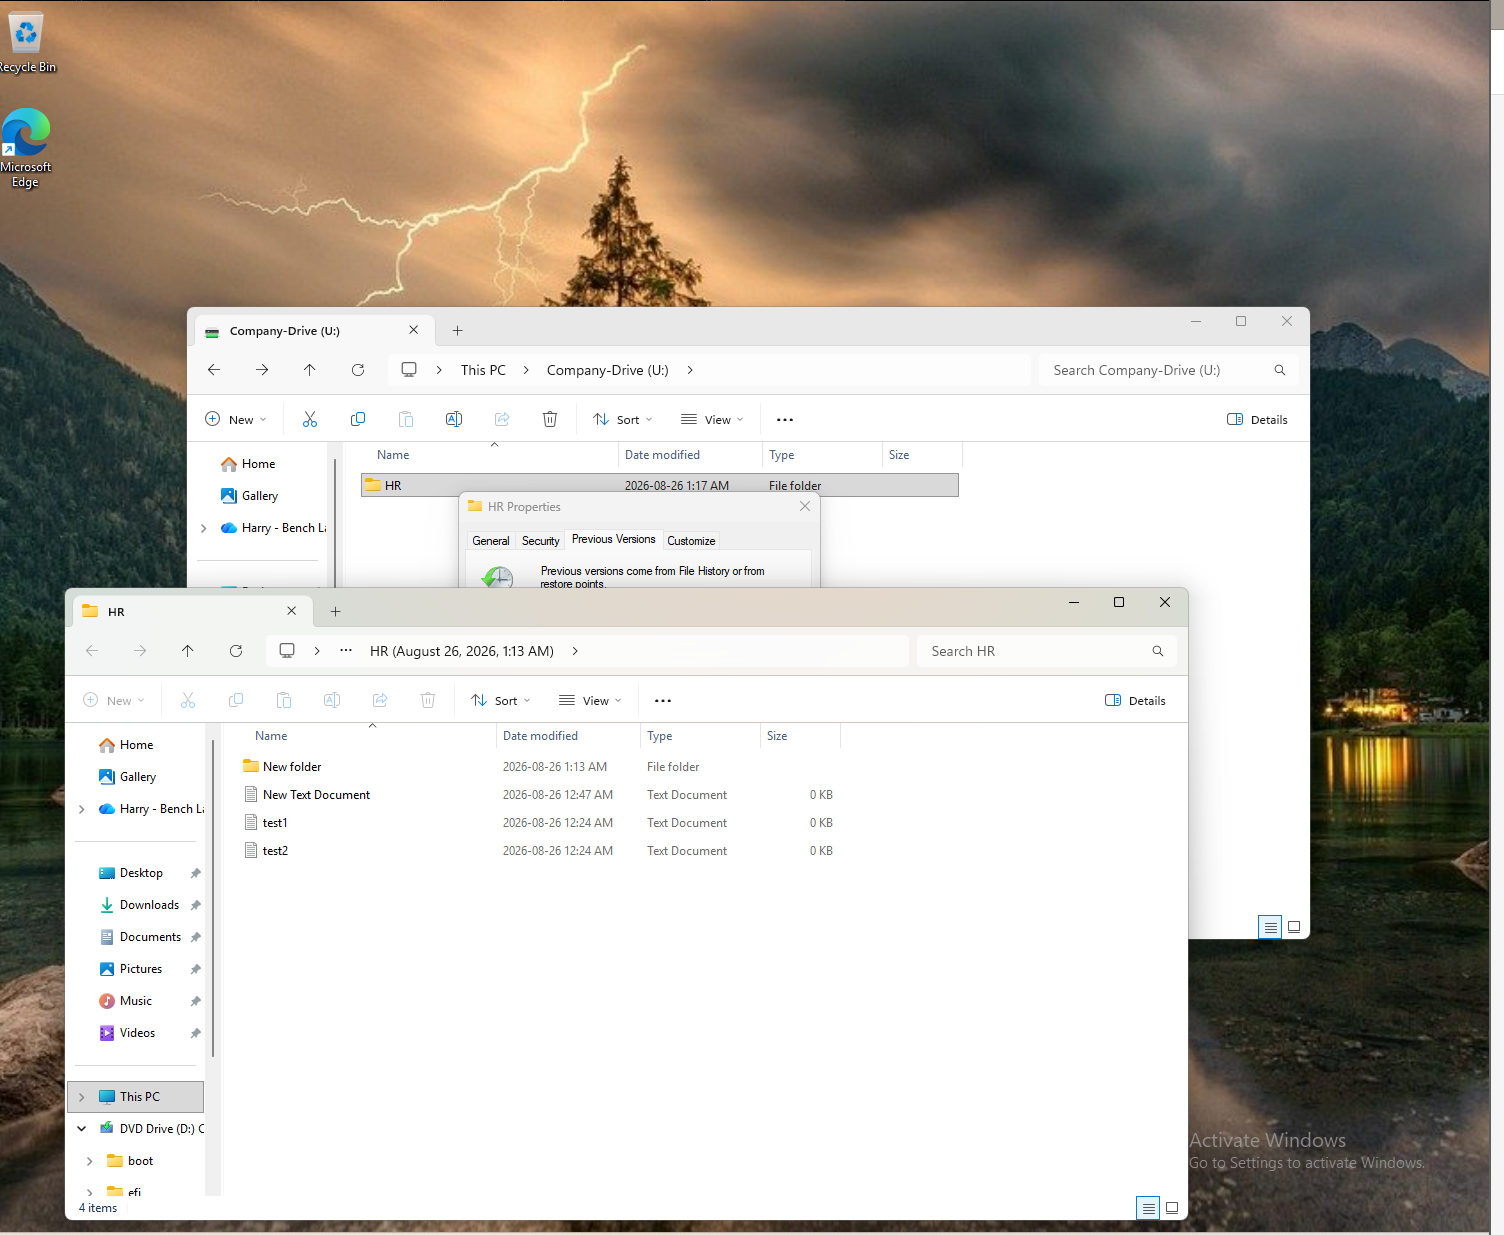
Figure 38 — Current versus previous HR folder.
The current Company-Drive\HR folder is missing test1 and test2, while the Shadow Copy version retains the original files. This directly validates point-in-time recoverability.
13.4 Restoring the Deleted Files
I restored the deleted test files back to the live HR folder. The final view shows test1 and test2 present again alongside the other HR content.
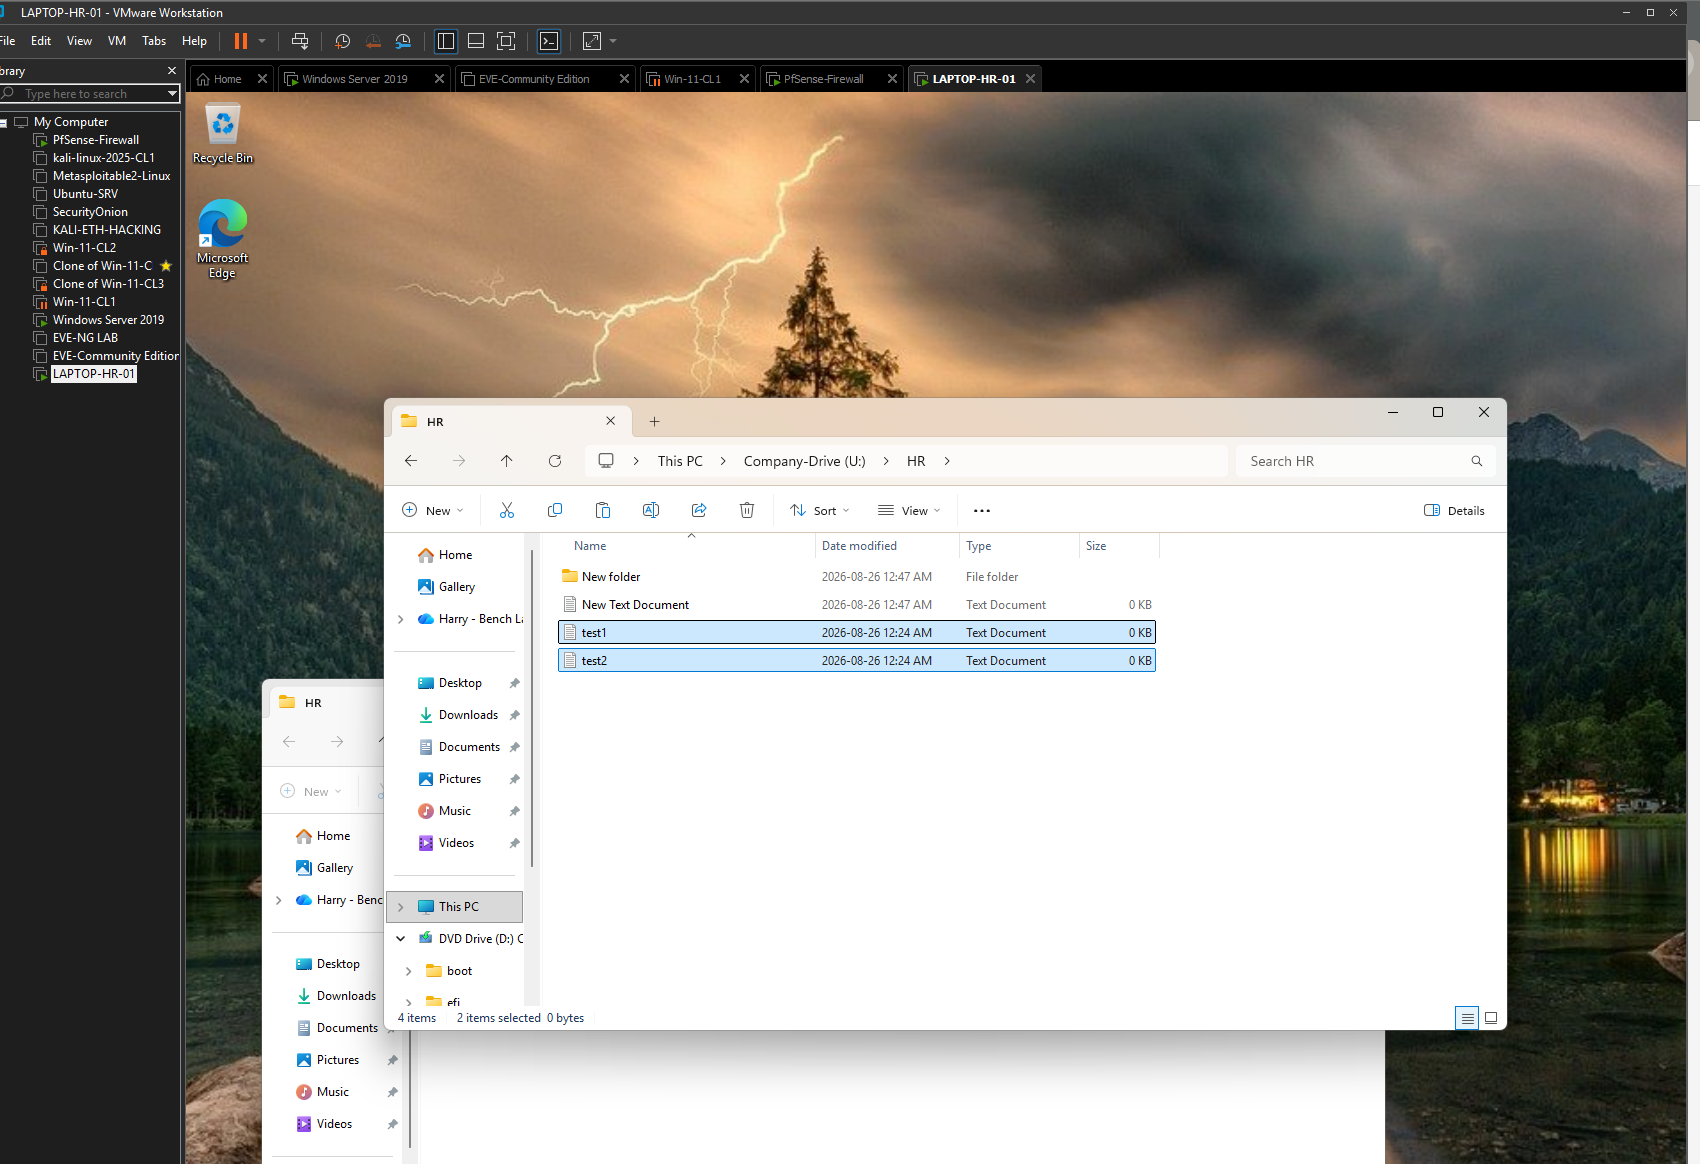
Figure 39 — Restored files visible in the live folder.
test1 and test2 are present again in Company-Drive\HR, completing the file-recovery validation.
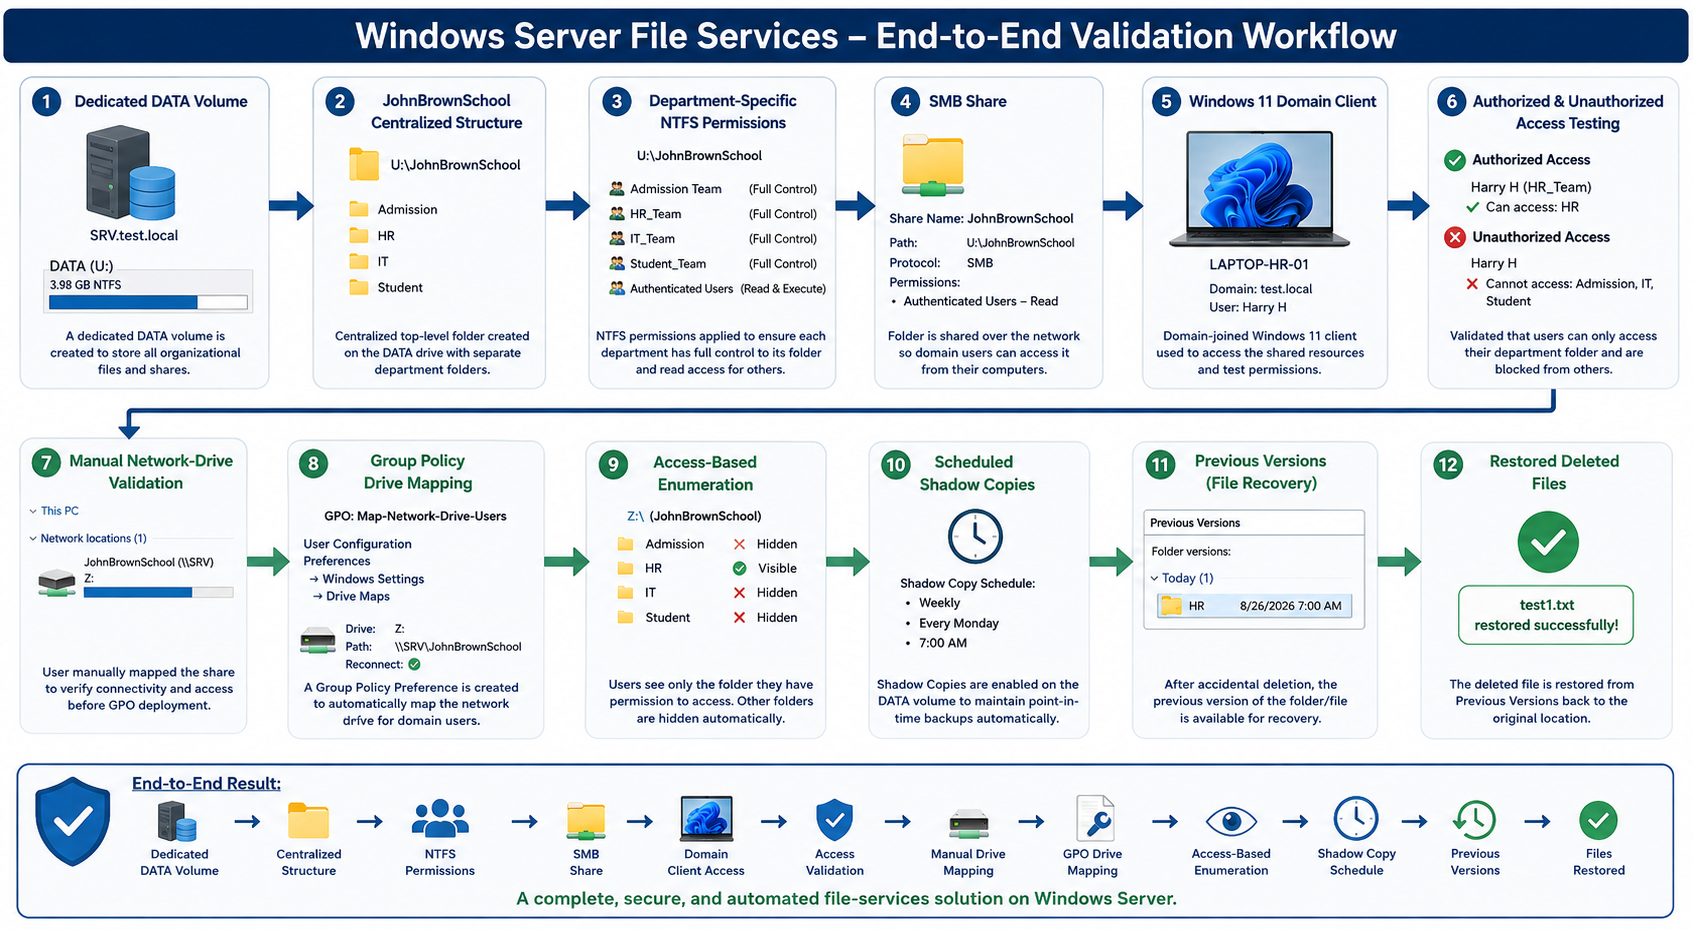
End-to-End Validation
The completed workflow demonstrated a full Windows Server file-services path:
Dedicated DATA volume
→ JohnBrownSchool centralized folder structure
→ Department-specific NTFS permissions
→ SMB share
→ Windows 11 domain client
→ Authorized and unauthorized access testing
→ Manual network-drive validation
→ Group Policy drive mapping
→ Access-Based Enumeration
→ Scheduled Shadow Copies
→ Previous Versions
→ Restored deleted files
Troubleshooting and Administrative Learning
This lab involved multiple layers of Windows access control, which made validation important at every stage.
The first troubleshooting lesson was the difference between connectivity and authorization. The HR workstation could successfully browse the file server and see the JohnBrownSchool share, proving that SMB connectivity was working. However, Harry received access-denied errors when opening Admission and Student. This demonstrated that network reachability does not automatically mean authorization.
The second lesson was the relationship between share permissions and NTFS permissions. I used share-level permissions to allow authenticated organizational users to reach the share while relying on NTFS permissions and Active Directory security groups to control department-level access. This produces a more manageable design than assigning users individually.
The third lesson was the difference between security and visibility. Before Access-Based Enumeration was enabled, Harry could see all four department folders even though he could open only HR. After ABE was enabled, the unauthorized folders disappeared from view. NTFS provided security; ABE improved the user experience.
The fourth lesson involved Group Policy timing. After creating and linking Map-Network-Drive-Users, gpresult initially did not show the new policy. I used gpupdate /force to refresh user and computer policy and then reran gpresult /r. The second result confirmed that the drive-mapping GPO had been applied.
The fifth lesson was validating a recovery feature by actually testing failure. Enabling Shadow Copies alone would not prove that file recovery worked. I created a baseline, deleted test1 and test2, opened an earlier Previous Version, verified that the deleted files were preserved and then restored them to the live folder.
The lab also highlighted one production-design improvement. The drive-map configuration used \192.168.1.100\JohnBrownSchool. In a production deployment I would prefer \SRV.test.local\JohnBrownSchool or a DFS namespace because name-based paths are easier to maintain if the server IP changes.
Security and Administration Concepts Demonstrated
Centralized Storage
Departmental files are stored on a server rather than independently on user workstations, giving administrators one place to manage access, organization and recovery.
Role-Based Access
Permissions are assigned through departmental Active Directory security groups such as Admission_Team and HR_Team rather than directly to individual users.
Least Privilege
Users receive access only to the department resources required for their role. Harry can work in HR but is blocked from Admission and Student.
Separation of Share and NTFS Permissions
Share permissions control entry to the SMB resource, while NTFS permissions provide the detailed folder-level authorization model.
Access-Based Enumeration
Users do not need to see resources they cannot use. ABE removes unauthorized department folders from the user’s view.
Centralized Configuration
Group Policy automatically deploys the shared drive so users do not need to know the UNC path or manually map the resource.
Recovery and Business Continuity
Shadow Copies provide recoverable point-in-time versions of shared data and reduce the impact of accidental deletion or modification.
Validation from the User Perspective
The lab was verified not only from Windows Server but also from LAPTOP-HR-01 while signed in as a real domain user, ensuring that the configuration produced the intended end-user result.
Key Takeaways
This project moved my Windows Server lab beyond basic Active Directory administration into practical file-services operations. I implemented a centralized storage design, separated data by department, controlled access with Active Directory security groups and NTFS permissions, and exposed the storage through SMB.
The project showed how Windows permissions work as multiple layers. A user can have network connectivity to the server and still be denied access to a specific folder. Share permissions, NTFS permissions, group membership and Access-Based Enumeration all contribute to the final user experience.
Automated network-drive deployment was another important part of the lab. Instead of configuring each workstation manually, I used Group Policy Preferences to deploy Company-Drive across the JohnBrownSchool OU. This is much closer to how an administrator would manage a business environment at scale.
The recovery portion of the lab was equally important. I configured recurring Shadow Copies, deliberately deleted files and used Previous Versions to recover them. This demonstrated that file-server administration includes not only providing access to data but also protecting users from accidental data loss.
Overall, the lab brought together storage, Active Directory, permissions, SMB, Group Policy and recovery into one integrated Windows Server administration project.
0 Comment